• Skip to primary navigation
  • Skip to main content
  • Skip to primary sidebar

Cake Journal

  • Cake Lounge
    • Easy Embossed Cookies Recipe
    • How to Make Heart-Shaped Cake with Buttercream Roses
  • Desserts
    • Best 3 Cookie Scoop Sizes and How to Use Them?
    • Babycakes Cake Pop Maker Review and Tutorial
  • Recipes
    • Traditional Castella Cake Recipe
    • Stabilized Whipped Cream Frosting (Easy Recipe)
    • Best Frozen-Themed Cake Ideas with Images
  • Tips & tools
    • What to Do With Cake Scraps? (8 Easy Recipes)
    • Luster Dust: If You Don’t Know About It, You Need To!
    • How To Use Edible Glue and How to Make It
    • How to Use Russian Piping Tips and Tutorial
    • What Is Wafer Paper and How to Use It? (Video Tutorials)
  • Tutorials
    • How To Make Royal Icing (Easy Recipe)
    • How to Flood Cookies with Royal Icing?
    • How To Use Candy Molds Properly
    • How to Make Cake Pops: Easy Step-by-Step Tutorial
    • Fondant On Cookies: Easy Way To Decorate
  • About Us
  • Contact

How to Make Ladybug Cake Pops

by Louise 7 Comments

Ladybug Cake Pops

Today I want to share with you how to make ladybug cake pops. I’ve made these cake pops again and again and they are super cute and always a crowd-pleaser for ladybug themed parties!

How to Make Ladybug Cake Pops 02

Here’s what I used:
Red and Black Candy Melts
Prepared Cake Balls (about 3 cm or 1.25 inches), at room temperature
Small Rolling Pin
Lollipop Sticks
Small Squeeze Bottle with #3 Round Tip*
Small Cup or Bowl for melting candy melts
Black Fondant
Any Round Frosting Tip (you’ll need the large end)

*Note:  You can also use a frosting bag with a tip or even a plastic zip top bag with the corner snipped off.  These cake pops don’t require a lot of precision.

Step 1:
First you’ll want melt the red candy melts. I do this in the microwave, starting with one minute, then doing it in 15 second increments as needed to get a completely smooth, melted coating.
How to Make Ladybug Cake Pops 03

Step 2:
Dip your lollipop stick in the melted red candy and insert about halfway into the cake ball. Allow this to harden for a few minutes.
How to Make Ladybug Cake Pops 04
How to Make Ladybug Cake Pops 05

Step 3:
Carefully dip the cake balls entirely into the red candy. You want the candy deep enough to completely dip the cake ball without swirling it around much. The more you move it around, the more chance your cake ball will pull off the stick or break. After it’s dipped, gently tap the hand holding it and allow any excess candy to drip off.
How to Make Ladybug Cake Pops 06

Step 4:
Allow the cake balls to completely set up before decorating.
How to Make Ladybug Cake Pops 07

Step 5:
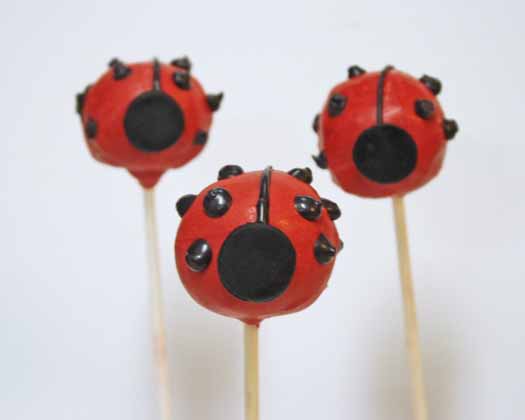
While the cake balls are hardening, roll out the black fondant and cut out the ladybug heads.  I used the big end of any standard size frosting tip.
How to Make Ladybug Cake Pops 075

Step 6:
When you’re ready to decorate, melt the black candy melts and pour them into the squeeze bottle. Start by piping a black stripe down the center of the cake ball.
How to Make Ladybug Cake Pops 08

Step 7:
Next, pipe the dots onto the ladybug. I usually do 5 or 6 on each side.
How to Make Ladybug Cake Pops 09

Step 8:
Put a small dot of black candy on the front of the ladybug and attach the fondant head there.
How to Make Ladybug Cake Pops 10
How to Make Ladybug Cake Pops 11

Step 9:
Allow all of the candy dots and the stripe to harden. After the candy sets, they’re ready to go!
Ladybug Cake Pops
Red Ladybug Cake Pops

I’ve also done these sweet ladybug cake pops in pink:

Pink Ladybug Cake Pops

Happy Caking!

Rose

Previous Post: « How to Make Pirate Cookies
Next Post: How to make shirt cupcakes »

Reader Interactions

Comments

  1. Nina

    October 18, 2013 at 3:06 AM

    Thank you for this blog.. Ive been searching everywhere for a recipe to make ladybug cake pop for my daughters birthday and then finally i came across this. Your a life saver. Thank you!!!!!

    Reply
    • Rose

      October 18, 2013 at 5:49 AM

      Yay!! I’m glad you found it too! Good luck 🙂

      Reply
  2. Paola

    June 13, 2013 at 2:41 PM

    Amazing! Can you please post your cake pops recipe? Is it possible? Thank you so much.

    Reply
  3. Catalina

    June 11, 2013 at 2:45 PM

    Wonderul! Thank you!!

    Reply
  4. Roshini

    June 11, 2013 at 6:34 AM

    Adorable! Thank you for the post

    Reply
  5. Renee

    June 10, 2013 at 3:44 PM

    Cute pops Rose! I love the pink ones 🙂

    Reply
  6. Radhika

    June 10, 2013 at 3:38 PM

    Really sweet!

    Reply

Leave a Reply Cancel reply

Your email address will not be published. Required fields are marked *

This site uses Akismet to reduce spam. Learn how your comment data is processed.

Primary Sidebar

Search Recipes on Cake Journal:

About Us

Kristen is the author of Cake Journal and a graduate of the Professional Baking program at Renton Technical College. She has worked as a pastry chef at a top Seattle restaurant and loves sharing her passion for baking amazing cakes on this site.

Contact Me

Privacy Policy

As Seen On:

Follow Us on Pinterest

Follow Us on Facebook

Copyright © 2025 · Cake Journal