
I’m slightly obsessed with bringing these fun little treats to parties. There is something so whimsical about a little piece of chocolate-covered cake at the top of a stick. And they have some major advantages at dessert time…no cutting, no serving, no mess, and usually no leftovers! People can grab them and go without even having to sit down. So, why not learn how to make cake pops? I’m sure you’ll love it and make alterations like a Halloween mummy style.
If you’re interested in making cake pops, the first thing to do is read Bakerella’s book called Cake Pops: Tips, Tricks, and Recipes for More Than 40 Irresistible Mini Treats. I’ve read it from cover to cover and I still refer to it often when making pops. But in this blog post, I’ll break down the basic steps and provide some helpful tips of my own. I hope this will help you in a little way.
Main Steps On How To Make Cake Pops With Cake Mix
First of all, making cake pops can be indeed time-consuming. However, by dividing the work into three main steps, you can make thongs easier for you. This is a similar method when making a cake pop with Minecraft creeper style.
You can even do each step on different days:
1. Baking the cake
2. Rolling the balls
3. Dipping the pops
Step 1: Baking the cake
For this step, prepare a 9 x 13 cake pan. Also, I like to spray mine with Wilton Bake Easy spray, as this ensures that my cake never sticks to the pan.

Here is my prepared cake pan.

Next, for the filling, you can either use your favorite box cake mix or make it from scratch. However, I used a white almond sour cream cake which works well for a cake pop. Additionally, the recipe I used yields 7 cups of batter.

Once your cake is baked, allow it to cool completely. Then, score it into four equal parts with a knife.
A box mix yields 12 cake pops from each quarter cake or 48 pops from the full cake. However, my batter is a little higher yield, so each quarter yields about 15 pops or 60 pops for the entire cake.
Also, keep in mind to note the quantity that your favorite recipe yields the first time you make them. This will help you plan ahead in the future. So, I recommend you to read more bake books to guide you on your baking.

For this tutorial, I worked with one-quarter of my cake. I removed it from the pan and let it finish cooling.

In addition, if you are not using the entire cake, wrap the other quarters tightly in plastic wrap and then foil. So, you can store them in the freezer for the next time you make cake pops.

Step 2: Rolling The Balls
For this step you will need:
- Cake;
- Large bowl;
- Serving spoon;
- Creamy vanilla frosting (canned actually works best!);
- Cookie sheet that fits in your refrigerator;
- Parchment paper;
- A small scoop for consistent sizing.

One of the best tips for making consistent round cake pops is to find a small scoop. This one is a 3/4 tablespoon size and it works perfectly for cake pops.

First of all, cut the outer edges of your cake because they might turn into hard lumps inside your pops.

Then, cut your cake into four pieces. Pick up two of the pieces at a time and rub them together over a wide bowl to turn the cake into fine crumbs.

Continue the crumbling process with your hands or two forks until the pieces are very fine.

Adding The Icing
I always make homemade frosting for my cupcakes and cakes, but canned icing actually works best for cake pops! This vanilla cake is very moist so I add less than a quarter can of the frosting. The amount you add will vary based on the moisture of your cake recipe. So be specific about the quantities you put.
You want your mixture just moist enough to roll into balls.
Tip: Be careful not to add too much icing or your mixture will be too moist. This can make for heavy cake pops with an unpleasant texture.

First of all, distribute the icing evenly over your cake crumbs then mix it in. Also, I use the back of my spoon for a smashing motion until the mixture binds together.

This is what the mixture looks like after mixing with the back of the spoon.

Now, use the scoop to get enough mixture for a well-rounded ball. Then, round out the top of the mixture into a ball shape with your fingers. This way you’ll ensure that your pops have a uniform shape.

Place the mixture into your clean hand.
Tip: Clean your hands frequently and keep them lightly moistened with water. This helps to get a smooth exterior of the cake balls.

Roll the ball in your cupped palms applying firm and then gentle pressure. Do this until you are pleased with the shape of the cake ball.

Continue until all the mixture is gone (scrap everything off the sides of the bowl). Then, place the cake balls on a parchment-lined baking sheet as you go.
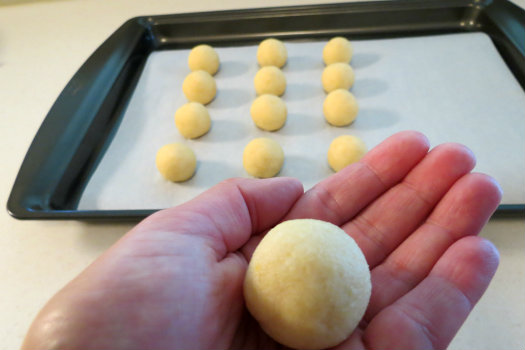
The finished cake balls look like this.

Finally, cover them with plastic wrap and foil and leave them for at least 4 hours in the refrigerator.
Tip: If this isn’t your first time making cake pops and you had problems with the cake balls falling off the sticks, they might not have been firm enough. Make more room in your schedule so they can properly refrigerate overnight. This will help them firm up before the dipping process.

Step 3: Dipping the Pops
For this step you will need:
- Chilled cake balls;
- Microwave-safe bowl;
- Spoon;
- Foil-covered foam block;
- Skewer for making guide holes;
- Lollipop sticks;
- Candy color;
- Candy melts (I use Chocoley Bada Bing Bada Boom dipping & enrobing formula).

Remove the foil from the cake balls and leave them in the refrigerator while you prepare the candy coating. I take them out one at a time from the refrigerator as I dip them.

Place enough candy melts in the bowl so you have room to fully submerge each pop straight down into the chocolate and be covered to the stick.

Follow the directions to melt your candy melts. Unfortunately, the brand of chocolate I use is only available for shipping in the U.S. and Canada. It is a very thin dipping white chocolate.
So, it melts to a silky smooth consistency for easy dipping. Properly chilling the cake balls and using this chocolate ensure that I never have a cake ball fall off its stick.

Dip a lollipop stick into the melted chocolate about one inch deep.

Push the chocolate-covered end of the stick into the middle of the cake ball.

Dip the cake pop straight down into the chocolate until it is completely submerged and the melted chocolate touches the stick. Hold the pop sideways over the bowl and rotate it slowly as it drips.
Tap the wrist that is holding the pop with the free hand to encourage the extra chocolate to drip off.

When it is done dripping, turn it upside down so that any excess chocolate stops dripping. Let it dry like this for a few moments.

Clean off the excess chocolate on the stick with your finger for a nicer look.

Final Touch
Pre-drill several guide holes with a skewer before placing each pop into a
styrofoam block to dry.

I added a tiny bit of candy color to the melted chocolate between dipping each cake pop to create an ombre-effect color palette from light to dark pink.
Tip: You must use candy colors for the chocolate melts because they are oil-based. If you use food colors, which are water-based, your chocolate will seize.

Finally, here are the finished cake pops. I displayed them in a low vase filled with decorative glass beads.
Tip for re-using the chocolate: The chocolate I recommended in this post is rather expensive because of its high quality. Save any leftover chocolate for your next project.
Pour the liquid chocolate onto parchment paper or plastic wrap and let it cool for 20 to 30 minutes. Peel the solid chocolate piece off and break it into large pieces for storage.

Place the chocolate pieces in a zip-lock bag and label them with the date. It will re-melt perfectly for your next project!

Cake Pops 101: Tips and Tricks
- If you’ve baked too much cake, you can freeze any extra and use it for more pops on another occasion;
- When using light-colored baked cake as filling, remove any burnt or darker portions of the cake to prevent unsightly specks in your cake pop mixture;
- When rolling the cake balls, do it with gentle motions so that the balls aren’t pressed too tightly since they usually increase in volume once coated and may crack the nice coating;
- You can dilute the cake coating if it is too thick with paramount crystals for candy melts or shortening;
- Don’t use whipped or creamy frosting when making cake pops because the mixture will lose firmness and the balls will not hold together as they should.
Suggested Read: How to Make Summer Popsicle Cake Pops
Final Sweet Thoughts
All in all, I hope you found some useful tips in this post and I welcome you to add your own cake pops tips in the comments section below! Also, before I go, I want to say that my way is not the only way. However, you can also make cake pop with no bake needed.
On the other hand, some people like to use a cake pop maker and bake fresh cake balls, giving you, essentially, a ball of cake on a stick. While that’s all fine and dandy, I find my fan favorite (and personal favorite) method of how to make a cake pop is one that is almost a truffle texture on the inside. So, if it takes only a bit more practice, why not learn how to make cake balls from scratch? Just make use of them.
However, I can understand why many of my readers will prefer easier and maybe faster methods, and that’s totally fine! Everybody has his own rhythm and time and I won’t judge. I know how busy can a cook be and their last problem would be preparing cake pops from scratch. So, just share your own experience with cake pops here, so everybody can find their own method. We are all here to inspire and be inspired!
Happy Caking!
Renée
Eating a cake is satisfying, but making one is more exciting yet fulfilling. Here on our website, we offer you different tutorials about cake making, cake topper ideas, lots of treat recipes, and more baking-related topics.
Ingredients and supplies for making cake pops: – A box cake mix and ingredients to make the cake – A can of frosting – Candy melts – Lollipop sticks – Cake pop stand
I’m gonna make about 6 dozen of cake balls for my wedding
Wow! The cake looks so delicious in these images, I really enjoyed reading your post. Thanks for sharing and keep up the amazing work.
Hi! Thanks for the tutorial. I don’t have canned frosting where I live (Argentina) 🙁 Should I use buttercream instead? Or homemade frosting? TIA
Do you ever have a problem with the chocolate cracking when using cold pops? If so, how do you mitigate the problem? Thanks!
they looks so good!! i’ll try to make them but can you use choclate chips for these cake pops
very good recipe, ı love it and made for my little princess. some recipes are harmful, hard, unhealthy. also you are my favorite website. in short words; congrulations!!!!!!
Too good this recipe. I thought it was easier to do but it’s a little complicated, but I think it’s worth it because it seems so tasty. Your site is parabésn for releasing good news like this.
This was the best tutorial.. mine came out great on the first try.. I broke up the steps as indicated and put my rolled balls in the freezer over night.. I used bark chocolate which is easier to find and less expensive..I took them out the freezer and maybe they were at room temperature is why they did not crack.. looked great and taste even better!!
Can you put this in the freezer and if so, how long should it be in there. Thank you
Thanks for sharing! Very useful tips!
Hey. I loved the tutorial! Question: what do you add to the chocolate to make it lighter and not so thick. Thanks.
Gulf Wax is my go to chocolate thinner. It’s safe to eat and adds no taste to the chocolate. You can get it here for super cheap! https://amzn.to/2sQXMpP
Looks so lovely and tasty! My child lovs it so much! Can i use leftover cake to make this cake pops?
Yes, you absolutely can! Just make sure you have the correct ratio of frosting to cake!
I love this cake!!! Thank you for blogging about it.
Very Nice Article…
THANK U SO MUCH SO HELPFUL REALLY THANK U
so helpful thank u so much
Thank you so much for your tutorial. It was very helpful. I wish I listened to it better. For instance, I was short on time, so I froze the balls instead of refrigerated them. I think you’re right and this will lead to the cracks. My other reason for freezing was that I wanted the balls to have rings of color inside, like a jawbreaker, so I froze them in stages. I think I ought to have let them thaw a bit before dipping. I also made the mistake of adding my usual gel color to my candy melts. You were right: it seized right up! Thankfully I had some paramount crystals on hand, so I was able to make it usable again. Maybe you could add that as a hint, that if they think their chocolate or candy melts aren’t thin enough, try adding some paramount crystals to it. Thanks again!
Hi, just came across this post, my question is once you have dipped the pop and allow it to dry how can u add sprinkles etc….with out them falling off? I’ve used guittard melts and always have difficulty with the pops dripping excess chocolate and not able to add sprinkles with out chocolate dripping down.
You can sprinkle on toppings when the cake pop has not dried yet. I wouldn’t recommend dipping the whole cake pop into a topping, I would lightly sprinkle toppings if you desire. I hope this answers your question!
We have a wedding in April. Can I make the cake balls early and then freeze them? How long will decorated cake pops last in the freezer? Thanks so much for all the advice!
Thank you for an amazing tutorial. I don’t have candy melt will this work with only chocolate
Hi. Ok so 1. Awesome tutorial. Following your suggestions step by step. However a couple of questions. 1. Do you place them in the refrigerator or the freezer. Is there drastic difference? 2. I love that bowl I feel like that’s the only way to melt without tantrums. What is it called or when can u get it. I Raw ceramic ones ? Idk what they are called but they are not working the magic. I did the double boiler and even then it wasn’t as liquid as it should
You can place them in the freezer or fridge. If you put them in the freezer, I suggest taking them out in 1 hour or until they are hardened. If you put them in the fridge, I would wait until they have completely hardened which may take a little longer than putting them in a freezer. Hope this helps!
Hi,
Would it be possible to freeze the cake pops AFTER they’ve been dipped and decorated? If so, would it still be wrap in plastic wrap and then foil?
Thanks!
Hello,
Thanks for this superb tutorial. I’m in London and making the cakepops for my son’s 5th birthday party tomorrow. I have one question just out of curiosity. Why do you cover the balls with plastic wrap AND foil before they go in the refrigerator?
Many thanks,
Cassie
It holds in the moisture and protects them from freezer burn to have the double wrapping.
i have used these tips/instructions twice now for my grandkids birthdays and they have turned out perfectly everytime. I love being able to do it over several days as I work full time. Refrigerating them overnight works great. Thanks.
I’m so glad the instructions have worked so well for you! 🙂
Lovely explained protocol. You are a great teacher!
Thank you so much for the lovely compliment!
can i freeze the cakew pops and dip the chocoloate the next day
If you are preparing the cake balls to dip the next day, I would recommend overnight refrigeration. That will be perfect.
I love this tutorial! Super easy to follow and I’m excited to see if I can pull this off! The only question I have is how do you go about unfreezing the cakes when you want to make more cake pops? Just put them in the fridge? Can they be store in the fridge if you intend on making more cake pops the next day?
Great question. I leave the cake wrapped in the plastic wrap and allow it to thaw at room temperature. It takes a few hours.
plz help me.
can i make cake poops commercially to sell?
how? which preservatives i will use?
Hi,which band candy melts do you use
I buy them online at chocoley.com. They are called Bada Bing dipping and enrobing formula. They melt very thin!
Hi,which brand candy melts do you use
Wow, thanks for sharing this recipe to me. The steps are so details, complete with pictures, and I fully understand how to make it. Thanks
You’re welcome!
Where can I find that cake pop dipping bowl?
I buy from chocoly.com. They are called Bada Bibg dipping and Enrobing chocolate. They melt nice and thin!
I bought the flexible silicone bowl at my local Home Goods. The brand says Casabella.
Thanks for this tutorial!
I just finished a practice batch for my daughters 1st birthday this weekend. They worked out well and now I’m so excited to make the rest! Best tips and advice ever 🙂
So glad to hear it! Thanks for sharing the good news! ????
How do I make chocolate and vanilla marble cake pops?Like what frosting should I use,etc.
🙂
I would try to make the chocolate cake crumb/ vanilla frosting mix in one bowl and the vanilla version in another bowl. Take some of each to roll the ball. It should come out marbled.
This did not work at all. I mixed the icing into the crumbled cake and it turned out all goopy. Nothing like the photo.
Thank you so much for sharing these tips, especially the idea on storing leftovers, brilliant!
You’re welcome. I’m so glad you found it helpful!
Omg! Thanks! Bookmarking this rightnow. I thought I’d be needing cakepops maker which costs around 25CAD then I saw this. Sweeeeet! Thank you. Been dying to make one for my kids
You’re welcome. Good luck 🙂
I did these step nd my cake pops cracked, hope your future post will be better
Unfortunately, it’s pretty common for cake pops to crack. You have to try and control the temperature of all the components so there are no drastic changes. I’ve had great luck with the chocoley.com chocolate that I use in the tutorial. Also, if they crack you can re-dip them which hides the cracks. Don’t give up. Just keep trying 🙂
Thanks so much for the great tutorial! Am thinking about making the cake balls ahead of time at home and freezing them. Then I could travel with the frozen, plain balls of cake across the state, and put the sticks in and decorate them when I arrive at destination for holidays! Have you tried freezing the cakeballs and decorating them at a later date?
I think it would work fine if you freeze them and then allow them to almost thaw (so they are still pretty firm). That is the best consistency for dipping! Good luck 🙂
How long does it take to prep it? And go thru with the steps?
Thanks,
Mammy
I broke the tutorial into three main steps so you can plan for three work sessions. You will have to judge how long those work sessions may take based on the number of cake pops you plan to make 🙂
What an easy step by step process. I usually don’t comment on articles but I am really pleased to find this easy cake pops recipe. Sure will be trying them for my son’s birthday. Very kind of you for sharing the tips too.
My pleasure. I’m glad you found it helpful. Thanks for the kind words!
How many pounds of chocolate are needed to make a batch of cake balls?
The are absolutely beautiful! Thanks for the info!!
Thanks so much for the kind feedback 🙂
Hi,
Do you think I can freeze the cake balls until I dip them in chocolate? Should I unfreeze them before or just dip them frozen?
I would like to prepare them in advance and I don’t want them to go bad!
Thanks! 🙂
Hi. I think you can freeze the cake balls. When you are ready to dip them, let them almost that’s so they are still nice and firm. This will help them hold their shape and stay on the stick during the dipping process.
*almost Thaw*
hey, question??. I was wondering where to get the lollipo sticks, could you use toothpicks?
I bought the lollipop sticks at my local craft store. Or any major store with a baking aisle should carry them. I don’t think toothpicks will work unfortunately.
I love these!
I tried making these cake pops for the first time I think they turned out pretty good I think! Question, I finished the dipping of the pops last night and left them in room temp (about 68-70degrees indoor) when I woke up this morning to finally taste them and see how the chocolate coating would breakup when you bite into it, I noticed there is a moist coating in between the cake pop surface inside and the candy coating. Dry on the outside though. Its only when biting into the cake pop when you notice it moist in between. Is that normal?
Perhaps you can use a little less icing in the mix next time to achieve a drier consistency inside. I have experimented a lot with the ratio of icing to cake in order to find a pleasing consistency inside. You want it just moist enough to hold it’s shape when you roll the balls but not so moist that they are unpleasant.
Renee, Wonderful tutorial!! You mentioned one 9X13″ cake could make roughly 48 cake pops, how many lbs of candy melts might it take to cover them? (I will order the melts you suggested) Thank you in advance!!
Sorry I’m not exactly sure because I usually buy a 5 pound bag which lasts for several projects. Perhaps start with 2 pounds just to be safe? That should be plenty. Good luck!
Hi, if I were to make the Cake pops the night before my party, should I store the completed Cake pops in the fridge or can I leave them in room temperature? I’m staying in a very humid country.
Thank you.
Hi. If you live in a warm, humid climate, it is probably safest to store them in your refrigerator overnight. Take them out a while before serving so they come to room temperature.
Hi, I live in Canada. What brand of wafers do you use to dip?
Hi Ginette. I use Bada Bing dipping and enrobing formula. I buy them online through Chocoley.com.
Is there something I could use besides the candy for the coating?
Yes, you can use chocolate chips. Many brands if them will melt and dip quite well.
I love your recipe! I used it to make cake pops for the first time and they were a hit. I’ve made them a half dozen times now with no issues – they always turn out adorable and delicious. Thanks for the photos and clear instructions!
Thanks for letting me know about your great results! They really are a fun party dessert that always get a big reaction. I’m glad you are making them often 🙂
Okay so I finished them but the party isn’t for a few hours so should I leave them out of put them in the fridge?
can you use regular frosting instead of the melting chocolates?
Hi. I’m going to use frosting to coat my cake pops; you should too. I feel I might like the taste better.
That is an interesting idea. Did you warm the frosting to make it dipping consistency? Did it dry firm like the melted chocolate does? How did it taste?
How long will the pops keep? And should you store them in the fridge once they have been coated?
Hi. They will store for a few days. I like to store mine in the fridge but that is not necessary as long as they are in a cool place.
Hi! May I know What’s the brand of the chocolate used? Thanks!
I buy my candy melts on chocoley.com. I use the Bada Bing dipping and enrobing formula (it melts thin. They are nut free.
These look so easy and delicious – I didn’t expect it. I am considering doing this for my son’s 2nd birthday party, themed Sesame street – and I was going to make them into Abby Cadabby’s wand!
I feature this on my blog’s one month birthday post, in a list of desserts I want to try!
Hi, I was wondering if you could freeze the cake balls instead of refrigerating them.
Hi..
Wanted to know if the chocolate used is tempered?
I tried making cake balls last year with my 7 year old daughter but found it to be a tad bit messy. I recently bought a cake pop mold from Keetzen in Amazon and found it easier to use. I think it’s healthier (?) coz it’s not as packed so you’re not eating as much cake as you’d think. 🙂
I bought the pink one and my daughter loves it! they have blue too 😀
oh im loving this.it is cute and its pink.
i will try at my niece birthday party.i know kids will definitely love this. except i’ll change the color.
Ja wiet! Cake pops deset mue samatja! Zacue oug ke cake pops tyo reh feriasti, qui tamas mues fruimes guiste! Teque tyo ya mueja! Che lau!
Thank you ms. renee.. I learned a lot!
hey well in my countrey no one knows about pop cakes so i would love to be the first person to serve them to my friends in school so in my countrey there is no such thing as canned iceing and bakerys usually use sweated cream so what can i replace insted of canned iceing???
You know that there are other recipes online for icing right? just search up a recipe on Google or something. The whole Idea is to get the cake to stick together to keep its ball form. It doesn’t matter what type of icing you use, as long as it doesn’t crumble apart when you try to make it into a ball. (I’m sorry if I sounded like a jerk in te beginning of the comment. No hard feelings)?
p.s. Happy Baking!
Hello! This is probably one of the best tutorials I have ever come across, but I noticed in one of your replies you said you’ve used white chocolate before. Would any white choc. work? (ex: melted Hershey’s or other brands of that sort) or is there one you can buy at a local grocery store that’s fairly cheap?
what brand chocolate. I cant find a one that is liquidy enough.
There is a link in the tutorial that lists the exact chocolate I use and takes you to the item online. The website is Chocoley.com.
What a great post! The pictures are great and I cannot wait to use this on Saturday when I make my cake pops!
Could you possibly post the almond cake recipe you use :)?
I’ve read that if your pops and in the fridge and you take them out and dip them the chocolate will cracked due to the difference in temp.
Yes, that’s true to some extent. Cracking is always an issue with cake pops. But the chocolate i recommend in this post melts quite thin and does not feel steaming hot. It feels room temperature or cool but maintains its thin consistency. So I don’t think there is a drastic temperature change when you take the cake ball from the fridge to the dipping chocolate. I’ve also noticed I experience more cracking when I color my chocolate with the candy colors than when I work with plain white chocolate (practically no cracks at all!) If you have a few cracks in your batch, they will appear pretty quickly. Just re-dip those pops at the end of the process and it will hide the cracks. Unfortunately, I don’t think anyone has come up with a full proof solution for cracks 🙂
Great tips! Thanks. I saw another tutorial where they said after rolling the balls you should put them in the freezer for 15 minutes. Then place them in the refrigerator while you melt the chocolate. And then take one out at a time from the refrigerator to dip them. Would this be the same as refrigerating them overnight if I want to make them and dip them the same day?
Linda. Yes you can dip them the same day. If you do not have time to let them firm up in the fridge overnight, just pop them in the freezer for 15 minutes while you melt your dipping chocolate. Then you can take them out one at a time as you dip them, If you notice they are getting too cold on the bottom (starting to freeze) transfer them to the fridge and pull them from there one by one to dip them. I’m glad you asked because this is a good way to get the right firmness!
Hi,
I will be making cake pops for Thanksgiving. How long should I wait for the cake to cool before crumbling the cake? If I place it in the freezer how long after I take it out of the oven for it to be put into the freezer and how long would I need to freeze it and how long to thaw?
Hi Melissa. You don’t have to freeze the cake unless you are breaking up the steps to make the process easier. If you decide to bake well in advance of making the pops, freezing is a good option. You can let the cake cool for an hour before wrapping and freezing it. You can also wrap it while still warm. This traps the moisture in the cake. Let it thAw for three hours at room temp before crumbling. Good luck!
Thank you so much for postings this info, surprisingly just finding how much cake is need for x amount of cake pops is difficult! Thank you for the quantities of cake pops per box! This was so informative and helpful, great pics!
helow i like the sweets cakes and foods in this website.Can you gave tips and tutorial for halloween cupcakes or how to make it?
hope you recieve this …. 🙂
great recipe tips helps make a moist batch definitely recommend thanks 4 your help
How many cake pops would 1lb of the chocolate you recommend makes?
I’m sorry but I’m not sure exactly how many pops one pound would make. I usually buy a 5 pound bag and it lasts through several large projects. I’d guess one pound would make 3 or 4 dozen cake pops.
Thanks for the great post.
Have you ever frozen cake pop when there finished?
Hi. I have not tried freezing them yet. I often bake the cake ahead of time and freeze it as a short cut in the process. Then I let it thaw slowly before the crumbling step. For that reason, I avoid re-freezing. If you are going to experiment with freezing them, I would individually wrap them first to avoid freezer burn.
Do you ever have problems with the cake pops cracking after dipping or oozing from where the stick was stuck in? I have had cake pops fall off sticks (know what caused that), crack, ooze and also be perfectly cooperative. Not sure what I did wrong when I got the cracking and oozing. Any ideas?
Hi Angie. Yes, I have experienced those problems. If I have a small air bubble in my chocolate shell, it has resulted in the oozing that you refer to. I try to touch up any air bubbles before they dry with my finger or a toothpick. Perhaps you have openings where your pop meets your stick. After you dip the first time and push the cake ball on, be sure that the second (fully submerged) dip goes in far enough that the melted chocolate meets with the chocolate on the stick. This should make a strong seal. Secondly, I do experience a small amount of cracking…about 1 in 10 pops. I try to avoid drastic temperature changes with my pops.
Can you share your white almond sour cream cake recipe?
Sure. I’ll do a future post on that!
Adriana, yes, I can share that recipe in a future blog post. Thanks 🙂
Thank you for sharing – didn’t know you could make these without those special rounded cake tins! Will give this a try!
Rumbie…you’re welcome. Yes, this is the original way for making them that Bakerella shared with the world. I think they taste much better this way than when made in those tiny pans 🙂
This is a great tutorial – thanks, Renee! It helped me figure out what I was doing wrong. 🙂
Thanks Sugar Baby. What part do you think you were doing wrong? Let me know if this method helped next time you try them 🙂
Very interesting, I guess this is the “traditional” US recipe? Any suggestion for making them less sweet? Maybe using bitter chocolate? Or and alternative to the mixing ingredient?
Ciao
Alessandra
Good point…yes, they are very sweet. You could experiment with a moist, but not-too-sweet muffin recipe as the cake. Then add the tiniest bit of icing needed to bind it, then dip in dark, bitter chocolate? Let me know how it goes 🙂
I don’t add any frosting, I use a food processor to bind the cake:) You don’t need any frosting this way, unless you want it, but it just costs more and tastes sweeter;) Here is a video tutorial! http://www.thebestcakepops.com/video-support
The candy melts from Wilton and Mercks don’t seem as smooth as the brand you use…..I often add vegetable oil to get the smooth consistency. Chocoley Bada Bing Bada Boom Dipping & Enrobing Formula looks really smooth…too bad shipping is expensive too Canada. Thanks for the tutorial….
Trust me this chocolate is totally superior. It is such a pleasure to work with. You can contact the company and ask if there is a coupon code. I did this last time I bought and it eliminated the shipping costs. Good luck.
Great tutorial – thanks for sharing! I love Chocoley and their candy and molding formula makes amazing modeling chocolate. 🙂
Martha, thanks for the tip. That’s great to know for when I try modeling chocolate for the first time 🙂
Ahh thank you for this! It’s been super helpful. I’ve only made cake pops a couple of times and both times I’ve had trouble with them staying on the sticks. And, it was real painful to have to throw away the excess chocolate – but now I know what to do with it! 😀
You’re welcome! I really hope it helps 🙂