Winter has been brutal this year…I haven’t seen this much snow in my entire life!
I am already dreaming of Spring, warm weather, clear skies and beautiful flowers 🙂
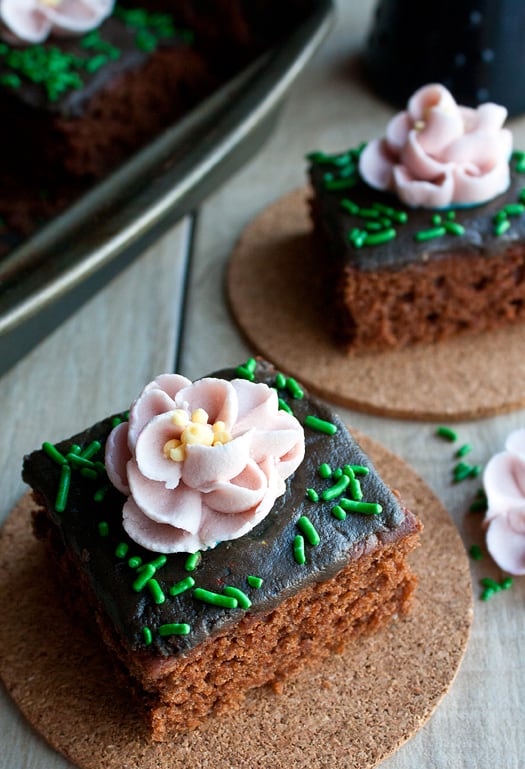
Here is an easy flower you can make with royal icing. You can make them in any color you like.
The wonderful thing about these flowers is that they last for years if stored properly, away from humidity and moisture.
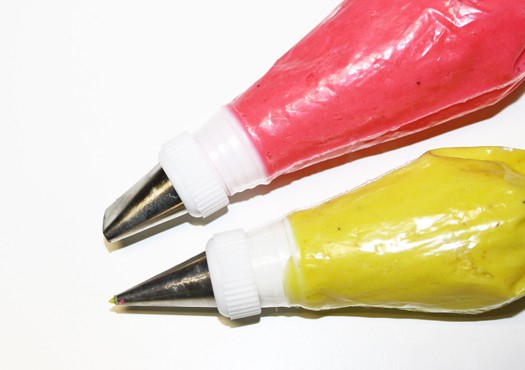
You will need the following supplies:
Scissors
Wax paper or parchment paper
Pink royal icing
Yellow royal icing
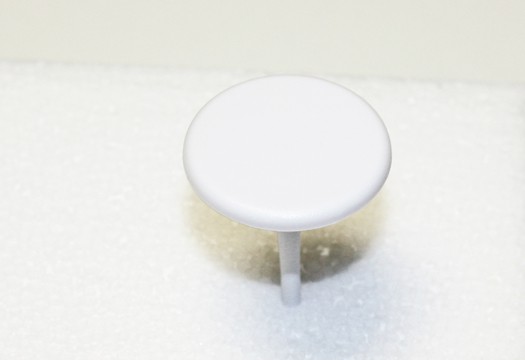
Flower nail
Tip # 104
Tip # 3
2 Piping bags
Block of styrofoam
Note: In the pictures that you just saw, I used a light shade of pink royal icing to make the flowers. But in the tutorial you are about to see, I have used a brighter shade of pink royal icing so that the steps are more prominent.
These are the steps:
Step 1:
Use scissors to cut wax paper into 3in x 3in squares.

Step 2:
Fill one piping bag with pink royal icing and attach Tip # 104.
Fill another piping bag with yellow icing and attach Tip # 3.
Step 3:
Push the flower nail into the block of styrofoam.
Note: I had to do this step so that my hands could be free and I could hold the camera and take pictures. You don’t have to do this at all.
Step 4:
Squeeze a little dot of yellow icing on top of your flower nail.

Step 5:
Stick the small piece of wax paper here.

Step 6:
Now, hold your pink piping bag at a 45 degree angle.
The wider end of the tip should be at the bottom and the narrow end should be at the top.

Step 7:
Start moving your piping bag until you end up with somewhat of a “loop” shape.
This image with the arrows should help…
You start at the dot and move your piping bag along the direction of the arrows.
And you will end up with a petal.

Step 8:
Continue making petals until you have a complete row.
Note:
You can stop now and just pipe little yellow dots in the center.
Or complete the next few steps and you will end up with a more “petally” flower.

Step 9:
Now, make another row of petals, as shown by these arrows.

Step 10:
Continue to make petals until you have another complete row.

Step 11:
Finally, pipe little yellow dots in the center.

And that’s it! You have a lovely flower now.
Allow these flowers to dry at room temperature until they are completely hard.
Then, store them in an airtight container, away from moisture and humidity.
These flowers should last you ages and can be used whenever you want.

I hope you enjoyed this tutorial.
Happy caking everyone!
Beautiful and nice creativity.
I’m in love with your pretty flowers… thank you for the lovely tutorial. would have helped more if you had showed how you piped the last petal in 😉
Wow, it looks real easy as i see the pictures you made! Thank you for making so much pictures for dumb people like me. I’ll give it a try with your pictures beside it! The flowers are really pritty. I love them and hope it will happen that i can make as gorgeous flowers as you! Thanks again for your clear explanation! It helps a lot. Have a stunning day. Happy baking to you. 🙂
Thanks for the splendid tutorials. I love the fact that you give simple directions, along with excellent pictures. 🙂