• Skip to primary navigation
  • Skip to main content
  • Skip to primary sidebar

Cake Journal

  • Cake Lounge
    • Easy Embossed Cookies Recipe
    • How to Make Heart-Shaped Cake with Buttercream Roses
  • Desserts
    • Best 3 Cookie Scoop Sizes and How to Use Them?
    • Babycakes Cake Pop Maker Review and Tutorial
  • Recipes
    • Traditional Castella Cake Recipe
    • Stabilized Whipped Cream Frosting (Easy Recipe)
    • Best Frozen-Themed Cake Ideas with Images
  • Tips & tools
    • What to Do With Cake Scraps? (8 Easy Recipes)
    • Luster Dust: If You Don’t Know About It, You Need To!
    • How To Use Edible Glue and How to Make It
    • How to Use Russian Piping Tips and Tutorial
    • What Is Wafer Paper and How to Use It? (Video Tutorials)
  • Tutorials
    • How To Make Royal Icing (Easy Recipe)
    • How to Flood Cookies with Royal Icing?
    • How To Use Candy Molds Properly
    • How to Make Cake Pops: Easy Step-by-Step Tutorial
    • Fondant On Cookies: Easy Way To Decorate
  • About Us
  • Contact

How to Make a Cute Buttons Cake

July 24, 2014 by Louise 2 Comments

fondant buttons 14

Buttons look adorable on cakes and cupcakes and are great for baby showers or baby birthdays.

You can make them, using button molds or you can make them without a mold… like I did.

To make these buttons, you will need the following supplies:

Yellow, red and blue gumpaste
Rolling pin
Star cutter, heart cutter, circle cutter (various sizes)
Toothpicks
Wooden skewers
Paintbrush
Water

These are the steps:

Step 1:
Roll out yellow gumpaste.

fondant buttons 1

Step 2:
Use various cutters to cut out different pieces.

fondant buttons 2

Step 3:
Use toothpicks to make holes in the small pieces.

fondant buttons 3

Step 4:
And use a wooden skewer to make holes in the bigger pieces.
You can make different number of holes in the button pieces to keep them cool and fun.

fondant buttons 4

Step 5:
You can also create somewhat of a border around some of the pieces by using a big and small cutter of the same shape.
For instance, you can cut out a big flower piece.
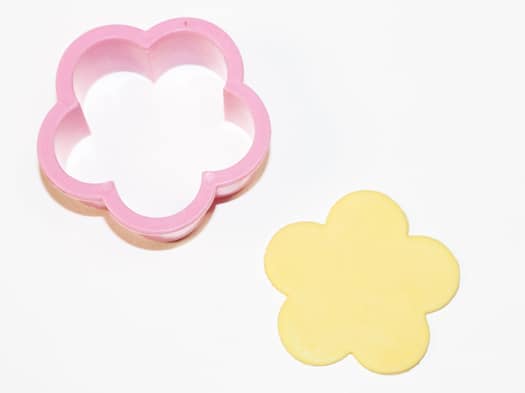
fondant buttons 5

Step 6:
And then press a smaller flower cutter on top of it gently…

fondant buttons 6

Step 7:
And you will end up with a flower button with a border.

fondant buttons 7

Step 8:
Now, you can make holes with a wooden skewer,  to make it look more realistic.

fondant buttons 8

Step 9:
For some of the buttons, you can also add an illusion of a “stitch.”
For example, in this small heart button… use a toothpick to make holes.
Then, roll out a thin “rope-like” red gumpaste piece.

fondant buttons 9

Step 10:
Brush the holes with some water and press the “rope-like” piece between the holes so that it looks like a small stitch.

fondant buttons 10

Step 11:
Have fun with the number of stitches you want on the buttons and the number of holes you want on them.

fondant buttons 11

Allow these pieces to dry overnight and then use them on your cakes and cupcakes.

fondant buttons 12

I hope you enjoyed this tutorial.

Happy caking everyone! 🙂

Previous Post: « How to make a Teenage Mutant Ninja Turtle Cake Topper
Next Post: Bakery Charms Jewelry Review + A GIVEAWAY! »

Reader Interactions

Comments

  1. ifii

    August 13, 2014 at 1:46 PM

    Lovely tutorial! Short, simple and useful.

    Thank you so much.

    Reply
  2. Carrie @ Unique Bakes

    August 13, 2014 at 2:55 AM

    Great idea for a baby shower.

    Reply

Leave a Reply Cancel reply

Your email address will not be published. Required fields are marked *

This site uses Akismet to reduce spam. Learn how your comment data is processed.

Primary Sidebar

Search Recipes on Cake Journal:

About Us

Kristen is the author of Cake Journal and a graduate of the Professional Baking program at Renton Technical College. She has worked as a pastry chef at a top Seattle restaurant and loves sharing her passion for baking amazing cakes on this site.

Contact Me

Privacy Policy

As Seen On:

Follow Us on Pinterest

Copyright © 2023 · Cake Journal