[tcb-script src=”https://app.involve.me/embed”][/tcb-script]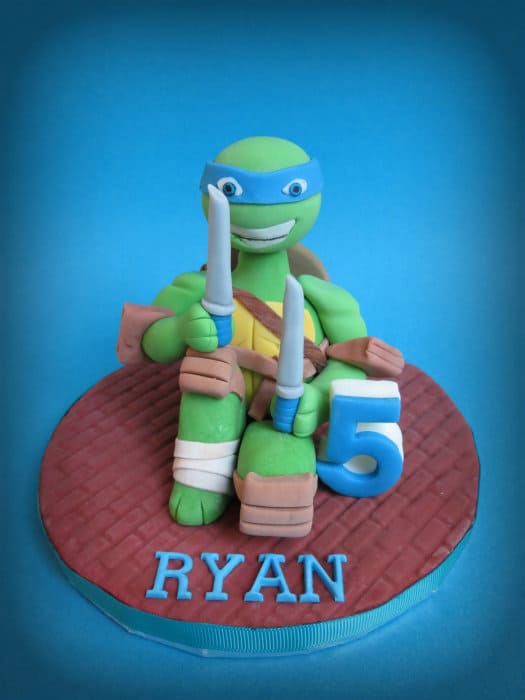
With a new Teenage Mutant Ninja Turtle movie coming out soon, it seemed like a good time to share this tutorial.
In making custom cake toppers, I get many requests for popular characters. I was able to take photos during the creation of this one. I hope these photos provide insight into the construction method for a complex, detailed character like Leonardo!
1

Step 1
Roll a mix of 60 percent fondant and 40 percent gum paste into a large ball. I custom color mine with gel colors to match all the parts of the character I am working on.
2

Step 2
Using your hands and a fondant smoother, create a stable torso and neck.
3

Step 3
Shape two smaller green balls of fondant to form the legs.
4

Step 4
Leonardo will be in a crouching position. Shape one leg as shown in an upward kneeling pose.
5

Step 5
The other leg will be shaped into a bent under pose.
6

Step 6
Use your tool to create creases in the sides of each leg to give the illusion that they are bent.
7

Step 7
Use a toothpick to indent the toes.
8

Step 8
Roll out a thin sheet of yellow fondant and use a toothpick to outline the shape of the torso.
9

Step 9
Cut out the yellow breast plate and indent the details with a rolling cutter or toothpick.
10

Step 10
Attach the breast plate with water or edible glue. Distress some dents with a toothpick.
11

Step 11
Color fondant a tan/green for the shell next.
12

Step 12
Use your hands and a fondant smoother to create the shell shape.
13

Step 13
Use a toothpick to indent the detailed pattern on the turtle shell.
14

Step 14
At this point, I measure my wooden support skewer. After the torso is attached to the base, this skewer will be inserted in the torso. I will leave enough length to attach the head. It is important to measure the skewer so the part sticking out the top will go through 2/3 of the character’s head. This holds the head firmly in place. For this measuring process, I place the torso at the edge of my counter and hold the skewer down in front of it until I find the right length.
15

Step 15
After holding the skewer up to the torso and measuring, I cut the bottom to the proper length using a wire cutter. Put the skewer to the side for now.
16

Step 16
Before securing the torso and legs of the character to my base, I finish a few clothing details. Beige strips are cut and attached with water to the legs.
17

Step 17
Brown squares are shaped and defined for the knee pads.
18

Step 18
When the torso, legs and shell are ready, decide the best position for them on the base. I use edible glue (made of gum paste and warm water) to secure down the torso and legs. The same glue is then used to firmly attach the shell to the back of the turtle.
19

Step 19
At this point, the support skewer is carefully pressed down the center of the torso. You want the position to be as straight as possible.
20

Step 20
I shape a head from green fondant/ gum paste mix. By holding it up in front of the skewer, you can determine if the shape and scale are correct. Remember, you want the exposed top of the skewer to be 2/3 the height of the head.
21

Step 9
Use your fingers and a toothpick to define the eye area of the head.
22

Step 22
I place it in an ice cream scoop as I work on it so the back of the head remains round. Here I have used the toothpick to define and depress a mouth area.
23

Step 23
Fit a small piece of white fondant into the mouth shape and use a ball tool to smooth it flush.
24

Step 24
Use a toothpick to create the smile line.
25

Step 25
Roll a small band of blue fondant for the eye mask. Trim the sides straight with a rolling cutter.
26

Step 26
Attach the eye mask with water and use a stick tool to depress the eye areas.
27

Step 27
Similar to the mouth, you will fill these areas flush with small pieces of white fondant.
28

Step 28
I used the end of a Wilton 5 piping tip to cut out tiny blue eyes.
29

Step 29
When working on a character, I print plenty of reference material and compare to it often.
30

Step 30
Use a black edible marker to draw the tiny pupils of the eyes ans define the smile line.
31

Step 31
Once happy with the face, place it aside to dry. I usually do not attach the head of the character until the last step of the process, generally after letting it harden for 24 hours.But now, I will turn my attention to the arms and swords of the character. Using 2 toothpicks as internal supports, I form the blue handle of each sword. Then using a circle punch, I create the middle piece of each sword.
32

Step 32
Then hand form the blade of each sword as shown.
33

Step 33
I decided to push the handles up on the toothpicks during assembly. This left a length of toothpick at the bottom of each sword to work as an anchor.
34

Step 34
Moving on to more costume details, I marbled a length of brown fondant and rolled it out.
35

Step 35
After trimming it with a rolling cutter, it was attached as a costume detail around the chest and shell of the character.
36

Step 36
Next I formed the arms by rolling a ball of green fondant/ gum paste mix.
37

Step 37
Hand shape the arm and hold it up to the figure frequently to determine the right length and shape.
38

Step 38
I used a small brush handle to depress the muscle shapes in the arm.
39

Step 39
Once the arm was attached with edible glue, I poked a small hole where I planned to anchor the sword in place.
40

Step 40
Wet the handle of the sword with edible glue at all touch points, and then carefully press it in place and form the hand around it.
41

Step 41
Follow the same process with the other hand and sword.
42

Step 42
After 24 hours have passed for the body and head to become firm, it’s time to attach the head.Wet the top of the skewer with edible glue on a small brush.
43

Step 43
Carefully lower the head onto the skewer until it connects with the neck. (I use a toothpick to pre-mark the center point on the bottom of the head before starting this process.It helps me to lower it on straight.)
The fondant cake topper should be allowed to dry in a cool, dark place for 4 days minimum before transport. I deliver them in a small cake box lined with a slip mat.

This topper was customized with name letters made from Tappits and a number made from a cookie cutter. I hope the photos of the process were helpful. Please post any questions below.
Happy Caking!Renée
Hi can you tell me what green do you use to achieve that perfect color for the turtle?
I love this so explanatory,the first one that is such detailed with step by step that I can keep up with. Thank yoy so much 🙂
I would like one of this ninja turtles cake topper
That topper is awesome!
Thanks Rose! 🙂
Followed your tutitirual for a Ninja Turtle cake. Donatello was a hit. Wish I could post a pic of the cake.
Thanks for sharing.
I would LOVE to see it. Can you send me the picture to renee@mycakefairy.com? Thanks!
So cool! Thanks for sharing!
You’re welcome! So glad you enjoyed it.