
My kids LOVE Halloween. From dressing up to creating a desert table, treats for trick or treaters….It is hands down a fabulous day of fearsome fun!
So what better than to impress your little guests with some easy peasy cookies. I’m going to show you how easy and quick these very effective cookies are and can be made from scratch in just a couple of hours.
You will need:
A selection of Halloween themed cookie cutters; bat, ghost, pumpkin, witches hat, Frankenstein etc…
Cookie dough
Colored sugar paste (fondant) in colors, white, green, black, orange and purple.
Royal icing (1.5 tablespoons of dried egg white to 250 g of icing (powdered) sugar.
Rolling pin.
Dresden tool or similar
Ziplock freezer bag or cling film (Saran wrap).
Cookie tray.
Greaseproof paper/parchment
Paintbrush
Small cup of cooled boiled water
Step 1.
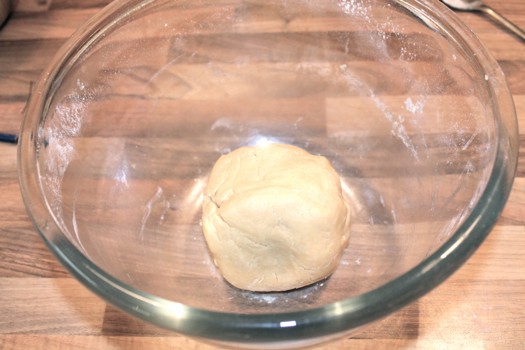
Make your cookie dough mixture until it forms a ball. Place in a ziplock bag and refrigerate for half an hour before use.
Step 2.
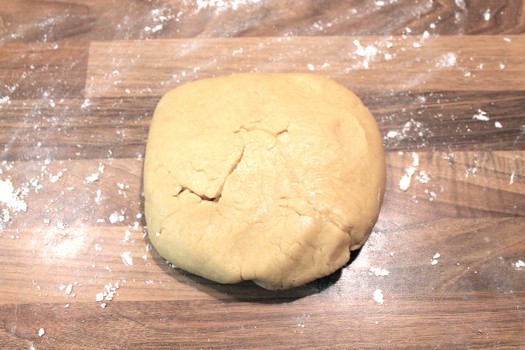
Remove Ziplock bag from fridge and take dough out of the bag and knead lightly. Then roll out on a lightly floured surface.
Step 3.

Taking your cutters, punch out your shapes and place them on a baking tray lined with parchment or greaseproof paper. Wash your cookie cutters. Bake in the oven for approx 12 mins or until they have gone golden.
Step 4.

Wet around the surface with a little water (not too much or your cookie will get soggy).
Step 5.

Taking your chosen colored sugar paste (fondant) and corresponding cutter, punch out the shape and stick onto your pre dampened cookie. You may find that your cookie will have risen and expanded a bit during the cooking process so use your rolling pin to gently stretch the sugar paste to the ends of the cookie or smooth with your finger.

Then add detail such as wrinkles to the hat by marking with a dresden tool.

Repeat this step for all your cookies and add features such as eyes, by rolling small balls of black sugar paste and sticking them onto your cookies with a tiny day of water. Alternatively, you can use royal icing. With the pumpkin cookies, I used royal icing to draw on the detail of the lines.

Step 6.

For the one-eyed purple monster I used a ghost cookie and I used a clay gun to make the hair. If you do not have a clay gun, you could also use a garlic press or a sieve to push the sugar paste through. Alternatively, you could color royal icing purple and pipe it on using a grass tip (nozzle).
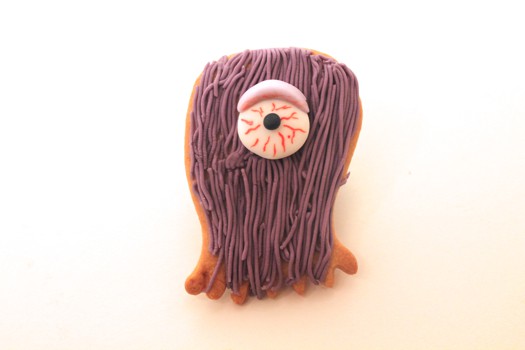
To make his eye, roll a ball of white sugar paste, to which add an even tinier bit of black sugar paste to make the pupil. Dip a fine tip paintbrush into some red food colouring mixed with a little vodka or lemon or oil and paint on the bloodshot veins.
Lastly, roll a little purple sugar paste into a thin sausage and place over the eye in an arch to make the eye lid. For added effect you could add lips or teeth!
Happy Halloween!
Gillian x
Really appreciable post. You always present the perfect and more different things and that’s why I like your posts so much. Thank you for sharing such fun and beautiful Halloween cookies.
What perfect cookies!!
I decorate my Halloween cookies with homemade royal icing. I think it tastes so much better than fondant. Here is how I do it.
Absolutely amazing as usual. Everyone should check out the Facebook page! I have a (silly) question though, how exactly do I make royal icing?
There are many ways to make royal icing, and there’s even a link here on CakeJournal by Louise on how to make it, but I cannot suggest you use real egg white as to the risk of Salmonella. Therefore I recommend using 3 tablespoons of dried egg albumen/or Merriwhite (meringue powder works too) and 500grams of icing sugar. I usually just stir the egg white into the icing sugar, then add a little water an eggcup at a time and mix in a mixer with the beater attachment on and mix for about 7 minutes, scraping down the sides half way through. Adding too much water will ruin your icing so, always make it on the stiffer side first. Royal icing goes hard quickly so keep it tightly wrapped in cling film between using it. Any left over can be kept in the fridge for up to two weeks if air tight. Hope that helps. Gillian x