
Keep the kids busy this summer with these quick and easy to make ice-cream cone cakes.
What you will need:
Ice cream cup cones
Selection of food paste colours. I used red, blue and green Wilton paste colours (optional)
Any white cake mix (home-made or bought)
Cadburys flake
Sprinkles
Buttercream
Piping bag and Wilton 1M tip
Cocktail sticks
Tin foil
Muffin/cupcake tray
Step 1.

Divide the cake mixture into bowls. Using a cocktail stick dipped into some colour paste add a little colour (of your choice) to each bowl as above.
Step 2:

Add a teaspoon full of each colour (layering the mixture) until the cones are three quarters full (to give room for the sponge to rise).
Step 3.

Take some tin foil and wrap it around each cone and place into the muffin tray. This ensures the cones don’t fall over.
Bake in the oven as you would your cupcakes, or until a skewer inserted into the cake comes out clean.
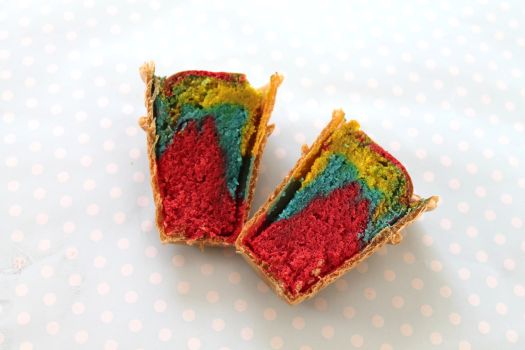
Once cooked, your sponge will look similar to this.
Step 4.

Ready your piping bag and tip. Then taking a cocktail stick dipped in Wilton Rose (you can use red also) add a slither of colour inside the bag.

Massage the colour with your hand to spread the food colour paste inside the bag.
Step 5.
Add your buttercream to the bag, and pipe swirls on top of the cones. The food colouring inside the bag will add a raspberry ripple effect to the tops.
Garnish the cone cakes with sprinkles, and a chocolate flake. (Or anything you like).
Ice Cream Cone Cupcakes

These treats are both fun to make with the kids and are delicious at the same time.
You will enjoy making these ice cream cone cakes.
Ingredients
- Ice cream cup cones
- Selection of food paste colours. I used red, blue and green Wilton paste colours (optional)
- Any white cake mix (home-made or bought)
- Cadburys flake
- Sprinkles
- Buttercream
- Piping bag and Wilton 1M tip
- Cocktail sticks
- Tin foil
- Muffin/cupcake tray
Instructions
- Divide the cake mixture into bowls. Using a cocktail stick dipped into some colour paste add a little colour (of your choice) to each bowl as above.
- Add a teaspoon full of each colour (layering the mixture) until the cones are three quarters full (to give room for the sponge to rise).
- Take some tin foil and wrap it around each cone and place into the muffin tray. This ensures the cones don’t fall over. Bake in the oven as you would your cupcakes, or until a skewer inserted into the cake comes out clean.
- Once cooked, your sponge will look similar to this.
- Ready your piping bag and tip. Then taking a cocktail stick dipped in Wilton Rose (you can use red also) add a slither of colour inside the bag.
- Massage the colour with your hand to spread the food colour paste inside the bag.
- Add your buttercream to the bag, and pipe swirls on top of the cones. The food colouring inside the bag will add a raspberry ripple effect to the tops.
- Garnish the cone cakes with sprinkles, and a chocolate flake. (Or anything you like).
Happy caking!
Gillian x
I created these nowadays for my husband. he’s fastidious and aforesaid they were extremely good! Thanks for the recipe!
I love the rainbow effect – such a great idea!
Looks really good! I have seen lots of similar ideas but a rainbow sponge inside is amazing.
My mom used to make something similar ~ yummy!