
A few weeks ago, I shared a tutorial for a cute fondant bumble bee.
And today, I am sharing a pretty Spring-themed cake, where I used that bee as a cake topper.
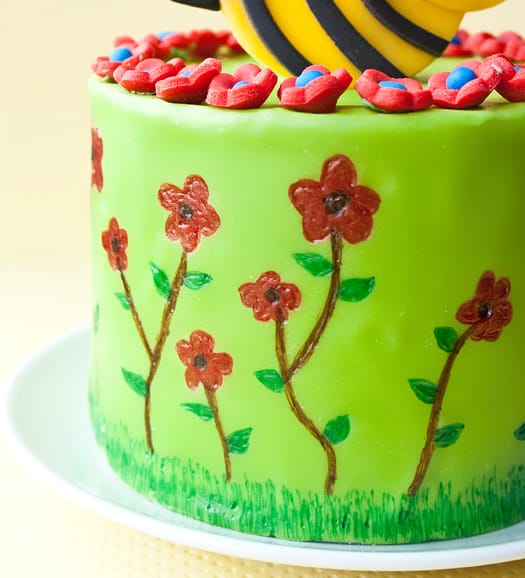
I also drew some flowers and branches all around the cake with edible markers and I found this process to be faster and easier than actually painting.
I picked up a few tricks that I hope will help you as well…
– Markers with fine tips work the best. I use the Americolor brand.
– Cover your cake in fondant and let it sit overnight. This allows the fondant to dry up a little. Then, draw on it with edible markers in the morning. This prevents the tip of the markers from making dents in the cake. It also avoids the color from leaching and spreading all over your fondant.
– Watch your knuckles when drawing because it’s so easy to accidentally dig them into your cake. That will leave your cake with horrible dents! You can also end up with smudges if your knuckles smear your design :S
– You can lightly use a pencil to sketch the design and then draw over it with edible markers. It’s less nerve-wrecking this way! 😉
– I find it easier to start drawing/coloring from the base of the cake and then working my way up. There’s less smudging this way.
– If you make a mistake, you can’t undo it! So, either make that mistake a part of your design or just be very careful and have a clear idea of what you will be drawing/ coloring before you actually start. I highly recommend making a sketch on paper first.

To draw and color on your cake, you will need the following supplies:
Round cake covered in fondant
Edible markers with fine tip (Americolor brand)
Pencil
These are the steps:
Step 1:
Cover your cake in fondant and let it sit overnight at room temperature.

Step 2:
In the morning, start drawing on your cake.
As mentioned earlier, start working at the base and work your way up the cake.
So, use the green marker to make grass at the base first.
Note: At this point, you can sketch the rest of your design in pencil, if you like.

Step 3:
Use a brown marker (very lightly!) to draw stems around your cake.

Step 4:
Then, go over those light lines a few times until you have thick brown stems.

Step 5:
Use a red marker to draw and color flowers on top of each stem.
Be sure to leave a little circular space inside each flower.

Step 6:
Use a black marker to fill the circular space inside the flowers.

Step 7:
Use a green marker to draw and color some leaves along the stems.

And you are done 😀
You can use this idea to come up with new designs and just have fun with edible markers!
Happy caking everyone!
The edible markers did not work on my green chocolate Frankenstein pops. SPENT $10 dollars and can’t use them. Had to buy icing tubes to draw on details. This was better but hard to use for detailing the small stuff. Is there a special way to use the edible markers?
Pencils are made of a mixture of graphite (carbon) and clay. Neither of which are harmful or dangerous. It is fine to use a pencil to make fine lines on a cake that you will later cover. If you either paint or marker over the pencil most of it will get removed anyway. Using a toothpick will leave permanent marks and indents in the cake. Nail polish is far more dangerous then pencil lead (which isn’t lead). And people think nothing of painting it all over their fingers and then using those same fingers to make cake, and eat food. All while it may chip or flake off and you or someone may eat it. That is why nail polish is a no no for food safety.
“You can lightly use a pencil to sketch the design and then draw over it with edible markers.” – I’d not recommend using pencil on food. I think using a toothpick to lightly sketch out your design would be a better option.