
This adorable little cat is cute and really simple to make. Only needing a few items, you can make this cat in less than 30 minutes. Take a look at this tutorial to see how simple making this cat cake topper is.

What you will need:
4 colours of fondant (one colour for the body, one for the paws, white for the eyes, and pink for the nose)
Zacto Knife
Black edible marker
Gum glue
Tooth pick

Step 1:
Roll two balls, one slightly larger than the other using the fondant colour you have chosen for the cat’s body. Depending on how large you would like the balls, the ball sizes here are about one inch and half an inch.

Step 2:
Form the larger ball into a cone shape so that it is tapered at the top. Place the tooth pick through the centre of the ball.

Step 3:
Round the smaller ball and press the front flat so that the face will have a flat surface.


Step 4:
Add some gum glue to the top of the larger ball and around the tooth pick. This will help stick the balls together. Place the smaller ball on top of the larger ball, through the centre of the tooth pick. Press firmly to secure that the pieces are stuck together.


Step 5:
Roll two small balls. Push the balls flat and using your index finger and thumb, pinch the top of one side to create a pointy tip on one end. This is the cats ears.
<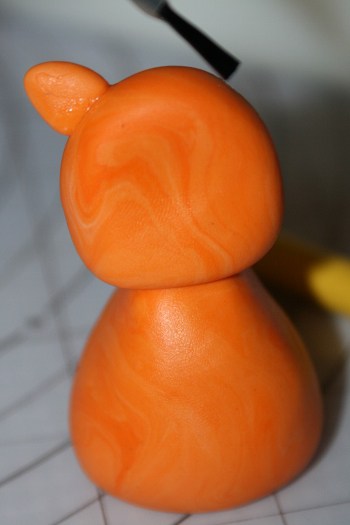

Step 6:
Using gum glue, attach the cat’s ears to the top of the head. You may need to re-shape the ears a little once they are attached if they become a little misshaped.


Step 7:
Roll a long log. This will be for the cats tail. Glue the tail behind the cat and curl the tail as you wish to give it some life.


Step 8:
Roll two small balls using the white fondant. This is for the eyes. Once you have created the shape you want for the eyes, attach them using the gum glue.

Step 9:
Using a small piece of pink fondant, shape a little cat nose. I added a little point to the end of mine.


Step 10:
Roll two small pieces of the fondant colour you have chosen for the paws. Once you have rolled the two small balls, flatten the balls with your finger. Then cut the piece in half.

Step 11:
Using the gum glue, attach the nose and the paws to the cat. Once you have all the cat’s parts attached you can draw on the wiskers and eye balls with the black edible marker.

Happy Caking!
Diane
Leave a Reply