The new Pokemon Game, Pokemon X & Y has just been released and I thought it would be an opportune time to share my unique idea for making Candy Pokemon Pokeballs with you.

Great for parties, easily customisable to include your favourite Pokemon and loads of fun to smash open, these cute little candy bombs are sure to be a hit with Pokemon fans everywhere – big or small.
I recently shared my idea for Candy Crush Color Bombs with you, and this is a bit of an extension of the Candy Bomb series. Small bite sized, candy filled chocolate pinatas!
You can view the full comprehensive video tutorial or you can read on below for step by step instructions.
Tools, Equipment and Ingredients:
Silicone cake pop mold (or dome chocolate mold)
Scissors
Zip lock bag
Toothpick
Spoon
Paintbrush
Melted red candy melts
Melted white chocolate
Melted black candy melts
Mini M&M’s (or Nerds or any small candy you like)
Pokemon Printables (optional – easy to find on Google)
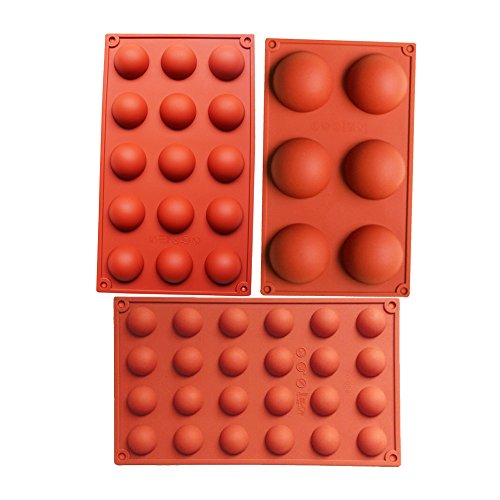
- EASY BAKING & RELEASE: Non-stick surface and flexible, just pop out with pressed finger, easy to release and clean, these silicone molds set is reusable, practicality, and durability.
- MAKE BAKING SAFER: High-temperature resistance and anti-freezing, safe for the oven, microwave, dishwasher, fridge, freezer. Wide heat resistant range: -104℉ to 446℉(-40℃ to 230℃).
- SEMICIRCLE SHAPED DESIGN: Included 3 pieces half sphere silicone molds, 6 cavity: 100ml (3.5oz) ( around 2.8″ per hole ) . 15 cavity:15ml ( 1tbsp 1 tablespoon 0.5oz )( around 1.5″ per hole ). 24 cavity: 5ml ( 1tsp 1 teaspoon 0.2oz )( around 1″ per hole );
- HIGH-QUALITY GUARANTEE – Our aim is providing the best product and top customer service to every buyer friend. If there are any concerns with the product, just reach out to us and we’ll be happy to resolve any issues you may face.
- For Use: Soap Mould, Mousse, Jelly, Cake, Bread, Prepared food, Chocolate
Step 1
Make sure your silicone cake pop mold is clean and dry and melt your chocolate & candy melts using a microwave, chocolate pot or double boiler.
Step 2
Scoop about half a teaspoon of white chocolate into one half of the mold cavity and use the back of the teaspoon to distribute the chocolate evenly around the circle in a nice thin coat, Repeat for as many Pokeballs as you’d like.
Tip: Don’t make this coat too thick
Step 3
Scoop about half a teaspoon of red candy melts into the other half of the mold cavity and use the back of the teaspoon to distribute the candy melts evenly around the circle in a nice thin coat, Repeat so you have a partner for each of your white halves
Step 4
Place in the fridge to set (approx. 10 minutes)
Step 5
Remove your silicone molds from the fridge and add another ¼ teaspoon of melted white chocolate, spreading once again to make an even second coat. Repeat with the red candy melts on your second half
Tip: Pay attention to the top edges of your Pokeball as these will be easier to stick together if they are a bit thicker.
Step 6
Return to the fridge for a further 5-10 minutes till fully set
Step 7
To remove your Pokeballs from the mold, you’ll need to peel the silicone away from the edges of each sphere. Be warned, these might ‘pop’ out at you so be ready to catch them!
Step 8
Pair each white half-sphere with a red half-sphere and fill one side with mini m&m’s, nerds or any small candy you like. If you are using a cardboard Pokemon character, add this now.
WARNING: Make sure you warn your guests if you are adding a non-edible character into the Pokeballs, to prevent choking.
Step 9
Scoop some melted white chocolate into your zip lock bag and cut off a small corner to make a fine piping tip.
Step 10
Gently put your two sphere halves together and hold them at the top and bottom so the seam is exposed. Pipe a line of chocolate over the seam and count to 5, before using your fingertip to wipe off any excess chocolate creating a smooth even finish
Tip: If you have “hot hands” you may wish to wear cotton gloves to hold the sphere while you join the two halves
Step 11
Using your paintbrush, dip into your melted black candy melts and paint a nice thick line all the way around your Pokeball.
Step 12:
Paint a large black circle on the front of your Pokeball (make sure you choose the best side for your front)
Step 13.
Using your toothpick, add a dollop of melted white chocolate in the center of the black circle, and affix your white round sprinkle to complete your Pokeball “button”
The completed Pokeballs are pictured below with our Pokemon Pikachu cakepops.

Storage:
Store at room temp (NOT in the fridge) for up to a week in an airtight container
Serving:
I used the back of a spoon to whack the candy bomb and crack it open, letting the candy spill out
I hope you like this easy, fun treat idea! If you love it, please LIKE and SHARE on your social media.
Check out my YouTube channel MyCupcakeAddiction for lots more great ideas and different variations of the candy bomb (including the awesome Candy Crush Color Bomb), as well as 3 x weekly uploads for all things cake, cupcake and cake pop!
If you have any questions about this tutorial, if you don’t find your answer then feel free to comment below and I will do my best to answer.
Xxx Elise
Hello, awesome idea! How did you get the center to be hollow?