• Skip to primary navigation
  • Skip to main content
  • Skip to primary sidebar

Cake Journal

  • Cake Lounge
    • Easy Embossed Cookies Recipe
    • How to Make Heart-Shaped Cake with Buttercream Roses
  • Desserts
    • Best 3 Cookie Scoop Sizes and How to Use Them?
    • Babycakes Cake Pop Maker Review and Tutorial
  • Fondant Friday
    • #FondantFriday – Minnie Mouse Cake
  • Giveaways
  • Recipes
    • Traditional Castella Cake Recipe
    • Stabilized Whipped Cream Frosting (Easy Recipe)
    • Best Frozen-Themed Cake Ideas with Images
  • Tips & tools
    • What to Do With Cake Scraps? (9 Easy Recipes)
    • Luster Dust: If You Don’t Know About It, You Need To!
    • How To Use Edible Glue and How to Make It
    • How to Use Russian Piping Tips and Tutorial
    • What Is Wafer Paper and How to Use It? (Video Tutorials)
  • Tutorials
    • How To Make Royal Icing (Easy Recipe)
    • How to Flood Cookies with Royal Icing?
    • How To Use Candy Molds Properly
    • How to Make Cake Pops: Easy Step-by-Step Tutorial
    • Fondant On Cookies: Easy Way To Decorate

How to make a chocolate basket

March 5, 2014 by CJ [email protected] 3 Comments

chocolate basket with brownies

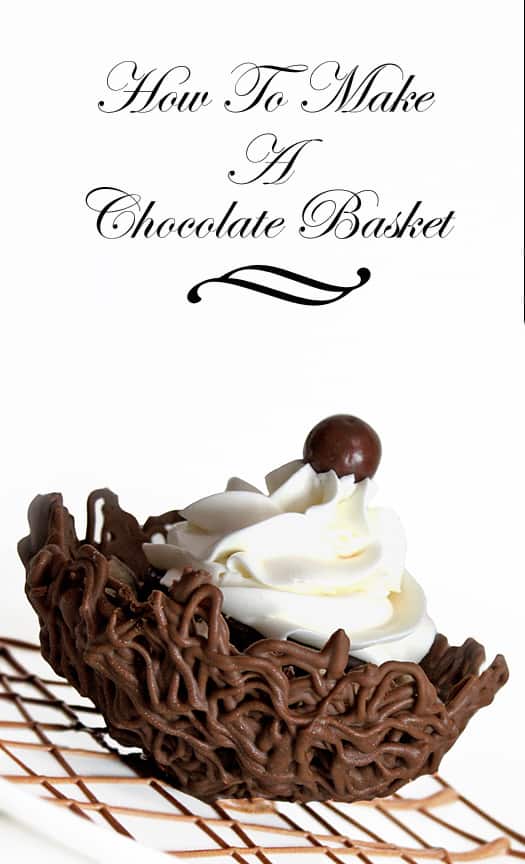
I recently made these chocolate baskets and filled them with small pieces of brownies and whipped cream. I think they turned out to be very elegant.

They are very easy to make and you can fill them with anything you like…ice cream, cake, candies, fruits….

To make this basket, you will need the following supplies:

Melted chocolate
Squeeze bottle
Wax paper
Half sphere styrofoam
Tape

These are the steps:

Step 1:
Fill a squeeze bottle with melted chocolate.
Also, cover the half sphere styrofoam with wax paper and secure it in place with some tape.

chocolate basket 1

Step 2:

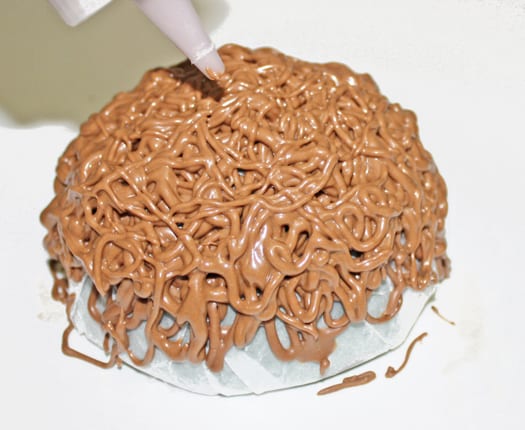
Start squeezing the chocolate randomly all over your foam ball.
Place this foam ball in the freezer for 5-10 minutes until the chocolate firms up.

chocolate basket 2

Step 3:

Take the foam ball out of the freezer. Now, squeeze another layer of melted chocolate randomly all over the foam ball.

Your basket should have a thick coating of chocolate by now. Pop this in the freezer again until the chocolate firms up.

chocolate basket 3

Step 4:
Then, carefully remove the chocolate basket from the parchment paper.

chocolate basket 4

And that’s it… you  have a lovely basket now that you can be filled with whatever you please.

Well, that’s all for today.

Happy caking everyone!

chocolate basket

Filed Under: Tutorials Tagged With: Chocolate, desserts

Previous Post: « How to Make Bright Rainbow Cupcakes
Next Post: Chocolate Mint Cupcakes »

Reader Interactions

Comments

  1. Vanessa

    March 6, 2014 at 7:54 PM

    My 9 year old would LOVE this! Next Mother/Daughter bake night idea 🙂

    Reply
  2. Trisha @ KMR Cake Pops

    March 6, 2014 at 4:28 AM

    I just saw a post by Bakerella using balloons to make chocolate bowls and just showed my girls. Now I found this idea and definitely need to try this one too 🙂

    Reply
  3. oumrukia

    March 5, 2014 at 3:47 PM

    Good afternoon,
    Tahnk you Abeer for sharing your lovely idea, I simply loooooooooooooove it!
    Have a nice day!

    Reply

Leave a Reply Cancel reply

Your email address will not be published. Required fields are marked *

This site uses Akismet to reduce spam. Learn how your comment data is processed.

Primary Sidebar

How to Make Frozen Buttercream Transfer Tutorial

Frozen Buttercream Transfer recipe

Buttercream transfer can be learned easily at home. This buttercream transfer recipe with images is easy to follow and affordable!

What to Do With Cake Scraps? (9 Easy Recipes)

9 easy and delicious recipes using leftover cake

What to do with cake scraps? Here are 9 easy and delicious recipes using leftover cake, including cake pops, milkshakes, and even pie.

Fondant On Cookies: Easy Way To Decorate

how to decorate cookies with fondant

Learn how to decorate sugar cookies with fondant with this simple tutorial with images. Fondant on cookies is quick and easy to use!

Copyright © 2023 Cake Journal on the Foodie Pro Theme