• Skip to primary navigation
  • Skip to main content
  • Skip to primary sidebar

Cake Journal

  • Cake Lounge
    • Easy Embossed Cookies Recipe
    • How to Make Heart-Shaped Cake with Buttercream Roses
  • Desserts
    • Best 3 Cookie Scoop Sizes and How to Use Them?
    • Babycakes Cake Pop Maker Review and Tutorial
  • Recipes
    • Traditional Castella Cake Recipe
    • Stabilized Whipped Cream Frosting (Easy Recipe)
    • Best Frozen-Themed Cake Ideas with Images
  • Tips & tools
    • What to Do With Cake Scraps? (8 Easy Recipes)
    • Luster Dust: If You Don’t Know About It, You Need To!
    • How To Use Edible Glue and How to Make It
    • How to Use Russian Piping Tips and Tutorial
    • What Is Wafer Paper and How to Use It? (Video Tutorials)
  • Tutorials
    • How To Make Royal Icing (Easy Recipe)
    • How to Flood Cookies with Royal Icing?
    • How To Use Candy Molds Properly
    • How to Make Cake Pops: Easy Step-by-Step Tutorial
    • Fondant On Cookies: Easy Way To Decorate
  • About Us
  • Contact

Tutorial: Chocolate Loops Cake

by Louise 2 Comments

chocolate loops 5

Today, I am sharing another tutorial, using chocolate 😀

I just love chocolate… it’s an easy medium to work with and there is just sooooo much you can do with it!

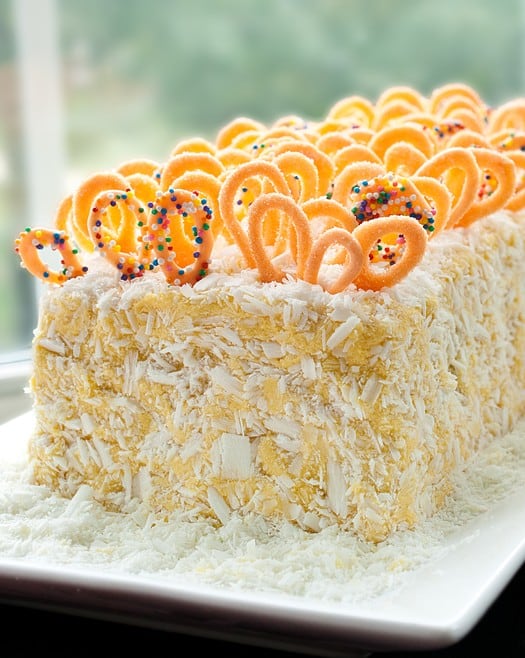
I made these sprinkly chocolate loops and pushed them on top of the cake, which resulted in a beautiful cake.

chocolate loops 7

To make these loops, you will need the following supplies:

Melted orange chocolate (or any color you like)
Piping bag or squeeze bottle
Orange colored sugar sprinkles (on any color you like)
Wax paper
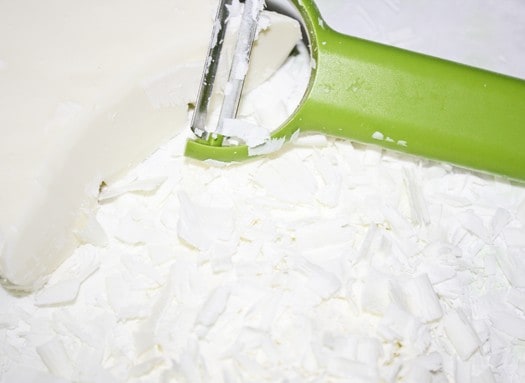
Brick of white chocolate
Potato peeler

These are the instructions:

Step 1:
Melt orange chocolate in the microwave.
Fill a squeeze bottle or piping bag with melted chocolate.
Make chocolate loops (like the ones shown in the picture) on a sheet of wax paper.

Tip 1:
Don’t squeeze your bag too hard or else you will end up with fat and and ugly loops, like the one on top in the picture.

Tip 2:
If you want all of your loops to be identical, draw multiple loops on paper with a pencil or on your computer. Place that sheet beneath your sheet of wax paper. Then, use those drawings to guide you. I personally prefer all the loops being slightly different in shape and size.

chocolate loops 2

Step 2:
Before the chocolate hardens, sprinkle sanding sugar or colored granulated sugar all over your sheet of wax paper.
You can also toss some colorful sprinkles on these loops, if you like.
Allow these chocolate loops to dry and harden.

chocolate loops 1

Step 3:
In the meantime, use a potato peeler to make chocolate shreds.

chocolate loops 3

Now, stick the chocolate shreds all over your frosted cake.

Finally, push the chocolate loops on top of your cake.

And you are done!

chocolate loops 4

Well, I hope you enjoyed this tutorial.

Happy caking everyone! 🙂

Previous Post: « Tutorial: How To Make A Fox Cake Topper
Next Post: Tutorial: Geometric Cupcakes »

Reader Interactions

Comments

  1. Ana

    November 26, 2014 at 7:10 PM

    Looks delicious. I love chocolate.

    Reply
  2. I Love Chocolate

    November 23, 2014 at 11:52 AM

    Wow ! Look yummy..
    Thanks for the recipe.

    Reply

Leave a Reply Cancel reply

Your email address will not be published. Required fields are marked *

This site uses Akismet to reduce spam. Learn how your comment data is processed.

Primary Sidebar

Search Recipes on Cake Journal:

About Us

Kristen is the author of Cake Journal and a graduate of the Professional Baking program at Renton Technical College. She has worked as a pastry chef at a top Seattle restaurant and loves sharing her passion for baking amazing cakes on this site.

Contact Me

Privacy Policy

As Seen On:

Follow Us on Pinterest

Follow Us on Facebook

Copyright © 2025 · Cake Journal