
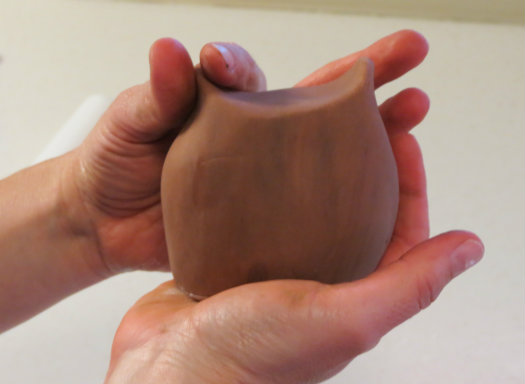
I’ve loved owls since I was a little girl so I can’t get enough of the recent trend in cake decorating. When designing this cake topper, I kept it simple using only a couple of tools including a flower cutter for the eyes and wings.
Previous posts explored methods for making flat cake decorations out of chocolate, buttercream and fondant, so this is a good opportunity to start exploring 3-D cake decorations.

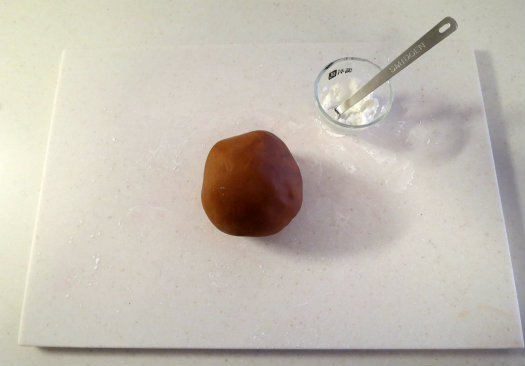
This is what I used:
Flat work surface
Corn starch
Small rolling pin
Fondant smoother
Water pen
Flower cookie cutter (1.5 inch size)
Wilton #12 piping tip
Fondant in brown, yellow, blue, pink and orange
Not pictured:
Fondant cutter
Plastic Wrap
Step1:
Choose a base color for your owl and roll it into a large smooth ball around the size of a fist.
Step 2:
Using the palm of one hand and a fondant smoother in the other hand, rotate your fondant in a circular motion while smoothing it upward. The goal it to create a tall oval for the owl’s body. The shape should have a flat bottom.
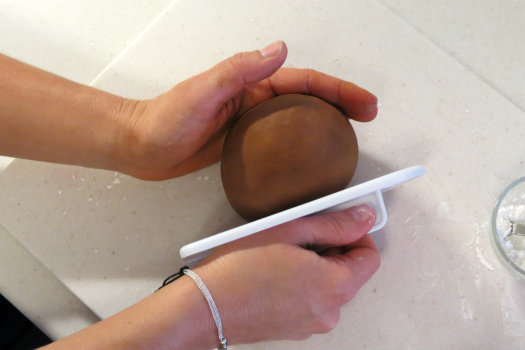
Step 3:
Rotate and smooth your fondant until you achieve this shape.
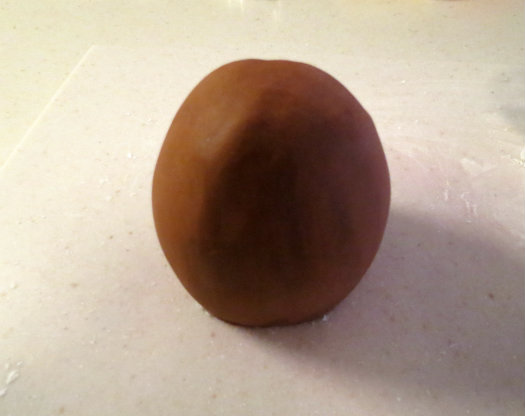
Step 4:
Use your small rolling pin to gently depress a dip in the top of the owl’s head.

Step 5:
Use your fingers to further define the two peaks at the top of the owl’s head.
Step 6:
Make sure that your owl is at least 3 inches tall. If you’d like to make a taller owl, that would look nice as well. Allow this body shape to dry overnight before moving on to the next steps.

Step 7:
Now we will move on to cutting out the colorful pieces that will become the eyes and breast feathers. Roll out your orange fondant and cut two flowers and three circles. For the circles, use the larger opening of the #12 piping tip.

Step 8:
Next roll out your blue fondant and cut out 5 circles.

Step 9:
Use your rolling pin to gently roll two of the blue circles so they become a little larger.

Step 10:
Use your water pen to wet the back of these two circles and attach them to each orange flower. This in the beginning of the eyes.

Step 11:
These are the pieces that you have so far. I recommend storing the cut outs under a piece of plastic wrap as you work so they do not dry out.

Step 12:
Next roll out your yellow fondant and cut out 5 circles.

Step 13:
Wet the back of two circles and layer them over the blue circles to build the owl’s eyes. Place the other three circles under your plastic wrap. We will use them later.

Step 14:
Next roll out your brown fondant. Use the large opening of the #12 tip to cut out three circles and the small opening to cut out two more.

Step 15:
Wet the backs of the smaller brown circles and place them as another layer of the eyes. I finished my eyes by hand rolling and attaching tiny blue circles. Store your larger three brown circles under your plastic wrap.

Step 16:
To attach your eyes, hold them up to your owl body and determine how much of them will make a connection with the body. Wet that part of the back with your water pen.

Step 17:
Place each eye carefully on the owl body and hold it in place for a minute as it dries. I use my fingers to shape the petals that flare out.

Step 18:
To form the beak, roll a large pea-sized ball of yellow fondant.

Step 19:
Shape the ball into a cone and use a tooth pick to press a groove in each side of it.

Step 20:
Wet the back of the beak and hold it in place a minute as it attaches.

Step 21:
The final color to roll out for breast feathers is pink. Cut out three circles and place them under your plastic wrap.

Step 22:
You should now have three circles each of five different fondant colors.

Step 23:
Wet the back of each circle and attach them slightly overlapping to form the bottom row of feathers.

Step 24:
Continue on to attach the second row of circles, slightly overlapping each one as shown. I placed the colors randomly.

Step 25:
Depending on the height of your owl’s body, you may have to trim the top row of feathers to fit them. I cut mine in half.

Step 26:
The finished rows of feathers should look like this.

Step 27:
Our owl is nearly complete. We will create wings now by rolling out the brown fondant and cutting out two flowers.

Step 28:
Gently roll each flower to make it slightly oblong.

Step 29:
Trim each wing as shown. You will use the larger piece.

Step 30:
After holding it up to the owl body to determine the position you like, wet the back portion of the wing that will make contact.

Step 31:
Carefully position each wing on the owl’s body ensuring the wet surface is firmly attached. Then use your fingers to flare out the “petals” in a position you like while it dries. I held each wing for a minute until it stayed flared out when released.

Step 32:
The final step is to create and attach the owl’s feet. Roll two small balls of yellow fondant.

Step 33:
Use your finger to flatten the back of each ball and use a toothpick to create grooves as shown.

Step 34:
Wet the flat portion of each foot and gently attach it under the owl. Be careful lifting the owl once the delicate wings are attached. Lift it from the back of the base.
This little flower owl is so cute and versatile that you could adapt it to fit any event from a baby shower to a birthday.
Happy caking!
Renée
Hello! Love your cute little owl! Any suggestions for how to avoid creases? When I roll the fondant I have some little seams and I’m not sure how to make the pieces smooth. Thanks!
So cutie!!
Hey there. Just wondering if you can suggest how to make an owl without using fondant. Do I just take a picture and try to copy it using an icing bag?
Annie..at the bottom of this post, there is a small summary about me that says “view other posts by Renee.” If you go there, you should check out my post “How to make a fondant puzzle plaque.” That would be perfect for making a flat, 2D owl.
Thanks Renee, good to know I don’t have to try and get it done the day before or on the day!
Hoping to make one for my son’s 1st birthday! Fingers crossed!!
I love this owl cake.
So cute 🙂
Hi, love your tutorials!
How far in advance do you recommend making the fondant cake topper before you need them?
Hi Ying. It would be ideal to make the topper around a week in advance. But if you are on a tight schedule, three days would probably be sufficient time for it to harden. In that scenario, I’d suggest mixing some gum paste in with your fondant to speed the hardening process.