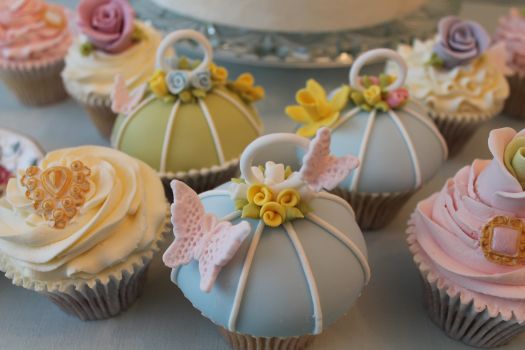
 As spring approaches so does the wedding season and afternoon teas on the patio. So what could be more perfect than these cupcakes? Vintage bird cages are all the rage at the moment whether it be wall paper, table decor or cake! Here’s how to make one.

Here’s what you will need:
Coloured fondant icing
Bowl of non-coloured buttercream (not pictured)
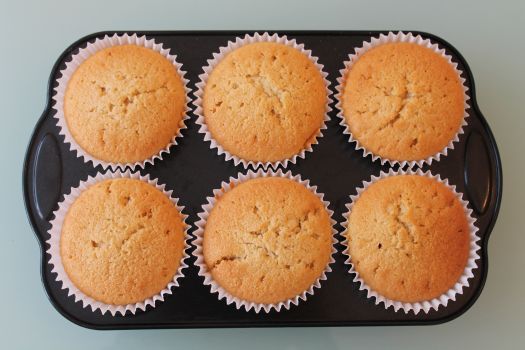
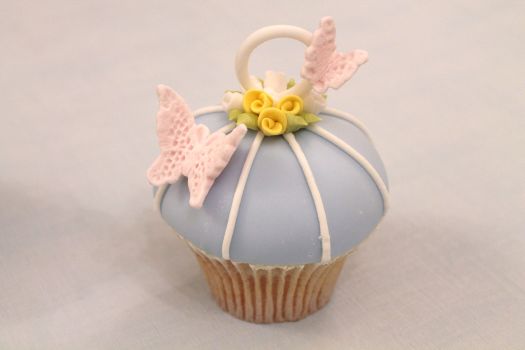
Cupcakes (pictured below)
Large circular pastry cutter (size depends on your cupcake size, so you will have to play around to find the size to fit yours)
Green food colouring
Toothpick
Spatula
Small bag white royal icing with a round tip (I used a Wilton no. 4 tip)
Small bag of green royal icing with a very small leaf tip (I used a Wilton no. 65 tip)
Parchment/greaseproof paper
Step 1:
Make and cook your cupcakes.
Step 2.
Add a large dollop of buttercream to the top and use the spatula to smooth into a dome shape. Then pop into the fridge for 15 minutes to set. (Do not be tempted to go to Step 3 without refrigerating first as the cream will be too soft and won’t hold its shape).

Step 3.
While your cupcakes are chilling in the refrigerator, roll out your fondant and cut a circle large enough to cover the tops of your cupcakes.

Step 4.
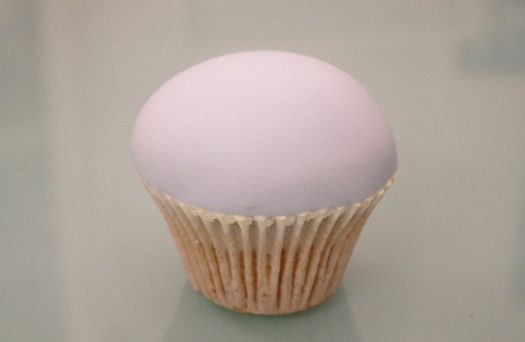
Remove cupcakes from the refrigerator and place the fondant on top of the cupcakes and smooth over and down with the palm of your hand. As the buttercream is firm you can be quite rigorous in your smoothing.

Once smoothed and polished with your palm of your hand, your cupcake should look like this.
Step 5.
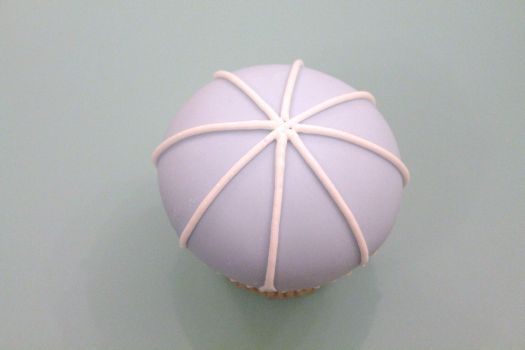
Using your toothpick, gently score lines on your icing so you can easily see where to over pipe and to help you achieve nice straight lines. Next pipe your royal icing lines to make the bars of the bird cage, as can be seen above.
Step 6:
Using a food pen, draw the handle for your bird cage on the greaseproof paper and then pipe over it in royal icing and set aside. (Alternatively, you can use petal paste or fondant mixed with CMC and mould it around the shape drawn) Once dry, very gently peel from the paper and attach to the top of the cupcake with royal icing.

Hide where you have attached the handle with decorations such as little flowers, leaves, butterflies etc.

Step 7.
Using your small green royal icing bag, pipe little leaves in between the flowers and why not add a butterfly or some more flowers? The design choices are endless…….. Go get creating.
Happy Caking!
Gillian
simply gorgeous! Thanks for sharing.
Really lovely, gonna give these a go, thank you xx
Absolutely lovely and so simple too! I should make more cupcakes methinks.
…Beautiful…and love your guide for those of us who may need a little or a lot of help…LOL…Thanks for posting…Kendra Day…
Oh so pretty! I have been thinking of trying out a birdcage cake but these little birdcage cupcakes are even better 😉
They look incredible!! Love the step-by-step pictures, you make it looks so easy 🙂
These are gorgeous!