
Today I want to share with you How to Make Simple Fondant Ribbon Roses. These roses are very easy to make, and they’re perfect to adorn little girl birthday cakes (as you see above) or baby shower cakes or cupcakes (see a cupcake at the end of the post), or even for wedding cakes!
For this tutorial I’ll only be making one size of ribbon roses, but as you can see on the cake up top, you can make them smaller or larger and they’re still just as pretty! They also don’t require a long drying time, so they can be made for last minute projects.
The biggest benefit however, in my opinion, is that they can be made very quickly! I could easily make a few dozen of these in under an hour to adorn an order of cupcake or to make a cake a little extra special!

Here’s what you’ll need… and the list is short today 🙂 :
- Work Mat
- Shortening (to prevent sticking)
- Fondant (I’m using pink)
- Small rolling pin
- Ribbon cutter
- Scalpal or Xacto blade
Once you have all of your tools and materials gathered, you can get started immediately!
Step 1: Start by rubbing down your work surface with a thin layer of shortening to prevent sticking. Once it’s ready, roll out your fondant into a long rope or snake. The length and diameter of your rope will depend on how large of a rose you want to make.
For the roses that I’m making in this tutorial (to go on a cupcake), the rope is about 10 inches long and less than an inch in diameter.

Step 2: Using your small rolling pin to flatten the rope. I like to make mine no more than 1/8th of an inch thick.


Step 3: Once you have it rolled out evenly, set your ribbon cutter to the width of the ribbon you’d like to cut and simply roll over it to cut the ribbon! You could also do this with a ruler and pastry cutter, but I use my ribbon cutter almost every week for cake projects and I highly recommend having one!
For these flowers, I had the ribbon width set to about 1 inch. For smaller flowers, you could make the ribbons narrower. Once the ribbon is cut, use the scalpel to cut the ends off even/straight (not pictured).

Step 4: Start at one one of the fondant ribbon and begin rolling it up. I like to keep them tight in the center.

Step 5: After making a few loops, I begin to loosen it up at the top by pinching it on the bottom – this causes the top of the ribbons to flair out a bit.

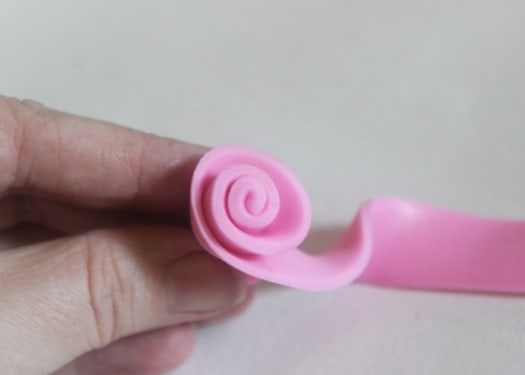
Step 6: Keep rolling and pinching until you have the size flower that you want. I wanted flowers to cover the top of my cupcake, so I made them a little larger:

But as you can see on this simple Ribbon Roses and Ballet Cake, I mixed small and large roses and it turned out beautifully!a
And that’s it! I hope you’ve enjoyed this little tutorial and feel free to leave any questions in the comments below!
Happy Caking!
Rose
Thank you for the inspiration. I enter baked items at the California state fair and will be entering petit fours this year. There was only one entry for them last ywar. I am just a hobby baker having fun in my 87th year
They come together very quick – it only takes a few minutes to make them!
They are beautiful! About how long does it take to make these?