I have made more Minnie Mouse bow toppers over the years than I could ever count and I’m always asked how I do them. So, today I want to share with you how to make a Minnie Mouse Polka Dot Bow Topper with some simple essentials and a little experience.

As you may think, it does take a few steps but they’re not hard to make and in the end – everybody loves the final result! Just imagine the look on your daughter/niece/little friend’s face when she sees the Minnie cake. Not to mention the appreciation from the other guests: “That’s amazing! How did you make it look so real?”. Well, you will all learn that from this article. So let’s get it started!
What You Need to Make a Minnie Mouse Bow Topper
First of all, here are all the tools, ingredients, and other essentials you will need in order to succeed in this recipe.

- White gum paste;
- Pink fondant (or gum paste);
- Small Rolling Pin and mat;
- Shortening;
- Water or sugar glue;
- small paintbrush;
- Small pastry wheel;
- Xacto knife or scalpel;
- Ribbon Cutter;
- Mini Circle Cutter or punch/plunger;
- Two bubble tea straws or dowel rods (not pictured).
Step-by-Step Tutorial
All in all, these 10 steps will make it clear to everybody what exactly you should do in order to achieve the sweet Minnie Mouse bow topper from the image. So, follow closely the instructions and your success will be guaranteed!
Step 1

Roll out the white gum paste and then cut it into a rectangle using your pastry wheel and a ruler (if you need to). The size can vary depending on how big of a bow you need, but for this bow, it was 9″ long by 3″ wide.
Step 2

Now it’s time to add polka dots!! I like to use shortening to adhere the dots to the gum paste. I brush down the entire surface with a very thin layer, then use a paper towel to wipe off any excess. Shortening is not as messy as sugar glue or water, but those would work too if you prefer.
Step 3

Roll out your pink fondant or gum paste, then cut out lots of tiny circles and lay them on your gum paste. I tried to keep mine pretty evenly spaced but they don’t need to be in a perfect pattern.
I love using a circle plunger/cutter because it makes the polka dots so easy, but you could also use a mini circle cutter or even the end of a frosting tip to cut the circles. Also, you can make them as big or as small as you want. These were just under half an inch.
Steps 4 and 5

Once the dots are in place, flip the white over and cut it into a rectangle. You can make the bow as big or small as you want but mine was 9″ long and 3 wide.


Now, using water or sugar glue, paint the ends of the rectangle, then fold and pinch the ends together for what will be the center of the bow.
Steps 6 and 7

Flip the bow over then fold the ends together. (oops – one of my dots popped off!)
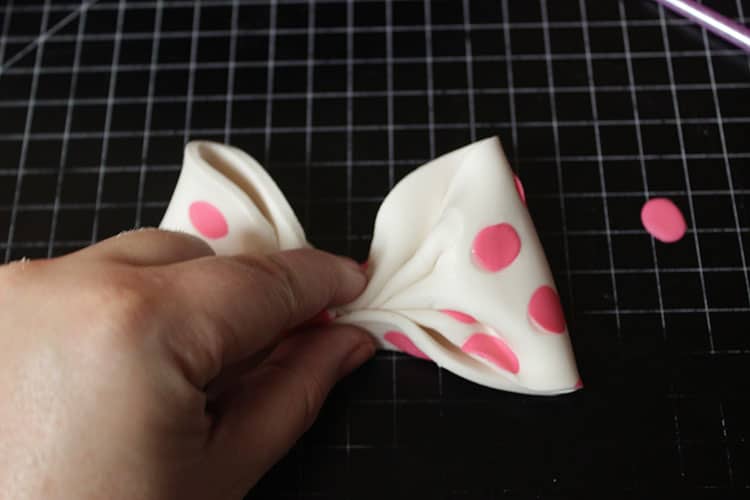

Now use your fingers to pinch the back of the bow down to match the front. The gum paste should still be pliable so you can manipulate it without cracking. Once you have it shaped, flip it back over.
Steps 8 and 9


Using some of the gum paste you trimmed when you cut the rectangle, cut out 2 smaller rectangles to add the knot at the center of the bow. These need to be around 3″ long and about half an inch wide. I cut two, then layer them together and wrap them around the center of the bow.

Use a little sugar glue to secure the knot on the back then use bubble tea straws or dowel rods to shape the loops while it dries. I like to put straws through the loops, then stand it up to dry because that’s how it’ll be on the cake.
Final Step
Finally, let the bow dry overnight or at least 12 hours, then slide the straws out and it’s ready to go! Last but not least, I used melted white chocolate to secure mine to the cake!!
And you’re all set – a super cute Polka Dot Minnie Mouse Bow Topper! If you’d like to know how to make Minnie’s ears, I also have a tutorial for that here on Rose Bakes.
Happy Caking!
All in all, this is all you need to know in order to create a sweet, dotted Minnie Mouse bow topper for your little princess. If you follow closely these ten steps and you use the tools and ingredients listed, you shouldn’t encounter any problems. However, if anything was unclear from my tutorial, or if you have any further questions, please do not hesitate to ask them in the comments section below.
Also, I would love to hear all your thoughts, advice, and even improvements about this recipe of mine. So, anything on this topic is expected in the comment section! Not to mention, I am super excited to hear everything about your experience with the Minnie Mouse bow topper.

Happy Caking!
Rose
Hi Rose,
I found your blog via Blog Catalog and am very impressed with your creations and you simple to follow and clear directions.
Thank you
This is so pretty. I think I may try this for my goddaughters first birthday It’s such a pretty bow!
Thank you! I hope it works beautifully for you!