• Skip to primary navigation
  • Skip to main content
  • Skip to primary sidebar

Cake Journal

  • Cake Lounge
    • Easy Embossed Cookies Recipe
    • How to Make Heart-Shaped Cake with Buttercream Roses
  • Desserts
    • Best 3 Cookie Scoop Sizes and How to Use Them?
    • Babycakes Cake Pop Maker Review and Tutorial
  • Recipes
    • Traditional Castella Cake Recipe
    • Stabilized Whipped Cream Frosting (Easy Recipe)
    • Best Frozen-Themed Cake Ideas with Images
  • Tips & tools
    • What to Do With Cake Scraps? (9 Easy Recipes)
    • Luster Dust: If You Don’t Know About It, You Need To!
    • How To Use Edible Glue and How to Make It
    • How to Use Russian Piping Tips and Tutorial
    • What Is Wafer Paper and How to Use It? (Video Tutorials)
  • Tutorials
    • How To Make Royal Icing (Easy Recipe)
    • How to Flood Cookies with Royal Icing?
    • How To Use Candy Molds Properly
    • How to Make Cake Pops: Easy Step-by-Step Tutorial
    • Fondant On Cookies: Easy Way To Decorate
  • About Us
  • Privacy Policy
  • Contact

How to make gum paste cowboy hat cupcake toppers

February 17, 2014 by CJ [email protected] Leave a Comment

cowboy hat cupcake toppers

Want to learn how to make a simple cowboy or cowgirl hat?  In a matter of a few simple steps, you will learn how to make these cute, adorable hats.

cowboy hat (1) (525x377)

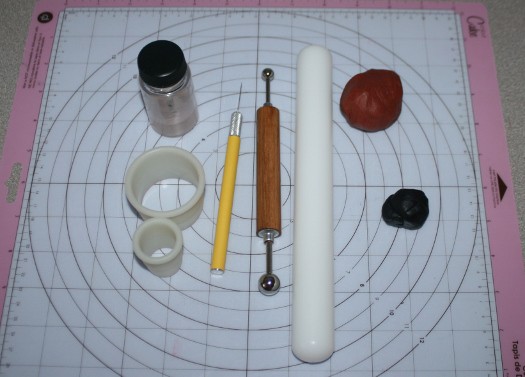
This is what I used:

Brown and black fondant
circle cutter (2 sizes)
rolling pin
ball tool
Zacto knife
gum glue
Flower former (not shown in picture)
two other modelling tools (not shown in picture) – but will be used for drying purposes

cowboy hat (2) (525x397)

Step 1:

Roll out the brown fondant thinly. Using the largest circle cutter make a cut.
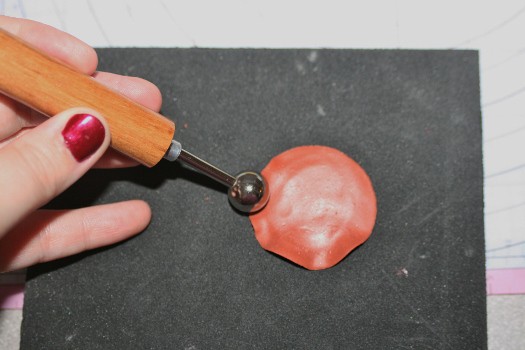
cowboy hat (9) (525x350)

Step 2:

Using the ball tool, thin the edges of the big circle.
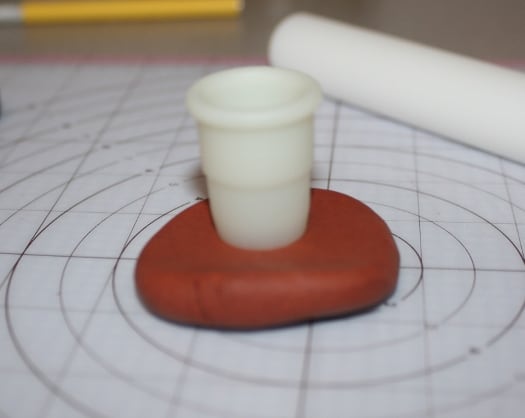
cowboy hat (3) (337x525)

Step 3: 

Place circle onto a flower former as shown in picture above.

cowboy hat (4) (525x418)

cowboy hat (5) (525x350)

Step 4:

Roll out the brown fondant to half an inch thick. Using the small circle cutter make a cut. In the picture above you can see how thick to make the small cut.

cowboy hat (10) (525x350)

cowboy hat (11) (525x311)

cowboy hat (13) (456x525)Step 5:

After cutting the small thick circle, press the top flat so that there is no bulge on top. Taking one of your modelling tools press it in the middle of the small circle creating an indent on the top of the circle. This will create the top of the hat.

cowboy hat (14) (350x525)

Step 6:

Taking the large circle that is drying in the former, grab two modelling tools and place the semi-dry fondant circle in between the two tools. The tools will help to keep the edges rolled up. This is creating the base of the hat.

cowboy hat (15) (350x525)

cowboy hat (16) (350x525)

Step 7:

Apply some gum glue onto the large circle in the center and then place the small circle on top.
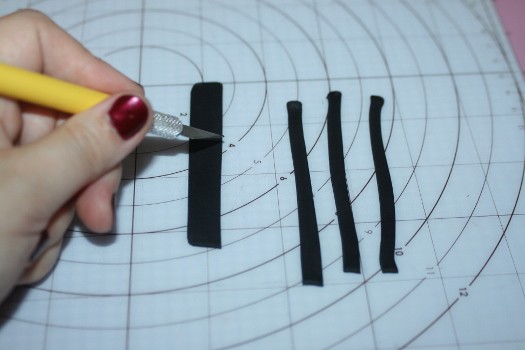
cowboy hat (6) (350x525)

cowboy hat (7) (525x350)

Step 8:

Roll out some black fondant thinly. Using the Zacto knife cut some thin strips.

cowboy hat (17) (525x350)

Step 9:

Apply some gum glue to the black strip. Place the black strip along the base of the top part of the hat. This will add some décor as well as hide the space where the two parts of the hat meets.

cowboy hat (18) (350x525)

Happy Caking!

Diane

Previous Post: « How to make fondant bumble bee cupcake toppers
Next Post: How to make a chocolate tree cake topper »

Reader Interactions

Leave a Reply Cancel reply

Your email address will not be published. Required fields are marked *

This site uses Akismet to reduce spam. Learn how your comment data is processed.

Primary Sidebar

Copyright © 2023 · Cake Journal