
Have you ever been asked to make special cupcake toppers for a bridal shower, or wedding, or even a graduation party but have been at a loss for an idea?
These dress cupcake toppers are really fun, simple and easy to make. They are easy to customize and are really pretty. You can make them whatever colour or shape you wish. Have some fun experimenting!
Here’s What I used to make these cupcake toppers:
Cupcakes 🙂
Fondant or gum paste (what ever colours you want to use)
Paring knife
Zacto knife
Rolling pin
flower formers
flower cutters (2 sizes)
Gum glue
Ball tool (optional if wanting to frill up the flower cuts)
tooth picks (not in the photo)
Icing (not in the photo)
Impression mat (any style)
Wilton flower maker
melted white chocolate (OPTIONAL)

NOTE: If you are going to place icing under your topper and suspect your guests are going to peal the topper off, you can make this topper using all gumpaste. However, if you think your guests will eat the topper, then you are best off using fondant for the flower cuts and gumpaste just for the dress top.
Step 1:
Roll out the fondant or gumpaste to 1/8 of an inch. Place the impression may on top of the newly rolled out fondant or gumpaste and roll the rolling pin onto the gumpate or fondant to make an impression.

Step 2:
After you have made an impression on your fondant or gumpaste use your flower cutters (2 sizes). For one topper you will need one cut of each size.


Step 3:
Place your cut pieces on to a flower former. This will allow the flower pieces to dry not too flat. You can either place the cut flower pieces into former to partially dry, or you can use the ball tool and frill the edges of the flower and then place into the former. I chose not to frill the edges in this demonstration; however, frilled edges will give you an alternate look for future dress toppers if you want a different option. These two flower cuts will make the “skirt”.

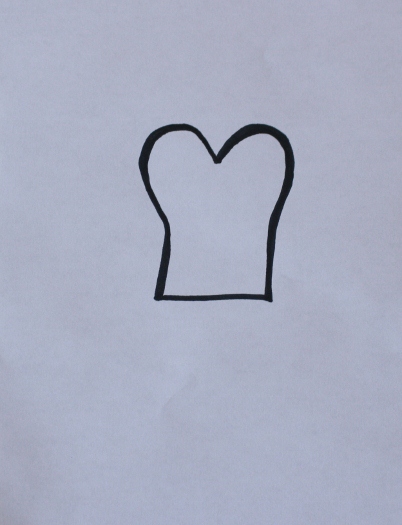
Step 4:
I have attached a picture of the template I used to make the dress top. You can use this same template or create your own. I suggest using a template if you are making many cupcake toppers and you want all the dresses to look the same. I just traced this template on paper and cut it out when I was ready to use it.
Step 5:
Roll out some gum paste (you need the dress top to dry hard so that it can stand up in the air — so use gumpaste for this part). If you are rolling out a new piece of gumpaste, you may want to use the impression mat again to make a pattern on the dress top, or you may choose to leave it with no pattern.
The choice is up to you! You will want the roll out piece of gumpaste thicker, so roll it out to 1/4 of an inch. Then using a paring knife, lay the template onto the gumpaste and trace around the template, cutting out the shape. Place the shape aside. You will want this to dry overnight. And you may find it easier to do this step a day before the rest of the steps.

Step 6:
Roll out another piece of gumpaste. Use a different colour if you wish to add contrast to the dress top. Roll the gumpaste out thinly, approximately, 1/8 to 1/16 of an inch in thickness. Using your paring knife cut a small strip. This piece will be used for the dress belt.


Step 7:
Attach the belt using gum glue. Cut the belt to size.

Step 8:
Using a Wilton flower maker, or any alternative small decoration you may want to use, make some small details for your belt.

Step 9:
Place the small decorations onto the belt using some gum glue.

Step 10:
When the dress top is firm/dry, and you are ready to start assembling the cupcake and topper, you will need some icing. You can choose whatever icing you wish for your cupcake. I would recommend a buttercream or cream cheese icing. Using an icing that will be firmer is required. (Using a whipped cream icing will not work as it will soften or moisten the fondant skirt.) Apply some icing onto the cupcake. Then place the largest flower piece onto the icing.

Step 11:
Apply some gum glue on top of the first large flower piece and then place the smaller flower piece on top. You have now assembled the skirt!

Step 12:
Finally, place a tooth pick in the middle of the skirt. Apply some gum glue ( or melted white chocolate) onto the base of the dress top and press it into place on top of the center of the skirt. The tooth pick should be behind the front of the dress top.

Happy Caking!
Diane
I amm regular reader, how are you everybody? Thiis piece of writing polsted at this website is rsally
nice.
Hi, The designs are beautiful. If you don’t mind , Where can I get the fondant mat or who is it made by. Thanks
Wow! such a wonderful idea in a simple manner. I just love cupcakes to make and eat so much. That’s why I love your blog.