 In previous posts, we explored making cake decorations from chocolate and buttercream. Now let’s talk about my favorite material for cake decorations: fondant! As opposed to those other materials, fondant is not as messy to work with. It does not require piping bags or tips. Decorations can be made far in advance and will stay good for a long time if stored in a cool dark place, like a cake box. Fondant is also very forgiving. If you make a mistake, you can just smash it up and start over.
When I started working with fondant, the first types of decorations I attempted were flat decorations, like the puzzle plaque. It’s fairly easy to turn any character, logo or design into a fondant puzzle plaque. Here’s how:

This is what I used:
Work mat
Colored fondant
Corn starch
Rolling pin
Printed image
Parchment paper
Fine tip marker
Scissors
Exacto knife
Small brush and water
Optional items, specific to my image:
Black edible marker (for eyes)
Pink petal dust (for cheeks)
Royal icing (for rain drops and accents)
Impression mat (for bathtub design)
Small petal tip (for scale impressions)
Step 1:
Sketch or print your image to the scale of your cake. I sketched this ‘April showers mermaid’ and added a seven-inch circle which will be the background of the plaque. This will fit nicely on a standard eight-inch round cake.

Step 2:
Lay a piece of parchment paper over your image and trace it with your fine tip marker. Now you have two images to work with as you begin to create your puzzle plaque. It’s helpful to have at least two copies of the image.

Step 3:
Start by cutting out the background shape for the plaque. My background was a seven-inch circle.

Lightly dust your work mat with cornstarch and roll out your fondant. The background should be about a quarter inch thick so it is strong when dry. Gently hold down your guide shape while using your Exacto to cut around the edge. (I was working on a small extra piece of counter top. It was very useful to rotate it midway through the cuts so I could keep proper leverage.)

Step 4:
Having two copies of the image will come in handy if some shapes overlap. For instance, I used one of my copies for the basic outer and inner bathtub shapes. I used the other copy for the mermaid tail shapes that are within the bathtub.

I rolled out the cream color fondant large enough for my bathtub shape.
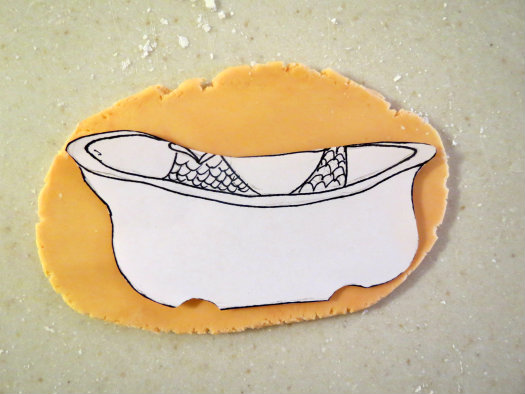
If you’d like to add interest to the decoration, impression mats are a great tool. Dust the mat lightly with cornstarch, place it on your fondant and use a rolling pin with gentle pressure to make the impression.


Step 5:
Continue cutting out your shapes from your image copies and using them as guidelines to cut your fondant. Once you have a good start, you can begin to glue the pieces to your background. Use a small brush and water to lightly wet the back of each shape and gently attach them. Do this carefully because they are difficult to move once in place.

Continue working on each element of your “puzzle.” Here I used a toothpick to add dimension to the claw feet of the bathtub. I also used a small petal tip to add scales to the mermaid tale. Be creative and use what you have on hand.


It’s fun to see your puzzle take form as you glue each piece of fondant to your background.

Step 6:
For the torso, I cut out the basic shape knowing that I would add clothing and hair next. It can be tricky to cut around the thin arms so I chose to cut out the guide shape from paper instead of parchment. It is a bit stronger to hold in place and cut around.

Tip: Use your parchment image to make sure everything is lining up correctly by laying it on top of the decoration from time to time.

Step 7:
Here I’ve added the mermaid’s simple face using a round tip to impress the smile, petal dust on the cheeks and edible marker for eye dots. A toothpick is perfect for making a belly button.

If you have any small molds or cutters, they can come in handy. I used a small flower mold to create her bikini top as a short cut. Be creative!

Step 8:
For the hair, I cut some thick straight pieces of fondant and curled them up. I arranged them on the plaque to see how they would look before securing them in place with water.


Step 9:
I wanted my mermaid to have an Aprils Showers feel, so I added raindrops using royal icing and a #1 piping tip. I also added some tiny accents like jewelry. Do this step last and be sure not to touch it until it dries.


Allow the plaque to dry for at least a day or two. Attach it to the top of your cake with a thin layer of buttercream. I hope you enjoyed this tutorial!
Happy caking!
Reneé
I have made this cookie to give to my friends mother’s day. The biscuit is beautiful. Thanks for share it. Hugs.
https://decabezaenlacocina.blogspot.com.es/2013/05/galleta-decorada-para-mama.html
Amazing! I’m completely in love with this! Thank you for sharing your creative talent!
Thanks for the tutorial! Would love to see even more 3D effects tutorials(like some of the toppers you see with characters)
stunning! beautiful work Renee!
Oh, thank you for the inspiration and tutorial!!
I did this with a Pocoyo scene. It was much more difficult than it looks, but everyone at my grand-daughter’s party thought it looked great.
Wow! Thanks for all of the positive comments about the tutorial. I hope yougive it a try some time and let me know if you have any questions! xo
It´s look so easy when you do it! I have to try it sometime!
Thanks for the tutorial. It’s inspiring.
A great a a. A great idea for those of us you can’t draw a straight line, much less draw! That’s me!!!!!
Thanks,this is a great tutorial,so fantastic.
That’s the cutest! Love this idea!!! Thanks!
Your work is incredible and an inspiration to me.
Excellent!! Thanks a lot!! 🙂