My favorite cakes to decorate our children’s birthday cakes, which often revolve around a theme or a favorite character. In my quest to figure out how to get these characters onto my cakes, I discovered the frozen buttercream transfer. So, the frozen buttercream transfer is a great method for transferring any image on the top of a buttercream cake. Also, do not worry about the difficulty of the process! As long as you can trace, then you can make one! You can also make a chocolate transfer if you want.
The Recipe
- Use an American buttercream recipe that has approximately a 50/50 butter-to-shortening ratio. I’ve had good luck with this recipe by Peggy Does Cake.
- Search online for coloring page images to find clear designs.
- Place your transfer in the freezer for a minute in between piping each color to keep outlines firm and strong. You might also wanna learn Russian Piping Tips.
- Also, make your transfer level so it will sit nicely when flipped onto your cake. If the back is not level, it may settle as it thaws.
- Make your transfer the day you are decorating or up to a week in advance and store it in the freezer.
- Use a crusting American buttercream (like the one referenced) so you can smooth the final transfer with a Viva paper towel.
If you want a full step-by-step tutorial on all things buttercream, check out some free courses to become a buttercream pro.
What You Will Need

- The flatwork surface that will fit in your freezer (I really like plexiglass for this purpose); [amazon box=”B00844SOSE”];
- Parchment paper;
- Image printed to the desired size;
- Fine-tip marker;
- Buttercream;
- Gel icing colors;
- Piping bags with varying-sized tips;
- Small offset spatula;
[amazon box=”B078XGJ6J7″] - Small paintbrush;
- Iced cake;
- Tape;
- Viva paper towels (not pictured).
Step-by-Step Guide
Now, we will make the transfer step-by-step, together. It’s really important to keep in mind that the next steps are mandatory (except the ones that I’ll say are in fact optional). So, this is a method and recipe that I strongly recommend closely following, rather than improvising. However, you’ll yourself that is not as hard as you may think now. Believe me, it’s easy.
Therefore, without further introduction, let’s get started!
Step 1
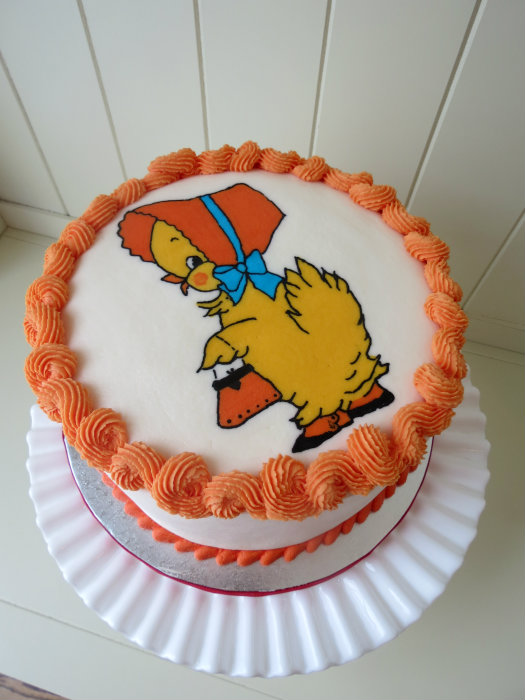
First of all, place the parchment paper over the image and trace it with the fine-tip marker. Moreover, I drew a 7-inch circle around my image because I planned to have it fill the top of an 8-inch round cake, leaving room for a border.

Step 2
Second, flip the traced image over and tape it, drawing side down, on a flat surface.

Step 3
Third, trace the outline of the image with black buttercream. Furthermore, I used a #1 tip for a fine outline.

Step 4
Then, begin to fill in the other colors. Remember the final product will be flipped so you are working in reverse order. For example, this chick has an orange blush on her cheek so I applied that color before the yellow background color.

Step 5
Occasionally hold your plexiglass up to check your work from underneath. However, if you see thin spots, add a little more icing. Also, if you see bare spots where light is peeking through, use your small paintbrush to gently press the icing against the outlines.

Step 6
Then, continue filling in all of the colors on the image.

Step 7
Since I wanted my transfer to be a 7-inch circular shape, I piped my desired background color all the way out to the circle and smoothed it with my offset spatula.

Keep checking from underneath during the process to make sure it looks good. Adjust with your small paintbrush as necessary.

Step 8
Pipe an even background on your transfer that will blend in with the cake color. Then smooth it gently with your offset spatula and place it in the freezer for at least 90 minutes overnight.

Step 9
When it is frozen, gently place it on your cake and move it to the desired spot.

Step 10
Next, gently peel off the parchment paper to reveal the frozen buttercream transfer.

Even with all of the careful work, I’m still not happy with the line marks that are visible in my transfer. However, these are from air bubbles between the piped icing.

Step 11 (Optional)
If you’d like to refine the look of your transfer and eliminate those lines, there is a solution. Wait for your crusting buttercream to thaw, then gently smooth it with a Viva paper towel. Thank you to my friend CorrieCakes for this tip! It makes a huge difference.
Much better!

Step 12
Add your border and any final piping or embellishments. I added some tiny fondant flowers to my frozen buttercream transfer for added interest.

Finally, serving time is fun since you can cut right through the frozen buttercream transfer and serve your guests the part of the picture they’d like to eat! (See also: The Best And Most Simple Buttercream Frosting Recipes)
Suggested Read: Summer Cupcakes
Conclusion
All in all, this is the whole recipe! Was it hard? Did you manage to create the frozen buttercream transfer that you desired? Also, was the celebrated person impressed by your work? Most importantly, did you enjoy what you made?
Tell me everything in the comment section!
You can try out different flavors of buttercream. Create Chocolate Buttercream, Dark Mocha Buttercream, and many more in the comfort of your home.
Moreover, that is the place where you can also ask all your further questions on this topic. So, do not hesitate to ask anything that is still confusing about the transfer technique.
Let me know what you think about this frozen buttercream transfer recipe!
Eating a cake is satisfying, but making one is more exciting yet fulfilling. Here on our website, we offer you different tutorials about cake making, cake topper ideas, lots of treat recipes, and more baking-related topics. Check us out now! Or you might have an interest in Banana Cake.
Happy Caking!
Rene
Hi! Does this method work as well for an image applied to the side of the cake?
Can you use something besides Viva Paper towels?
You can use parchment paper and fondant smoothers
You can if you can find something g as smooth as Viva. It has no ridges on it to deny the transfer
What a great technique!
My son is making a round cake of the earth for his layers of the earth science project.
Will this technique work on a round cake to make the continents?
Thank you soo much dear for this idea great information for biggners I will try soon.from faiza
This worked out great when I tried making a 3D cop car for a cake. It transferred right on and stayed put.
But months later attempting to do this again, without reading instructions… I used royal icing- don’t ask why I don’t know haha- and I didn’t smooth out the bottom. Will the royal icing work and also what are my options for smoothing the back when already frozen? Thanks!
Instead of parchment paper I use Reynolds Freezer paper. It has a paper side you can easily drawn on with any markers or pencils and the flip side is plastic coated. Works great for creating images with icing. I find the parchment paper resists marker ink.
Question.. so I have a really hard time getting icing black so I went to go buy some Wilton pre made but they were sold out. Could I use black candy melts instead just for the outline then fill in the rest with buttercream ?
If you start with blue buttercream then add black coloring to it, it turns black quickly :).
Is it possible to do this with a whipped icing instead of buttercream?
Unfortunately, no. This method will not work with a whipped topping.
That’s a very beautiful cake..I’ve one question, can I use a buttercream recipe without shortening and all butter for this technique, as I don’t wanna use shortening. Will it work?. Please reply me as I want to use this technique to make a Doreamon cake for my daughter’s birthday in August. Your reply would truly be helpful.
Thanks for the lovely post.
Cherry, Great question. You can substitute shortening for approximately 8-10 Tablespoons of condensed milk. Be careful to add a little at a time to avoid adding too much and your icing being too thin. Hope this helps.
It’s awesome. Just in time that I need it. Thanks a lot.
This is awesome. It’s just the time that I need to transfer my design to my new cake and I was thinking a way for it. Thanks a lot. Wow this is a great Tutorial! I’ll have to try this one day.
Can you pipe flowers and then transfer them to a cake, my mamaw’s birthday is in March and my little sister, cousin and I want to make her a cake and have all of her kids and grandkids celebrate with her, she’ll be 65 this year, but I have tried and failed at actually piping flowers or transferring roses onto a cake, I can make them, I just can’t make them on the cake, or when it comes to roses, I always destroy them before the get on the cake. I have thought about just making them on parchment paper and refrigerating them, But I wasn’t sure. One other question, when the decoration defrosts, will it still taste the same, like it won’t taste like watered down butter cream will it? Reply back if possible, Thanks a million!!
Freeze your roses on a cookie sheet lined with parchment. You’ll need to work quickly placing on cake after but works great!
Thank you so much for this awesome tutorial! I made a cake for my son’s second birthday this week using your directions. I have never frosted or decorated a cake. It came out pretty good for my first time thanks to your directions!!
That’s wonderful to hear. I’m glad the tutorial was helpful. I’m sure he loved the cake!
That looks incredible! Smoothing it afterwards gives it such a nice look, you can’t even tell it wasn’t just a printed edible image. I’ve been researching the frozen buttercream transfer technique and so many of the tutorials and demos out there are sloppily done with chunky designs, I love your delicate lines and the care you took creating your design. Thank you for sharing this.
Thanks for the kind words! I’m so glad you enjoyed it!
Thanks for the easy to follow instructions. This is exactly what I was looking for! I’m in South Africa, so we don’t have fancy Viva paper towels, will experiment with what’s available here.
Hot water and a spatula. Dip the spatula in hot water and smooth
Hi
Is it possible to take the transfer out of the freezer, keep it on the plexiglass and put it back in the freezer when I get to my destination.
I have to fly to visit the grandchildren and would like to have this part of their cake ready before I get there.
Thank you
Hi! I wouldn’t recommend trying that. Perhaps you can bring your supplies on the plane and then prepare the buttercream transfer on site. The best decorations for travel in my opinion are well-dried fondant decorations.
When you transfer the image onto the cake, do you peel the parchment paper right off or should you wait until it’s thawed a little?
When you carefully flip the image onto the cake, you should remove the parchment paper right away, while it’s still frozen. This gives it the best chance of staying intact. Good luck 🙂
Hi! Great explanation! I am wondering if you can tell many how many recipes of that crusting buttercream you made to have enough to do the whole transfer? I’m thinking of making two recipes just to make sure I have enough. Should I do more?
This cake seems very difficult to make but you made it so easy. Great recipe
Hi! This is wonderful! How do you use the paper towel? Do you press on it? Im sorry Im just a bit confused. lol…
Just lay the Viva on the cake and rub gently. Do not move the towel while rubbing. If you need to move it to another spot, carefully lift the Viva and ay it on the new spot. This does not work for other paper towels. Viva is the best.
Could you use a piece of parchment paper on top and rub with a fondant smoother?
I tried this last year for my son’s bday but the tutorial I followed didn’t say to add the layer of white buttercream. Needless to say, the transfer did not peel off the parchment 🙁 I’m hopeful that your version will work this year! Thanks!!
That’s a great blog! I’d love to have a go. Can you describe what a viva paper towel is? Is it a kitchen towel?
Thanks Debbie! A Viva paper towel is a brand of paper kitchen towels that are very dense and smooth. They work very well for smoothing crusting buttercream.
u explained it REALLY well!! thank u
Hi,
this is very good. I have tried FBCT a few times and it worked but I did one just recently and when the ice thawed the black outlines bleed and it made it messy. Can you offer any suggestions on how to prevent it?
Many thanks
Hi Elsie. I would recommend making your own buttercream with 50/50 ratio of butter to shortening and tint it black with gel colors that are made for tinting icing. I use the Wilton brand gel coloring. If you are in a humid area, it may help to bring the cake to room temp in a cardboard cake box. I hope these tips help you out 🙂
Awesome! Very detailed ,thank you Renee.
I was wanting to do this tonight for my friends birthday and I was wondering if when you use the paper towel does it smear the black I’m scared of that happening
Hi Kayla. It will not smear the black outline if you use a crusting buttercream recipe like the one I reference in this post. If you have an untested recipe, perhaps you could gently test a small area first to be safe.
Hello & Thanks for the well made tutorial! Does the color ever run as the transfer thaws? I live in Sanford, Florida (like another person on your team) and the heat & humidity sometimes makes cakes sweat.
Hi. I’ve used this method during the summer months in New jersey, which can also get quite hot and humid. I can vouch for Peggy’s buttercream recipe that I link to here. It is amazing in all types of weather. I tint all of the icing myself with Wilton gel icing colors. Some people use the premade tubes of black icing for the outline, which may be an issue with running. I store my buttercream cakes in my refrigerator in a cake box until delivery or party time. The cake box helps to absorb moisture during temperature changes. I’d suggest you do a small trial and test it out in your climate before using the method for a paid order. Let me know how it goes! 🙂
Thank you! I am going to have to try this!!!
I’m in love with this technique! I can’t wait to try it, and your tutorial explains the steps so clearly. 🙂
Just made a cake using this method and it turned out wonderfully! It was a little sketchy there for a minute when I first turned the frozen transfer onto the cake. I was doubtful that the viva paper towel could remove all the swirls and lines; and when the icing started to thaw it was sweating a lot, so I wasn’t sure if it would crust well enough to use the paper towel. But after thawing on the counter for 30 minutes or so, then sticking it back in the fridge for about 15, the paper towel did the trick.
Yay! I’m so glad you were patient and got good results. I’d love to see a photo if you took one (send to: renee@mycakefairy.com) Great work.
Im attempting this over the weekend for my son’s party on 06-08. Will it still be okay if I freeze it for a week? well 6 days to be exact?
Hi Katie. I have frozen them before for a week and they were fine. Good luck.
Hi I love your tutorial….my question is if we’re not able to get Viva paper towels, what else can we use to smooth out the buttercream? thank you
What a great idea to do the background big enough to cover the top of the cake. I haven’t seen it done that way, but it totally makes it seamless.
Thank you for sharing this technique. I never thought to use frosting this way. Great idea, I love it!
Thanks Renee! I actually do all that you suggested. I will try to leave it in the freezer a tad longer and see if that helps. I guess practice practice practice! 😉 Thanks for you help!
I have a question for you Renee. I have done this method a few times and have had one common problem with all of them. When I peel the parchment paper off it tends to peel the outlines off. I go straight from the freezer to the cake to ensure that it hasn’t started to thaw, and I go slow and steady. What could be going wrong? I love the variety this method gives me, I just can’t seem to get them on the cake completely! 🙁
Hi Michelle..sorry to hear that. How frustrating after your hard work! I’ll make a few suggestions that will hopefully help. Make your own buttercream with the suggested butter and shortening ratios. Don’t use store bought types. Also use parchment paper not wax paper. And finally let it freeze for a long time perhaps six hours. I hope that one of these will solve your problem.
I’ve always wondered how to do this. Thanks for the clear instructions; I can’t wait to try it. Just curious… do you think crusting buttercream (the 50-50 shortening/butter recipe) should be refrigerated? It tastes so much better at room temp but should it be stored cold? I’ve always wondered… thanks very much!
Great question Ellen. I store my buttercream cakes in the fridge to be on the safe side since they have butter and heavy cream in the icing. Then i take them out at least an hour before serving time so they can some to room temperature. I’m sure they could be out quite a bit longer than that if you wanted to display a cake at a party. Good luck trying the method!
This is beautiful cake, I will try this on my baby’s birthday cake.
Great tutorial, thank you for sharing and for all the amazing detail!
Fantastic post and i wonder how does make Corrie her cakes! Yours is beautiful so much! I’ll must trained on this technique! Thank you again Luise!!
Corrie’s skills still boggle my mind! She is amazing 🙂
You made something that looked complicated so easy. Thanks so much.
Thank you so much. That was my goal 🙂
Hi Renee, Loved this method. Works great. Cant wait to try it soon. I have a question, Can I use any other paper towels instead of Viva?????????
Thanks 🙂
Hi Saranya. I’ve never tried any type besides Viva. I think they work well because they have no pattern. I have heard that people also use copy paper to smooth crusted buttercream so that might be worth a try? Good luck.
It’s just perfect! Great tutorial, thank you for posting.
Thank you Elizabeth!
You did a great job Renee. The tutorial was easy to follow and the cake looks awesome. If I wanted to cover my cake in fondant, would it be better to use the chocolate transfer method or this method?
Thanks Donndarae. I don’t think you can put a FBCT on a fondant covered cake. For that I would suggest fondant or chocolate embellishments 🙂
Excellent tutorial! I’ve done FBCTs before the viva paper towel at the end seems to make a HUGE difference!
Yes! I’m so greatful to CorrieCakes for sharing that tip. i had no idea it would work until I read it on her page 🙂
I’ve used this technique before but it didn’t turn out nearly as beautiful as yours!! Great job!
Thanks Rose! I was definitely trying my hardest to get clean lines for the sake of the tutorial…plus Corrie’s tip about Viva helped to refine the FBCT. I love all of your cakes!
Too cool! Will definitely have to try that out some time 🙂
Thank you. Yes, give it a try! Start with a simple image the first time to get the hang of it. Good luck.
Wow…this is the best example of the technique I’ve ever seen, it’s so clean and neat.
Thank you for the incredibly easy to follow instructions!
What a compliment. Thanks so much Daysee.
I love this method, especially because I frost with whipped cream and you can’t use fondant designs on whipped cream. My customers love it, thanks!
I’m glad you liked the tutorial.
I am SO impressed! This is simple and much easier than the gel outline transfer in Wilton Method. Kudos to you Renee! Can’t wait to try it.
Thanks Melissa. OMG..I think I’ve tried that gel icing transfer with dismal results now that you bring it up. Yes, this works better for me 🙂
You are so super for sharing all these great ideas. Thank you so much, can’t wait to try this.
Good luck. Let me know how it goes 🙂
Haven’t made on in a while! Thanks for the tip on how to fill in and smooth out those lines!
You’re welcome. I’m glad you found the tips helpful 🙂
You read my mind! I was just looking up how to do a buttercream transfer! Perfect timing! Thank you! <3
I love it when that happens! Excellent.