
About 6 months ago, I tried to make fondant baby shoes for the first time and it ended in a complete disaster! lol
However, I learnt from those mistakes and I am now very excited to share the perfect template and tutorial for making these cute baby sneakers 😀
You can make them in any color you like and these shoes are perfect as cake toppers for baby showers or any baby event.

This is what I used:
Rolling pin
Dark green 50/50 OR gum paste (please read the note below)
Light green 50/50 OR gum paste (please read the note below)
Shortening
Wilton’s tip#3
Quilting tool (to create stitch marks)
Knife
Fondant cutter or pastry cutter (preferably with a small wheel)
Gum paste glue or corn syrup (I used corn syrup)
Templates (Please print them from Step 1)
Paintbrush
Wax paper or parchment paper
Clay extruder
Cotton balls
Large circle cutter from the Wilton circle cutter set
Small shot glass or a small bottle
Toothpicks
Scissors
NOTE: I prefer using 50/50 to make these shoes because it does not dry as fast as gum paste. Sometimes, I even make 70/30 (70% gum paste and 30% fondant). Using 50/50 or 70/30 gives me a chance to go back and fix something I am not happy with.
When I use gum paste, I have to work very fast because the pieces start drying quickly and if I make a mistake, I cannot go back and fix it easily. Also, the fast drying time can lead to cracking and breaking of pieces while I am trying to assemble the shoe.
I don’t like using only fondant because it takes very long for the shoes to dry…about a week or more. I am too impatient to wait that long…lol. Also, since fondant, especially marshmallow fondant (which is what I use) is softer than gum paste or 50/50, it’s very hard for the pieces to hold their shape. They start bending and rolling, making it very difficult to assemble these shoes.
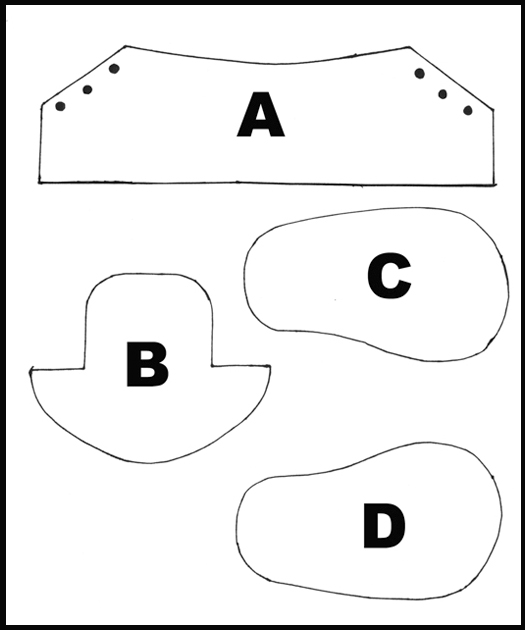
Step 1:
Print this image with the shoe template. It’s good to print them on thick scrapbook paper.
Use scissors to cut out the relevant shapes
NOTE: Before you print this template, you can resize the image in Photoshop and make it bigger or smaller depending on how big or small you want your final shoes to be.
Step 2:
Roll out dark green 50/50.
Place your templates on the 50/50 and use a fondant cutter or pastry cutter to cut out all the relevant shapes.

Step 3:
Use the quilting tool to create stitch marks on Piece A.
Make the stitch marks the same way I did, as seen in this picture.

Step 4:
Use tip#3 to cut out three little circles around either side of Piece A.
Jiggle the tip around the hole to make it a little bigger.
Keep this piece aside and move on to the next step.

Step 5:
Place Piece C on a sheet of wax paper. I highly recommend making this entire shoe on a sheet of wax paper because it prevents it from sticking to your table or work surface. You can peel it off once your shoe is dry.
Brush some corn syrup halfway around the top edges, as shown in this picture.

Step 6:
Stick Piece B on top of your corn syrup.
Fill the hollow space with cotton balls so that this piece holds its shape.

Step 7:
Now, brush some corn syrup around the remaining edge of Piece C.

Step 8:
Stick Piece A on top of your corn syrup.

Step 9:
Brush some more corn syrup along the sides of Piece A so that it sticks to Piece B.

Step 10:
Use your fingers to smooth out the joint where Piece A is glued to Piece B.

Step 11:
All this pressing and sticking of pieces makes the base of this shoe spread a little.
To fix this problem, use a fondant cutter to cut out any excess fondant near the back of the shoe.

Step 12:
Fill the hollow space inside the shoe with cotton balls or a small shot glass.
If you use a shot glass, rub a little shortening on the bottom so that it doesn’t get stuck to your shoe.

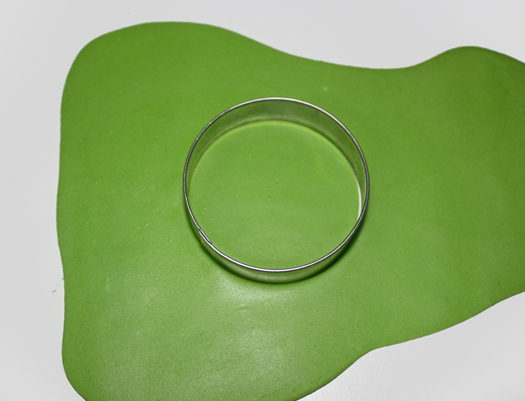
Step 13:
Roll out light green fondant
Use a large circle cutter to cut out a circle shape.
Step 14:
Roll out this circle piece a little more. It won’t look like a circle any more but that’s ok.

Step 15:
Use a knife to cut this circular piece in half.

Step 16:
Brush some corn syrup on the front of your shoe and place this light green piece until it sticks into place.
Smooth it out with your fingers and cut out excess fondant by using a fondant cutter.

Step 17:
Once your excess fondant is cut out, the front of your shoe should be smooth just like the shoe in this picture.
Use the quilting tool to create stitch marks of top of the light green piece. I like to make double stitch marks. So, I go over the area twice.

Step 18:
Now, cut out a long strip of light green fondant.
This strip would go around the base of your shoe. So, make it a little longer than your actual shoe.
Press your toothpick all over the strip until you have these indentations.

Step 19:
Brush corn syrup around the base of your shoe and stick the green strip.
You will have excess near the back.

Step 20:
Cut out the excess strip with scissors and smooth out the joint with your fingers.

Step 21:
Most sneakers have a small loop near the back.
To make this loop, cut out a small light green strip of 50/50.
Bend it and then press the bottom when the two ends meet until they stick into place.

Step 22:
Stick this little loop near the back of your shoe using very little corn syrup.

Step 23:
To make laces, use a clay extruder with a rectangular plate.
Push out strips of light green 50/50.
Cut the strips according to the length between the two holes on your shoe.
Use your fingers to roll the ends of each piece of lace until it’s a little “pointy.”

Step 24:
Brush some corn syrup in the holes.
Then use a toothpick to push the laces into the holes. They don’t have to go all the way in but it should still look like the lace is inside the hole.

Step 25:
You can make your laces tied up in a bow but I decided to leave my final laces hanging freely from the shoe.
To do this, brush some corn syrup in the holes.
Use your clay extruder to make 2 long strips and push each strip into the final hole and then let them just hang from the sides of the shoe.

Your left shoe is ready. Allow it to dry for 48 hours.
Repeat these steps for the right shoe now.

Here are some more details of this cake:
– The shoes are resting on top of an 8×3 round chocolate cake.
– The cake is covered in buttercream icing and yellow marshmallow fondant.
– I also cut out little green fondant circles and stuck them randomly all over the cake to create a polka dot effect.
– The border around the base of the cake is made by twisting 2 ropes of green fondant. I used gum paste glue to stick it in place.
I hope you found this tutorial helpful 🙂
Happy caking!
Abeer
I know the template can be printed and sized accordingly, but please share the measurements you used. How longs the sole and the other two pieces?
thanks a lot, you’re amazingly gifted.
Thank you too for reading, Daniel! I am blessed with incredible and talented readers!
Nice
wow! this is perfect, i can now do my baby shoe without stress. thanks
What sort of camera is that? That is certainly a decent premium quality.
Lovely instructions nd templates. .. just made dem… turned out perfect
thank you!
lovely work
I just made these shoes,your instructions are great!!
Fantastic thank you for sharing this. X
Hello! Thank you very much for this post. I made a pink version of this pair of cute sneakers as cake topper for my goddaughter’s baptismal cake. Was not completely successful though because i can’t put one on top of the other like you did, or else the shoe might fall apart. 🙂
Thankyou! Excellent, clear to follow tutorial! Extra thanks for the template 🙂
Oh my,you are incredibly talented!beautiful!
Wow! Thank you so much for sharing the template. 🙂 I might be able to use it. 🙂
GRACIAS POR EL PASO A PASO ES MUY UTIL, GRACIAS.
Thanks you so much for sharing.Cant wait to try it out for my sister’s baby naming ceremony.
woow that’s great.. thanks alot.. i tried doing it once and it was not so good 🙁 ur tutorials seem easy i think i’ll give it a 2nd shot thanks again 😀
Reem
I made these and they came out beautifull – thx so much, just love your tutorials.
thank you for your time and patience posting this tutoral.i am a stay at home mom with 3 beuatiful children ages 5mths to 11yrs old,and have a passion for baking and cake decorating,so coming across this tutoral gives me the confidence to lean and do something i have not done before.good luck and God bless with all your future endeavours!!
Precioso y lo más importante, es que nos enseña hacer las cosas con materiales que tenemos a mano habitualmente. Un abrazo.
Maravilloso, muchisimas gracias por este tutorial me a quedado mas q claro como armarlo eres genial.
Saludos
incredible tutorial, many thanks
Hi Abeer
Thank you for this great tutorial. It’s incredibly detailed and I can’t wait to give it a go.
Thanks a million
Regula
This is lovely! I’ve been looking foward to a tutorial like this. You’ve done a good job.
Great tutorial louise, so cute, thank you
I can’t take credit for these sweet baby shoes. It’s Abeers work 🙂
Wow That’s so cute & Thanks especially for the templates 😉 They’ll be very useful to us
wow,you gave a great tutorial.going to make those for sure, thanks
This is fantastic. I have a few baby shower cakes to make and this will be perfect to try. Thank you for a great tutorial.
These are gorgeous!!! Thank you sooooo much!!!!
Ur tutorials are so perfect…I have bin an ardent follower of ur blog…u have been an inspiration to me…Am Henrietta from Nigeria
Hello
Just what I was looking for to make as a cake topper for a baby shower. These are soooo cute and you can custom them as to the gender of the baby and make all kinds of embellishments as you want to. Thanks so much for your creations and hard work and sharing them with us newbies to cake decorations.
Keep up the good work!