As a follow up to the questions about the ribbon bow that was on my Valentine’s cake. Have I made a tutorial on how to make a ribbon bow for your cake. Remember to prepare your cake for the ribbon, by getting a nice and straight crumb coat -before the fondant cover. A side scraper is a great tool to use for that.
This is what I use:
Ribbon
Measuring tape
Scissors
Piping gel
Small brush
Double sided tape
And of course a cake.
Step 1:
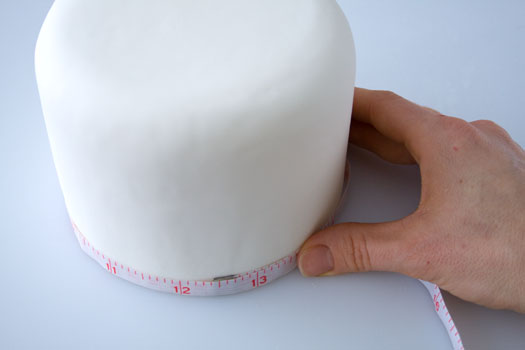
Measure around the cake and add 1/2″ extra, so that the ribbon can overlap. Cut the lenght of ribbon that you will be needing.
Step 2:
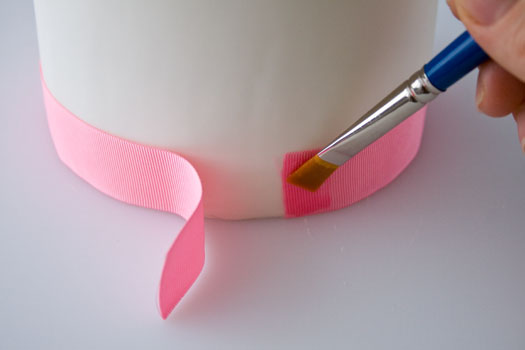
Brush a thin coat of piping gel around the base of the cake. Let the piping gel dry until just slightly tacky.
Step 3:
Add the ribbon around the cake and make sure that it is all smooth. Brush a little piping gel on one of the ribbon ends and “close” by overlapping.
Note: I prefere to have the overlap at the “back” of the cake.
Step 4:
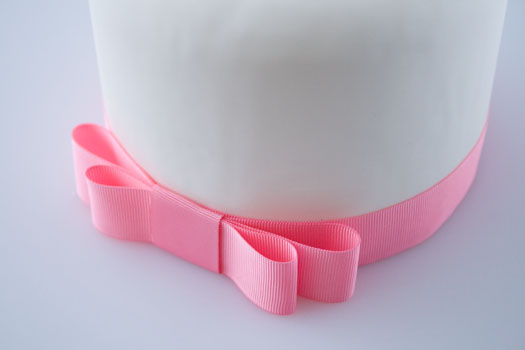
Find out how big you want the bow loops to be and cut a piece of ribbon in the desired lenght. Place a small piece of double sided tape in the center and fold in the ribbons.
Step 5:
Add another piece of double sided tape in the center of the bow. Cut a small piece of ribbon just long enough to go around the middle of the bow. Fold in the ends nicely.
Step 6:
Fasten the ribbon bow at the front of the cake with a small piece of double sided tape and you’re done.
Step 7:
If you want to make a double bow. Just cut an extra piece of ribbon at step 4 Make sure that it is a little longer than the first piece of ribbon.
Happy Caking!
Louise


Did this tonight and it turned out great. Super easy. Thanks.
wow, nice and easy bow. thanks for sharing. I will do it on my gift.
Great Tutorial!
This will come in very handy when I’m making & decorating my wedding cake 🙂 xx
Thanks for the great tut! You have a good blog that I enjoy! Please keep up the good work. BC, Canada
i love your page!!! everything it’s so amazing…. thanks for your tips!!!
Joelma: Well that really depend on what I need to make. Most of the time I use a ready made rolled fondant, simply because it is a time saver. But now and then I also make MMF and gum paste.
Oh this is great to know -thanks!
Dear Louise, congratulations for your fantastic work! Thank you for sharing it with us. My question for you is: do you use homemade rolled fondant or redy made, if yes, wich branch? thank you once more, warm regards from Dubai, Joelma
Deepika: I only use clear piping gel. I brush a thin coat and let it dry until slightly sticky.
Rossanal: A crumb coat tutorial is added to my list.
Cat: I dont think so. Then it would have to be a fondant bow?
Tammy: Like I wrote Cat, I dont think that you can do this with bc. But you can use this tutorial and make the bow only using fondant instead.
tamara nankivel: Ohh sorry, no this is a fondant cake, not bc. I the tutorial I just wrote about how important it is that the crumb coat is very smooth and straight, before covering the cake with fondant and then the ribbon bow.
Heidi: Piping gel is a clear sticky gel that you can pipe with onto cakes, or use it to make rain drops, water ect. it can be colored with food colors and oposit real water this will not soften the fondant like water would do.
Hi I just want to say that your blog is my favorite baking/cake decorating blog! I am learning so much from you. You have great content and your cakes are beautiful. Thank you for this tutorial. I love your work!
AHHHdorable!! thanks for sharing the ribbon tip! 🙂
Thank you for this tutorial! very easy to follow. 🙂
Lovely.. Thank you for the tips.. ^_^
Hi Louise,
Thank You so much for this tutorial. Wow I like all your tutorials and once again thank you for teaching and sharing your knowledge.
cherylann
What is piping gel? I have never seen/heard of it before? Thanks for the great tut.!
Hi Louse!
Once again, a fantastic tutorial and idea! You always make it all look so easy (wish it really was!)
regards, Jill, Cape Town
wow, here I thought the bow and cake were fondant!!! that is the smoothest BC I have ever seen..and girl I’ve seen lots, did you say it was IMBC??
HI LOUISE,THANKYOU FOR YOUR TUTORIALS..I GET VERY EXCITED WHEN I SEE THEM POP UP IN MY INBOX.
YOUR WORK IS FANTASTIC..
Thanks Louise!
Sorry, forgot to put the 🙂 😉 (otherwise it looks like I am just envious!) (well, maybe just a little bit…;-) )
🙂
Ciao
Alessandra
You make everything look so simple,,,and tidy!!!
Hi Louise, this ribbon is easy , delicate and very elegant yhanks so much for the send
Hi Louise! I must tell you that each time I receive your email updates it makes me happy inside!! I truly enjoy looking at your beautiful creations and learning about your techniques. Thanks so much for sharing your talent. This ribbon bow adds a very delicate and elegant touch to the cake. I’m so excited I now know how to make it! 😀
Can this technique (using the piping gel) also be used on buttercream? Thanks again.
Tammy
Thanks SO much for the piping gel trick! I’ve always fought with ribbon “sagging” when going around the layers!!! Louise, you are amazing! Thank you so much for sharing your great tips!
thank u for make thing look easier 🙂
Thank you so much for your tutorial ,it sure helps alot
Luisa
Is there successful way to put a ribbon on to buttercream so it doesn’t absorb the oils from the butter?
Thanks Louise for this great tutorial. I was wondering also if you are planning to make a tutorial about covering cakes with buttercream. I would like to know how you get a perfect surface on the cake before applying fondant. Regards from Canada!
Cute ~ love the way you have it on a small cake vs a large one. Looks more delicate.
This is awesome – thanks Louise however i’ve noticed that when I do add a ribbon on a cake I can usually see the wet patches come through – what’s the best way to avoid that?thanks I’m defi going to try and make this ribbon. Thanks for ur tutorial! Dee x
Thanks Louise,
I am usually very creative for these things, but to be honest this idea has never crossed my mind. I love it and it looks very beautiful.
Thanks for the step by step, it is very clear!
Have a wonderful and blessed day!
Thanks for this great tutorial..and ALL of the others!
I have learned as much from you & this wonderful website as I did 6 mos of baking school!
All the Best~ Kimberly
Thanks Louise for your wonderful tips. They are so appreciated!
Domestic sugar: I mostly use it as a glue for ribbons and before covering cake dummies. Piping gel is also good if you want to make a color flow with gel instead of royal icing. Many also use it to look like water. It can be colored too.
Stephanie: of course you can hide the overlap with the bow. I just like it to do it the other way 😉
Steph: I will eventually share more recipes and so.
Hi Louise, I think your website and everything that you do is amazing! Do you have any cake recipes that you are willing to share ? I never quite know what type of cake is best for which icing.
dear louise, thank you for the tutorials, and by the way, love your valentine cake roses….and the turtle step by the step, the turtle….sooo cute….
Wow! Way easier than I would have ever imagined.
I think you could hide the ribbon overlap by placing the bow directly on top- have you tried this?
Great post! But a question? What is a good store online to purchase piping gel? And what are some other uses for it?
Thank you for the tutorial.