
One of my favorite things about Spring is seeing flowers bloom. Maybe it has something to do with my background in Botany but I find all the colors and intricate details of flowers fascinating! Pansies are one of my favorite flowers. They are so colorful and pretty 🙂
I will show you how to make gumpaste pansies today. My technique is very simple with no fancy cutters or expensive tools.
This is what I used:
Yellow gum paste
Dark purple gum paste
Light purple gum paste
Black edible marker with a fine tip
Blue or purple petal dust
Paintbrush
Gum paste glue or corn syrup
Foam mat
Balling fondant tool to thin out each petal
Leaf veiner (I ordered a set of these from Ebay for very cheap)
Flower forming cups (I used Wilton’s large size)
Rolling pin
Medium heart cutter from the Wilton heart cutter set
Medium oval cutter from the Wilton oval cutter set
Powdered sugar to dust your work area
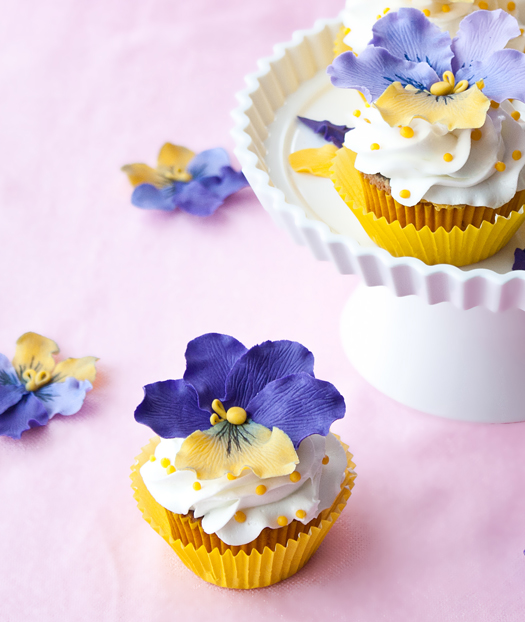
Note: My tutorial will show you how to make a yellow pansy with shades of blue, using petal dust. However, you can also use purple and yellow gum paste petals to make your pansies. If you look at my pictures closely, you will see a variety of pansies. Some are just yellow with blue petal dust…some are yellow and dark purple….some are yellow and light purple. That’s the beauty of pansies… They are found in so many vibrant colors!
Step 1:
Roll out yellow gum paste. Use the heart cutter to cut out 1 heart shape. Use the oval cutter to cut out 4 oval shapes.

Step 2:
Transfer these shapes onto a foam mat. Press the leaf veiner onto the oval shapes until you can see a leaf pattern.

Step 3:
Press the leaf veiner onto the heart shape until you can see a leaf pattern.

Step 4:
Use the balling tool to thin out the outer edges of each oval. It gives it a slightly ruffled look which I love in petals.

Step 5:
Use the balling tool again to thin out the outer edges of the heart.

Step 6:
Brush some petal dust on 2 ovals and 1 heart shape. Only brush the centers on the petal. Don’t brush the whole petal. Leave the remaining 2 oval shapes as is.

Step 7:
Use your black edible marker to draw lines on the pieces that were dusted with petal dust. Only draw lines near the center of each petal. They should not extend over the entire petal.

Step 8:
Arrange the petals the same way I did, as shown in this picture.
Then, brush very little gum paste glue or corn syrup behind each petal until all the petals stick together.

Step 9:
Make a small ball out of yellow gum paste and press it into the center of your pansy, using gum paste glue or corn syrup. Also, make 2 little yellow loops out of gum paste and stick those in the center, using gum paste glue or corn syrup. I find it easier to stick the loops first and then add the yellow ball in the center.

Let these flowers dry overnight in flower forming cups (lightly coated with shortening). And you are done!

You can use these pansies as cupcake toppers like I did or you can use them to decorate cakes.
Happy caking!
Abeer
Thank you, i get it, I’m in England and we don’t use the word ‘shortening’ very often 🙂
I’m making them for my Nana’s 80th birthday party, will they keep OK for a few days in a sealed food bag?
@ Roxana…Lol ok.
And yes, these should be fine in a bag. I like to place them in a box with a lid coz they are less likely to break rather than putting them in a bag. These can last months. I have had some for 3 months now and they are still fine 🙂
AMAZING CREATIONS
Hello. I have just found your website and i love it. I’m new to cake decorating and your tutorials make things so much easier even though they are very impressive! I just have a question to ask about the gum paste pansies, you say to leave them over night, ‘lightly coated in shortening’ what do you mean by this?
Thank you
Roxy x
Hey Roxana,
I am glad to hear you are enjoying CakeJournal.
When I wrote: “Let these flowers dry overnight in flower forming cups (lightly coated with shortening)”……i meant that once you assemble your flower, you place it on a flower forming cup. However, that flower forming cup should be rubbed with little shortening to prevent the flower from stickig to this cup.
I hope this clarifies the issue 🙂
Abeer you made it like that very easy, great tutorial.
Thumbs Up for your creation! I want to try to make these one day 🙂
These are beautiful – I thought they were real when I first saw them. Absolutely gorgeous.
You r very good teacher these look lovely very easy to follow look forward to some more thank you
Wow! You must have such a steady hand – I’m in awe. I can manage some fairly passable sugar paste roses but these pansies are in a different league. Thank you for the tutorial.
beautiful!! great tutorial, thanks abeer! ^__^
Wow! Ingenious! They look absolutely lifelike. Don’t you feel guilty about eating them? 🙂
Wow, I just love this tutorial! Such a beautiful flower & such a lovely result. 😀
These are beautiful Abeer. And you make it look easy. I’ll have to try them soon!
Looking forward to trying these. You make it seem easy. Thank you!