
This adorable igloo cake is a sweet and sugary, winter wonderland dessert. Chocolate mosaic tiles make this project a cinch and take the guesswork out of making time consuming icing bricks. Sugar cone trees add some flair and help complete the snow covered look.
YOU WILL NEED:
1/2 Ball Cake
6″ Round Cake Layer
1 Donut
Buttercream Tinted Light Blue
White Buttercream
14 oz. Bag of White Candy Coating
Opal Sanding Sugar
Craft Knife
Sugar Cones
Aqua Twine
White Glitter Tape
Sucker Sticks
STEP 1: ICE THE CAKE
Place the cake on a cake stand or display board with icing in between the layers and off set slightly to the side to create room for the trees. Cut 1/3 off of the bottom of the donut and trim the back to create a flat surface. Attach to the front of the cake with some buttercream.

Coat the cake in a layer of icing. Try to keep it fairly smooth, but it doesn’t have to be perfect.

When you’re finished, it should look like this.

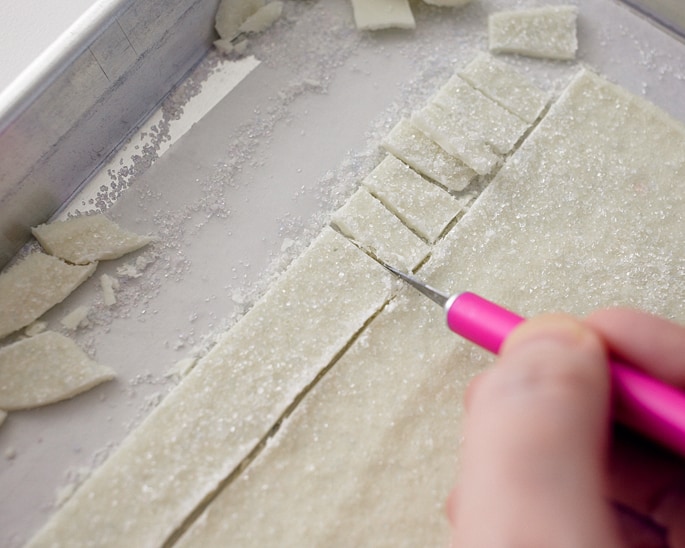
STEP 2: CREATE CHOCOLATE BRICKS AND FLAG BUNTING
Place the white candy coating in the microwave and heat on half power, stirring frequently, until just melted (do not overheat). Spread the melted coating on a 1/2 sheet tray covered with parchment, covering the entire tray.

Quickly sprinkle the coating in a layer of sanding sugar. Place the tray in the fridge for 10 minutes or so until the coating is firm.

After 10 minutes, remove the tray from the fridge and let it sit out for 10 more minutes to come back to room temperature (this will make cutting the bricks easier). Use a craft knife to cut small rectangles and place them on the front of the igloo door.

Next, break pieces of candy coating into smaller pieces and apply them to the sides of the igloo in a mosaic style, covering the remainder of the cake.


Create the mini bunting flags by tying twine between two sucker sticks. The string should be approximately 7″ long. Next, cut 2″ pieces of white glitter tape and fold them over the twine with spacing in between. Use scissors to trim each piece into a triangle.


STEP 3: FINISH WITH ACCENTS
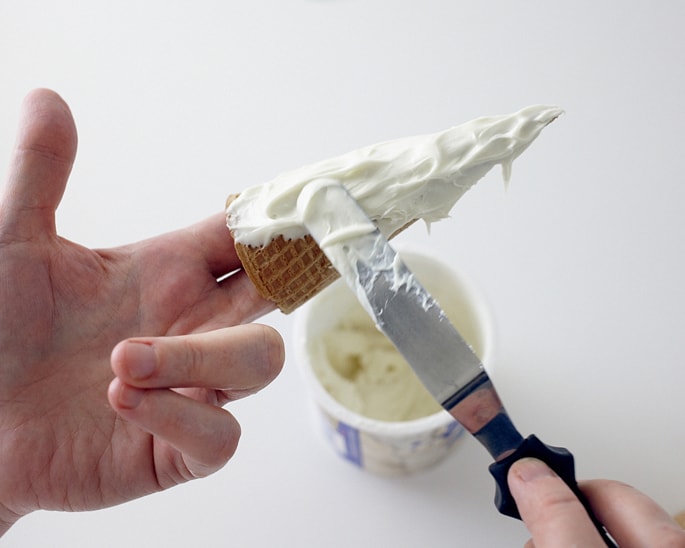
Break off 1/3 of the bottom of one sugar cone to create a shorter tree and then leave one cone in tact. Place a sugar cone on two fingers and coat roughly with the other hand in white buttercream. Sprinkle with sanding sugar and place on the cake, using more buttercream to adhere if necessary.
Smear white buttercream around the base of the cake and trees, and sprinkle with more sanding sugar to finish.

Place the bunting in the cake to finish.

I really want to make this cake but it needs to be a bigger size maybe a 10-12”. Any suggestions?
Thx!
Great tutorial ladies!!
What a wonderfull and beautifull cake! I really love what you did with the mozaïek. On the pictures it looks real easy, but it’s a lot of work involved i guess! It ‘s a real piece of art. Very well done! 😉