
My daughter asked for a Monster High-themed birthday party this year. Right away, I knew that I wanted to make “skullette” cupcake toppers. I considered making them as chocolate transfers or fondant puzzles. Then, as I often do lately, I decided to find a quicker method. I searched online to see if a custom cookie cutter existed and….yippee it does!

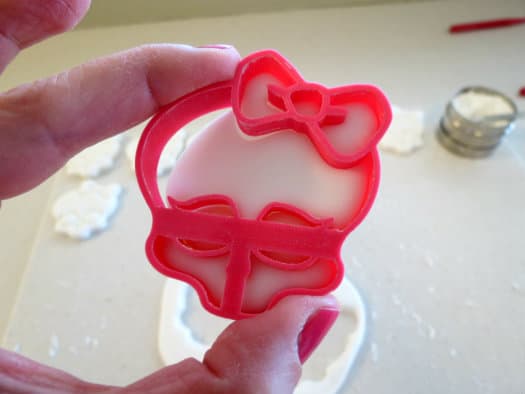
There were several versions available, but I chose this one because it allowed me to choose my size and color. This allowed me to get the perfect size for cupcake toppers: 2.5 inches. And I chose pink as the color of my cutter.

This is what I used:
Work surface
White fondant
Skullette Cookie Cutter (2.5 inch size)
Rolling pin
Corn starch
Gel colors in black and pink
Small clean paint brushes
Cap ful of vodka (not pictured)
Toothpick (not pictured)

Step 1:
Dust the work surface with corn starch and roll out the fondant to around .25 inches thick.

Step 2:
If you unsure about the thickness, set the cutter next to the rolled out fondant and get eye level with it to better measure the thickness. You don’t want the fondant so thick that it comes out the top of the cutter.

Step 3:
Place your cutter on the fondant and press it down firmly with your palm. Give it a wiggle to help it cleanly cut through to the work surface. (Tip: be careful the attached details of the cutter are fragile. Don’t push too hard!)

Step 4:
When you lift out the cutter, the back edge may need a little cleaning up. Run a toothpick along the back edge of the cutter to clean off any excess fondant.
Step 5:
Use the smooth part of your thumb to release one section of the skullette.

Step 6:
Then gently pull all the way around the shape to remove it.

Step 7:
If it became misshapen at all, gently press around the sides to fix the shape of the skullette.

Step 8:
It took me around an hour to cut out 24 skullettes. Now place them on a parchment-lined cookie sheet to dry overnight.

Step 9:
After the cutouts have hardened over night, prepare to paint them. You will need the gel colors, brushes and vodka.

Step 10:
Place several drops of gel color in a small dish along with a few drops of vodka to thin the color. Stir well until you have a good consistency for painting. You do not want it thin enough to drip off your brush.

Step 11:
The cutouts are convenient to paint because you can follow the details that were marked by the cookie cutter. I found the hardest part to be the tiny nose. If you have trouble painting it with a brush, you could use a fine tip edible marker.

Step 12:
Paint the black eye and nose details and then finish each topper by painting the pink bow. I painted around the top edge of the bow as well in case the edges are visible later on display.

Step 13:
I found it easier to go slow and paint neatly than to clean any mistakes off the white fondant. If you do make a mistake, use a Q-tip dipped in vodka to remove it. You may need several Q-tips to fully remove it)

Step 14:
Once I got the hang of it, it took around 2 minutes to paint each skullette. So this project took two short work sessions to make 24 cupcake toppers.

I was pleased with the clean lines and saturated colors that I achieved with this method! And to my surprise, the painted areas were nice and shiny after drying. I can’t wait to use them at my daughter’s party.
Happy Caking!
Renée
what website did you order the cookie cutter please . I would like to order one just line it
Super cute! Thanks for the post. What gel colors did you use? I’d like to achieve a good result like you did and mostly wondering about the pink. Thanks!
I used the neon pink from the Duff brand neon gel colors.
Hi! Love this tutorial! Where did you get the cookie cutter? The link you have posted doesn’t work for me. Thanks.
If you “Google” Skullette cookie cutters, you should find the one I used being sold on Etsy. Good luck 🙂
These are so cute. I love playing with fondant. I found your blog on StumbleUpon & I’m a new follower. Happy Mother’s Day!
Very cute! Looks great.