
This edition of #FondantFriday includes a Cupcake Fairy cake for Dot Klerck’s daughter Hope’s birthday party. Make sure that you share and tweet about the cake if you like it using #FondantFriday @cakejournal
Company Name: Eat Cake Party
Website: https://www.eatcakeparty.co.za
Location: Wellington, Western Cape, South Africa
Featured Cake: Cupcake Fairy Cake
Cake Artist: Dot Klerck started making cakes for her 4 Kids about 14 years ago then started in business 5 years ago. She studied sculpture and design and used these skills to both design and construct his cakes. Because Dot is self taught it took a while before her skill level caught up with his cake imagination! Dot hopes both his skill and imagination will grow as she strives to push the limits with cake and sugar art.
About the Cake:
When my youngest daughter didn’t quite know what she wanted for her party cake this year except for lots of cupcakes, I thought: what better than to have the cupcake fairy herself come and deliver!!
She’s rather a simple cake to make except for the arm holding the cupcake plate. She is supported with 6mm thread rod that goes from her toe to her head. Then a piece of 6mm thread rod is welded onto the upright rod to make the shoulders( forming a ‘t). Then a nylock nut was glued onto a piece of thread rod( to make the arm- slightly bent) and screwed onto the shoulder to form the arm. The nylock nut holds the arm at the right angle. All of this part of the cake is intrusted to my wonderful engineering hubby! Now it’s my turn!
The skirt is all cake and rests on a board held in place by a nut and metal washer. Once the cake is filled and carved, it can be ganached and placed on the metal thread rod. I modeled her body and covered it with an embossed piece of fondant to give it the look of fabric. I covered her skirt in two pieces, front and back and gathered it at the top to make it puffy and at the bottom also.
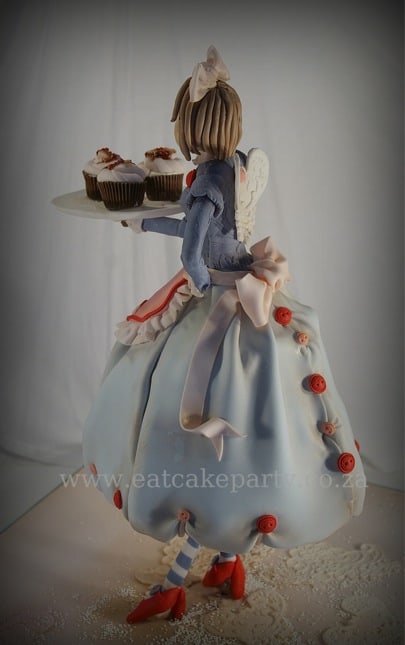
I added her apron and tie detail. For the arm holding the plate I embossed the fondant using a little cmc powder to keep the fondant stiff. The arm on the other side is done with a wire support inside. I added the hands on last. The plate was made by using my daughters’ play tea set. I rolled a thin piece of fondant over a mini plate and then using a sharp knife cut the plate round. This is left to dry out completely. I finished the shoulders off with a puffy sleeve and once I’d added her head and neck, completed her dress with a collar. Her hair is rolled by hand and I added a bow.
Her striped stockings are made by cutting thin stripes of blue and rolling them onto a thin piece of white fondant. They wrap around the 6mm thread rod- joining at the back. The additional leg is attached with some thin florist wire.
Her shoes are made by rolling a ball of red fondant into a smooth ball and then slowly rolling one end into a point. I pressed a hole to make the back part of the shoe and placed it on each leg, adding heels too. Adding a strap and button detail completes the whole look! The button details are made by using a daisy center. I roll different size balls of fondant and then ‘squash’ them using the daisy centers. Then I use a tooth pick to make the button holes.
The cupcakes are made by painting chocolate onto baby cupcake cases. About 4 layers are done allowing each layer to dry before applying the next. Once dry, I melted a few marshmallows and piped that into the chocolate cases to look like icing. A few sprinkles or strawberry jam to finish them off.
Once all that is done, there’s only one more thing to do!
Using one of my lace molds, I made a pair of wings to make this fairy fly!
Now I really hope that this cupcake fairy finds a place at another little girl’s party soon!
Leave a Reply