When it comes to baking a cake or a basket of muffins, you always need to impress someone dear to you. Decorating is the key to amazing someone when a cake is involved. The first impression really matters here. If your window shops the bakeries downtown, you would never believe it possible for you to create something that impressive. Believe me, I didn’t! Until I actually did it using edible icing sheets!

What You Need to Decorate a Cake with Icing Sheets
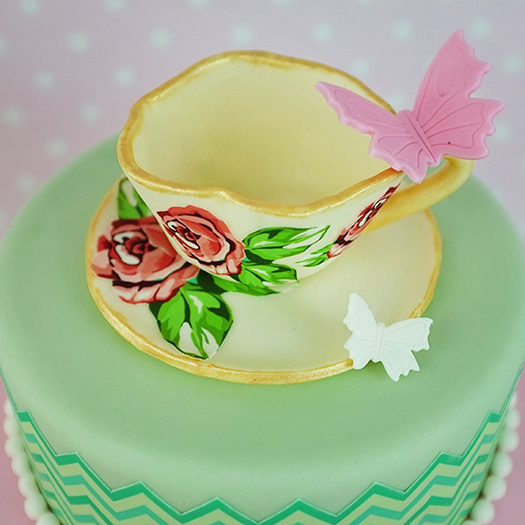
See the vibrant designs on this cake? I create it using edible icing sheets – a highly effective and easy decorative technique. Edible icing sheets are printed designs that can be applied to cakes, cookies, cupcakes, and other desserts. Believe it or not, the sheets are an actual layer of icing that bonds with buttercream, ganache, royal icing, and fondant. Moreover, you can purchase the sheets pre-printed or customized with your own design or photo.

Tools and Essentials for Decorating Your Cake With Edible Icing Sheets:
- Edible icing sheets (I provided the printer with the designs);
- Gum paste glue (made with gum paste and a little boiling water);
- Small paintbrush;
- Small sharp scissors;
- Paper punches;
- Paper Guillotine or Exacto knife and ruler;
- A cake iced with fondant;
- A gum paste teacup and saucer;
- Other gum paste decorations to finish.
From Where Can You Purchase Icing Sheets?
Since I live in Singapore, I had my designs printed by CuppyCakes, a local business that I really love. They also told me that icing sheets have a shelf life of approximately one year. So, the parts I won’t use on this cake will become handy decorations for my future sweets.
Do not worry, though! Wherever you are, you can always contact Icing Images, they offer you everything you need for creating your own edible design. They also offer a custom service. You can contact them via mail, phone, or chat, and they can also offer you support and tutorials.
Creating the Designs for the Edible Icing Sheets
First of all, I searched Etsy for ‘Floral’ and ‘Chevron Digital Paper’ and came across a shop called Digital Potpourri. Imagine my surprise when I found out that they were selling exactly what I had in mind.
Once I received the designs via email, I laid them out (repeated the design) to fill A4 paper size (this is the size of the sheets my printer uses). I also used Photoshop to put my design together, but you can use any graphics program or even Word. After that, I combined some designs on one page to save on printing costs.
Keep in mind that it is important to have a fair idea about your cake design before ordering the prints. You need to make sure you ordered enough edible icing sheets in order to cover the circumference of your cake. Also, make sure your designs (such as the roses) are sized correctly for your project. It is always a good idea to print out your design on paper at home to see what it looks like before you send it off to have printed on icing sheets. One can never be too prepared!
This was the design in the shop.

This is what they look like printed on the icing sheets.

How to Apply the Icing Sheets on a Cake?
Step 1: Start with a cake, smoothly iced with fondant.

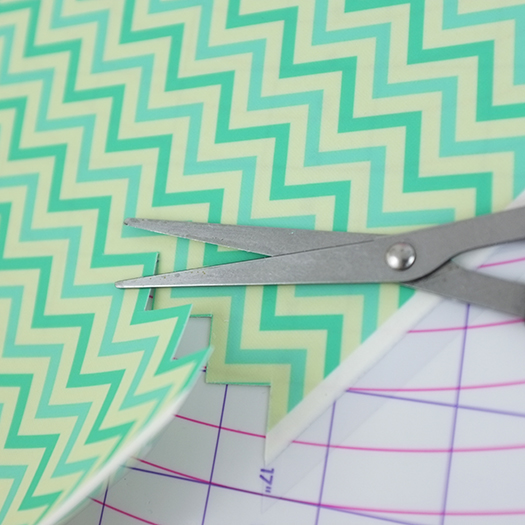
Step 2: Using a sharp pair of small scissors, cut the design out. It is easier if you first peel away the plastic backing and then cut.
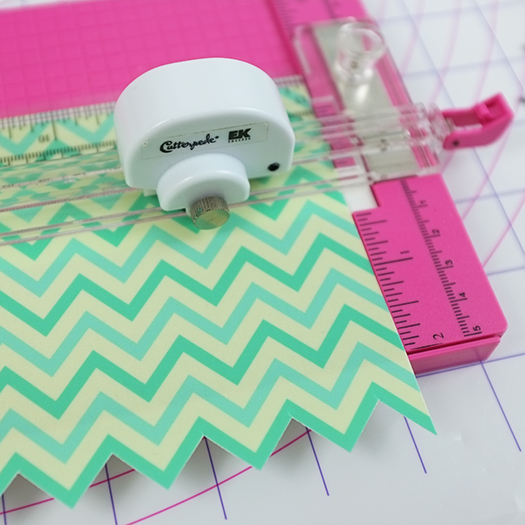
Step 3: In order to cut straight edges, you should use a guillotine or exacto knife and ruler. Scissors will also do the job.
Step 4: Apply a thin layer of glue to the entire back of the icing sheet. This step is not required if your cake is iced with soft icing such as buttercream, which is adequately adhesive.

Step 5: Apply the icing sheet to the fondant, using your fingers to gently press the sheets in place.

Step 6: For continuity make sure you cut the pattern in a way that it all matches up, as shown below.

Applying a Bunting Pattern from Edible Icing Sheets
Step 1: Make a template for the curved shape of the bunting. I used the lid of a container, sliced in half. I simply pressed the edge into the fondant.


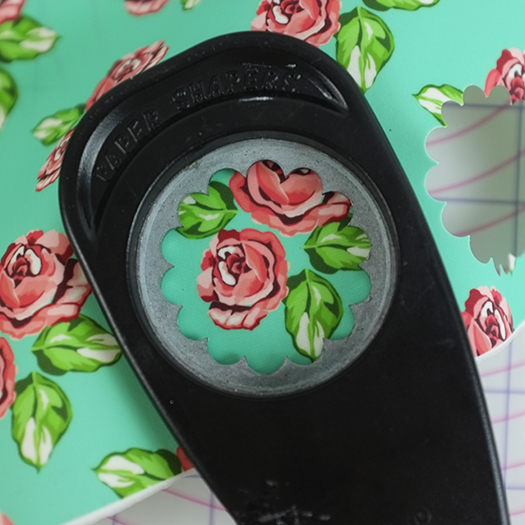
Step 2: Triangles can be neatly cut out using a paper punch. Alternatively use scissors or an exacto knife.

Step 3: As shown above, apply glue to the back of the icing sheets (triangles) and glue it into place.

Applying the Edible Roses
Simply cut out the rose shape and apply it on the surface with glue as above. Use your fingers to press and hold it into place.
This tea cup was made using gum paste and painted with gold luster dust mixed with a little alcohol (tutorial to come later).
How to Apply the Edible Icing Sheet to Cupcake Toppers?
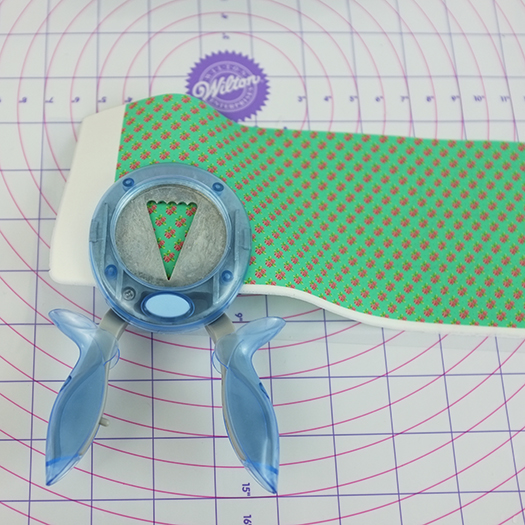
Cut icing sheets using a scallop or round punch. Apply cut-outs to the fondant cupcake topper in the same way as shown above. You may choose to apply the designs directly to the cupcakes (without a topper), however, make sure the surface is flat.

Final Thoughts
When it comes to your birthday cake or to a basket filled with cupcakes for your loved ones, you should let your spirit and instinct guide you. Your creativity and inspiration are your loyal friends when designing a cake.
Edible icing sheets are always a good idea because they are so easy to use, and the final result is just amazing. It’s so funny because my friends always pity me for “all the hard work and the time” invested in the creation of such a good-looking cake. Although, they do not know how easy and fun it actually is.
Finally, I want to remember that you can find a lot of tips and tricks on the Cake Journal blog. So, do not hesitate to give the blog a quick search before starting a new sweet project.
Happy Caking!
Wynona
Merely wanna say that this is handy, Thanks for taking your time to
write this.
Saved as a favorite, I really like your site!
The way you decorate these cakes with edible sheets is absolutely stunning! Loved all the design. I also do cake decoration as a hobby and found some good edible image supplies on Icinginks that helped me. Just like all the articles on this website, this one is equally lovely too.
can I use normal icing sugar with a cake topper ????
I seriously love your website.. Very nice colors & theme.
Did you develop this website yourself? Please reply back as I’m wanting to create my own website and want to
know where you got this from or what the theme is
called. Appreciate it!
Simply desire too say your article is as astonishing. The clarity in your publish
is just excellent and that i ccan shppose you are
a professional on this subject. Fine along with your perission let me to grab your
feed to stay up to date with impending post.
Thanks a million and please continue the enjoyable work.
I am very keen to try a tartan pattern on edible frosting sheets. Do you have to have a special printer or use special ink when printing the edible sheets?
Hi! This cake is beautiful. What is the size of you cake layers? I’m trying to figure out how many bunting flags i will need so I can order my custom icing sheet. I am using a 9 inch cake pan and i have the same paper punch you used. Thanks so much!
Hi Zain,
The paper cuts relatively smoothly if you use a very sharp knife, but not like fondant. A little bit more rigid. The texture is somewhat dry, not very sweet. I think it also depends on the manufacturer. I would say that is is more for decorative purposes than for taste to be honest. Most people would peel off the fondant and just eat the cake….hope this answers your question?
An awesome tutorial but can I ask that when cutting the cake does the edible paper cut smoothly and does it have a chewy texture as I’m baking for a party many thanks x
Where can I buy these edible icing sheets? It’s like presto-magic, ta da, decorated cake! You could really use you imagination like you have shown here. Great tutorial. Thanks, Lyn.
Hi curso fondant – the icing sheet is quite flexible. One you apply the glue at the back, it makes it softer and you can just press and hold it down a few seconds. It should adhere quite easily.
What about the flowers cup? How do you make it take the same shape without spaces?
Thanks again for another wonderful tutorial! This is such a great idea…
Kindest Regards,
Lori
Lovely idea and very quick and useful too! Kind regards, Juniper Cakery
This is simply lovely. looking forward to the teacup tutorial.Thanks so much.
Hi! Thanks so much for the lovely comments!
Angela – I had dealings with http://www.photofrost.com in the past and they were very helpful! I recall a few different printers but Canon make an A3 size printer. You could then print big sheets for larger cakes. Perhaps contact them for more info?
Marilyn – Sorry I have not used the Wilton sheets before. The backing a on the ones I have printed are very easy to peel.
I learned so much in this tutorial! What a beautiful cake!
That tea cup is amazing! I can easily picture it filled with some sweet Chamomile tea, but not too hot or it might melt.
Great tutorial, thank you!
That is truly a work of art. 🙂 Simply amazing!
Lovely Wynona!
Amazing!!
This is just stunning! Love the whole cake!
Love it! Thanks for the great and easy to understand tutorial.
Owesome!!! and thanks for sharing. I have a quiestion… Where can I buy a printer and which brand is recommended??? thanks again!!
Gorgeous design and a very informative tutorial!
Thank you so much.
I love the tip about using a plastic lid to score curved lines!
Love this idea,clean and so pretty.
This is a great idea! It is inspiring!
Thanks for sharing.
Love your ideas, however I can’t even get the backers off the Wilton sheets, even when I buy them brand new & use them right away. Any suggestions? Thanks.
I am new to your site..and I just love your posts. This cake is so cute. I just love the pastel spring colors.