• Skip to primary navigation
  • Skip to main content
  • Skip to primary sidebar

Cake Journal

  • Cake Lounge
    • Easy Embossed Cookies Recipe
    • How to Make Heart-Shaped Cake with Buttercream Roses
  • Desserts
    • Best 3 Cookie Scoop Sizes and How to Use Them?
    • Babycakes Cake Pop Maker Review and Tutorial
  • Recipes
    • Traditional Castella Cake Recipe
    • Stabilized Whipped Cream Frosting (Easy Recipe)
    • Best Frozen-Themed Cake Ideas with Images
  • Tips & tools
    • What to Do With Cake Scraps? (8 Easy Recipes)
    • Luster Dust: If You Don’t Know About It, You Need To!
    • How To Use Edible Glue and How to Make It
    • How to Use Russian Piping Tips and Tutorial
    • What Is Wafer Paper and How to Use It? (Video Tutorials)
  • Tutorials
    • How To Make Royal Icing (Easy Recipe)
    • How to Flood Cookies with Royal Icing?
    • How To Use Candy Molds Properly
    • How to Make Cake Pops: Easy Step-by-Step Tutorial
    • Fondant On Cookies: Easy Way To Decorate
  • About Us
  • Contact

How To Make Mini Love Letter Cakes

February 12, 2015 by Louise 4 Comments

mini love letter 2

I have seen lots of love letter cookies but I haven’t seen many love letter cakes.

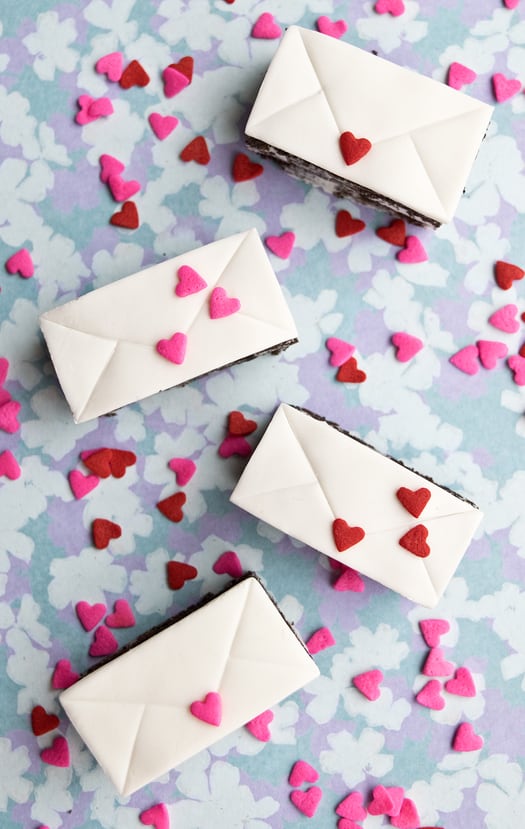
So, I prepared a tutorial for these mini love letter cakes today.

They are just so adorable, simple and perfect for Valentine’s day!

To make these cakes, you will need the following supplies:

Chocolate cake
Buttercream icing
White fondant
Pink and red heart sprinkles
Seedless strawberry jam
Knife

These are the instructions:

Step 1:
Prepare a chocolate cake in a square or rectangular cake pan.
Once the cake has cooled down, level it and fill it with buttercream icing.
Then, cut the cake into small rectangular pieces.

Tip:
If you chill the cake in the freezer for 20- 30 minutes, it will be easier to cut the cake and you will also have less crumbs.

mini love letter 11
Step 2:
Spread a thin coating of seedless strawberry jam on top of the cake.

mini love letter 10

Step 3:
Now, roll out white fondant.

mini love letter 12

Step 4:
Place the jam covered side of the cake onto your rolled fondant.
Press very gently on the top so that the cake sticks to the fondant.

mini love letter 8

Step 5:
Use a knife to cut off excess fondant around the cake.

mini love letter 9

Step 6:
Flip the cake over and use a knife to make the envelope details.
Be very careful not to push the knife too hard or else the fondant will tear.

mini love letter 6

Step 7:
Stick a heart sprinkle on your envelope cake with some buttercream icing.

mini love letter 7

And you are done!

You can arrange the sprinkles a little differently and just have fun with it!

mini love letter 1

I hope you enjoyed this tutorial.

Happy caking everyone! 🙂

Previous Post: « How to make a Love cake
Next Post: How To Make A Blue Velvet Naked Cake »

Reader Interactions

Comments

  1. Meena@AnchoredinSweets

    December 31, 2015 at 3:55 PM

    I stumbled upon your site. =)

    These are adorable. Love your site.

    Reply
  2. Meena@AnchoredinSweets

    December 31, 2015 at 3:53 PM

    I just love your baking.

    I stumbled upon your site. =)

    Reply
  3. MsGF

    February 13, 2015 at 3:36 PM

    Cute and clever!

    Reply
  4. Janine

    February 12, 2015 at 10:44 PM

    I love how these are super cute and the fondant work can be done by a beginner!

    Reply

Leave a Reply Cancel reply

Your email address will not be published. Required fields are marked *

This site uses Akismet to reduce spam. Learn how your comment data is processed.

Primary Sidebar

Search Recipes on Cake Journal:

About Us

Kristen is the author of Cake Journal and a graduate of the Professional Baking program at Renton Technical College. She has worked as a pastry chef at a top Seattle restaurant and loves sharing her passion for baking amazing cakes on this site.

Contact Me

Privacy Policy

As Seen On:

Follow Us on Pinterest

Copyright © 2023 · Cake Journal