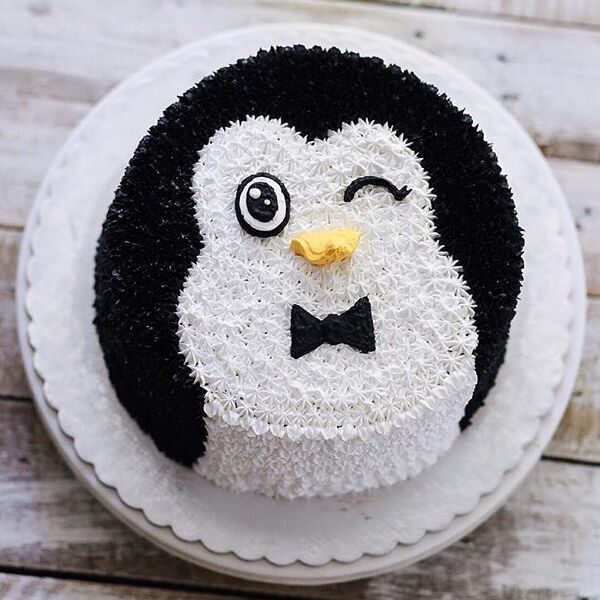
Penguin cake is one the cutest cakes design that you can make. Kids will absolutely love this cake because it is delicious and creative! With provided ingredients and instructions, you can create this easily while enjoying the process.
In this tutorial, we have listed below all the ingredients that you will need and comprehensive steps to follow. Additionally, this penguin cake is perfect for the winter season, and you can also make this on every occasion for kids to enjoy!
You can also try other cake designs like Pirate Birthday Cake, Valentine’s Cake, or Race Track Cake.
Penguin Cake Ingredients
Dark Chocolate
- 2 cups of all-purpose flour (260g)
- 2 cups of granulated sugar (400g)
- 3/4 cup of black or dark cocoa powder, sifted (75g)
- 2 tsp of baking powder (8g)
- 1 1/2 tsp of baking soda (9g)
- 1 tsp of fine salt (6g)
- 1 cup of hot water (240g)
- 2 tsp of instant espresso of coffee (5g)
- 1 cupof buttermilk (240g)
- 1/2 cup of vegetable oil (110g)
- 2 large eggs, room temperature (112g)
- 2 tsp of vanilla extract (8g)
Buttercream Frosting
- 2 cups (or 4 sticks) of unsalted butter, room temperature (452g)
- 1 tsp of vanilla extract (4g)
- 1/2 tsp of fine salt (3g)
- 7 cups of powdered sugar (904g or 2 lb.)
- 1/2 cup of heavy cream, room temperature (120g)
- Gel food coloring -pink, orange, and black – to be added after the cake is crumb coated
- 1 Tbsp of black cocoa powder – add this after the cake is crumb coated
Instructions

Dark Chocolate
- First, bake the cake layers so they can cool. Then, set the oven’s temperature to 350 F/175 C. Four 6-inch cake pans should be lined and greased with homemade cake release or nonstick baking spray.
- Next, in a big bowl, combine 2 cups of all-purpose flour, 2 cups of sugar, 3/4 cup of cocoa powder that is dark or black, 2 tsp of baking powder, 1 1/2 tsp of baking soda, and 1 tsp of salt. After, combine everything with a whisk, then put it aside.
- Add 1 cup of boiling water and two teaspoons of instant espresso or coffee to a different, medium-sized bowl. Shake until dissolved. However, you can’t taste the instant espresso, but it brings out the chocolate flavor in these cake layers. If you detest coffee, you may skip the instant or espresso.
- Moreover, the instant espresso mixture should now contain 1 cup of buttermilk, 1/2 cup of oil, two eggs, and two teaspoons of vanilla extract. To incorporate the components, whisk the mixture.
Cake Layers
- Add the dry ingredients to the wet ones. Mix by hand until completely combined. Although the batter will be thin, that is the desired consistency!
- Bake the cake pans with the batter distributed evenly for 25 to 28 minutes. To weigh the pans, I like to use a kitchen scale. It ensures that the same amount of batter is used in each pan and aids in baking the cake layers to the same height.
- The cake layers should be taken out of the oven and left to cool for about 15 minutes in the pans. After that, place the cake pans onto wire racks to complete cooling by carefully running an offset spatula around the rim of the pans to dislodge them.
- After the cake has cooled, trim the tops of two of the layers with a serrated knife.
Buttercream Frosting
- Prepare the buttercream frosting while the cake layers are baking and cooling. Using a paddle attachment, beat 2 cups of butter for 30 seconds at medium speed until it is smooth.
- Add 1/2 tsp salt and 1 tsp vanilla extract. Mix on low until all of the ingredients are combined.
- Add 1/2 cup of heavy cream and 7 cups of powdered sugar gradually.
- Once all of the ingredients have been thoroughly incorporated, and the frosting has achieved the proper consistency, beat on low for a few more minutes to smooth out any remaining air and make the frosting incredibly smooth.
- Add more cream if the frosting is too thick (1 Tablespoon at a time). 1/4 cup at a time of additional powdered sugar can be used if the frosting is too thin. After we fill and crumb-coat the cake, we may color the buttercream.
- To avoid crusting, completely enclose the buttercream in plastic wrap before putting it away.
Putting This Penguin Cake Together
- Then, it’s time to put our tiny penguin together! Before assembling the cake, I strongly advise freezing your cake layers in the freezer for around 20 minutes. It makes stacking and frosting them so much simpler.
- Use a dab of frosting to assist the initial cake layer adhering to the board as you stack and frost the cake layers on a flat plate or greaseproof cake board.
- Using an offset spatula, spread a uniform amount of buttercream between each cake layer. To make an hourglass-shaped cake, place the two cake layers that were cut and trimmed in the center. After stacking the first two cake layers, spread a thin layer of icing down the sides of the cakes.
- Then stack and ice the last two cake layers. To assist the cake layers, put a durable plastic straw or a wooden dowel through their centers.
- Apply a thin layer of frosting to the top two cake layers using a little offset spatula or piece of acetate. Chill the cake in the refrigerator for 30 minutes or the freezer for 10 minutes, depending on how hard you like your frosting to be to the touch.
Coloring the Buttercream
- Color the buttercream while the cake is cooling. Starting with the lightest hues, we gradually move toward the darkest colors. The colors merge and appear more unified when all the colors are in the same bowl.
- Start by adding a little drop of pink gel food coloring to 2 Tbsp of buttercream in a small bowl to give it a light pink color. Then, put the frosting in a little piping bag with a Wilton 10 or similar round piping tip. Also, put the bag aside after closing the top with a rubber band or clip.
- Use a generous amount of orange gel food coloring to turn 1/4 cup of buttercream orange into the same bowl. Put the frosting in a tiny piping bag fitted with a Wilton 10 or similar round piping tip. With the use of a rubber band or clip, secure the bag’s top, then set it aside.
- In the same bowl, add around 3 tbsp of buttercream and dye it black with a lot of black gel food coloring. Put the frosting in a little piping bag fitted with a Wilton 10 or similar tiny round piping tip. Set aside after sealing the top with a rubber band or clip.
- Place about a quarter of the leftover buttercream in a little piping bag equipped with a Wilton 233 small grass tip. Set aside after sealing the top with a rubber band or clip.
- The remaining buttercream can be made gray by mixing 1 Tbsp of black or dark chocolate and a few drops of black gel food coloring together. Put the gray frosting in a large piping bag fitted with a Wilton 233 tiny grass tip. Set aside after sealing the top with a rubber band or clip.
Decorating The Penguin Cake
- Finally, it’s time to decorate our cake with penguins! Place the penguin’s face and tummy where you want them to go by tracing around them with a little offset spatula or butter knife. Pour white buttercream into this area to resemble the penguin’s delicate, fluffy feathers.
- To finish the cake, pipe “feathers” using the gray buttercream. This step took me a very long time, so I highly recommend taking breaks to avoid getting hand cramps. If your hands get warm, wrap a paper towel or thin kitchen towel around your piping bag to prevent heat from your hands from transferring into the frosting.
- The penguin’s wings should be piped on using gray buttercream, and the eyes, beak, cheeks, and feet should be added using black, pink, and orange buttercream.
- And ready to serve!
This enjoyable and worthwhile instruction for making a penguin cake is comprehensive. Use our tutorial to do this at home, then share your experience with us!
Leave a Reply