When I made the sweet bunny cookie lollies, I made sure to take some photos of the working process so that I could put together a tutorial on how to make the bunny cookie lolly. They can be made in other colors than brown and I think that they would work just as good for a bunny themed baby shower, beside being a sweet Easter treat.
The whiskers on the bunny is optional, so you can make them without if you like. But if you do give the bunny whiskers, then make sure that you inform the receivers to remove the whiskers (flower stamens) before they eat the bunny cookie lolly.
This is what I use:
Cookie lollies, baked in the shape as a bunny (I have used the nesting bunny cookie cutter set from Wilton)
White rolled fondant
Gel paste colors: pink and brown
Royal icing in soft consistency
Piping bag with a plastic coupler
Piping tip round or a grass/fur
Corn syrup
Paint brush
Rolling pin
Cornstarch duster
Knife
Veining tool (Jem)
Fine Comb and Scallop (½ Moon) tool (No.4 from PME)
Optional (not showing on the photo):
White petal food powder + a little clear alcohol (or lemon extract)
Fine small paint brush
White flower stamens
Ribbon
Step 1:
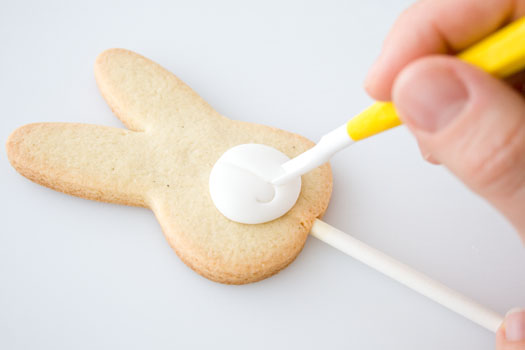
Take some white rolled fondant and roll a little ball. Flatten it slightly and glue it on the cookie with a little corn syrup.
Step 2:
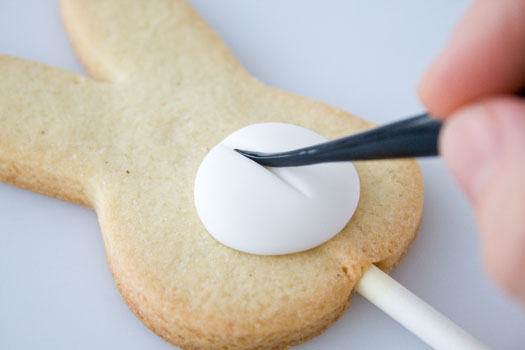
Make an indentation down the middle with the veining tool. Make sure that you dont go all the way down.
Step 3.
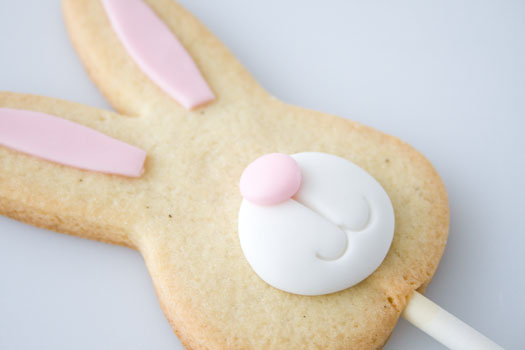
Take the scallop tool (1/2 moon) and make the rest of the bunny’s mouth.
Step 4:
Then color a small amount of the white rolled fondant pink with the gel paste color. Roll it out thinly and cut two strips of pink rolled fondant for the center of the ears with the knife. Glue them on with a little corn syrup.
Step 5:
Roll a small ball of pink fondant for the nose. Glue it on with corn syrup and flatten the nose a bit.
Step 6:
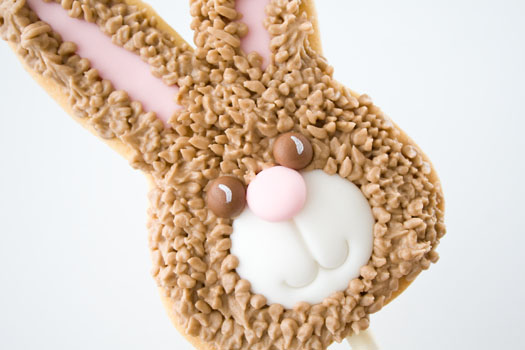
Start by coloring a small amount of the white rolled fondant brown with the gel paste color and make a pair of eyes and se aside (they can also be made in black if you like that better) Color your royal icing brown with the gel paste color and make sure that it have a soft consistency. Take the piping bag with the plastic coupler and fill it with the brown royal icing. Then use either a grass/fur tip and start piping the fur.
Step 7:
When you are done with the fur the place the eyes in the wet royal icing and leave the cookie to dry.
Step 8:
If you like you can paint a little “white sparkle” in the eyes. Mix a little white petal food powder with a few drops of clear alcohol (or lemon extract) and use a small fine paint brush to paint with.
Step 9:
The bunny cookie lolly is now finished, but if you want to add a few “whiskers” just insert a pair of white flower stamens under the nose (see top photo). Style the cookie with a pretty ribbon.
Happy Caking!
Louise


have you ever run across this type of recipe for diabetics? I have been looking but haven’t found one that assures me that it would work to put on a stick. I found a royal icing that is supposed to be sugar free.
How wonderful! My kids would absolutely love them.
so lovely bunny…
Thanks for your explainations…
These are SO cute…I just found your site and am so excited to see all the goodies.
this is absolutely amazing, what a wonderfull easter gift idea
I would love a tutorial on the little turtles..
There are a tutorial for the turtles 😉
https://cakejournal.com/archives/how-to-make-a-turtle-cake-topper
Yes, you can.
you have done a good job! weldone keep it up!!!!!
Could you tell me if you can actually use the paper lollipop sticks that you can buy at the craft store (usually made for making chocolate candy) or do you need special ones that can be baked?
OMG they are so cute! congratulations and thanks for the tutorial 🙂
best wishes,
juliana from brazil
Dawn: I use regular cookie sticks from Wilton. I have never had any that got burned 🙂
Laura: Ohh sad 🙁 Then you know what to make next year then.
HOLA RECIBE UN SALUDO DESDE VENEZUELA,MEGUSTA TU PAGINA,PERO NO LEEO EL INGLEES,TIENES UN TRADUCTOR,ESTARE ESPERANDO TU REPUESTA…GRACIAS
me encantan todas las recetas, pero mas las explicaciones tan sencillas para poder realizarlas, me encantaria que me mandaras a mi mail mas recetas y con las explicaciones como las de los conejitos de pascua,(con el paso a paso) de antemano muchas gracias espero pronto tener mas recetas ¡¡¡¡¡¡¡¡
Absolutely lovely, Louise!! Love the soft colours and the RI-Fondant combination…
Thank you soo much for this tutorial! So glad to learn something this cute!
Those are great! Love the tutorial. Thank you.
Adorable!
That is ridiculous cute! Thanks so much, I’ll be linking.
Looks too cute to eat.
Great idea, Louise! I’ve been searching fora new way to decorate Easter cookies other than colorflow. Thanks!
Happy Easter! ;D
How kind of you to share all of these lovely ideas. I have my bunnies cooked and shall be icing them this afternoon. Hugs
These are adorable and you make it look so easy! =)
sooo cute Louise!!
Hi Louise,
I’ve left a little something for you on my blog:
https://mariscakes.blogspot.com/2010/03/sunshine-blogger-award.html
Regards,
Mari
Louise, BELLISIMA, so cute, thanks for all tutorials you give us
Thank you for sharing your tips and ideas ! It’s always gorgeous and funny !
Love it and thank you for your ebook:)
love it… thanks for share with us…
I love these! I started baking the cookies on the weekend but my oven died 🙁 I was so excited too! Oh well, next year I guess 🙂
Thanks for the tutorial, I love it
A D O R A B L E S COOKIES.
Thans so much
what do you use for the lolly sticks, why don’t the sticks burn. I want to make some now…they look great…you are clever.
They look so beautiful, it is a wonderful ideas to give to the little ones. I love the way you show the steps by steps instructions.
God Bless!
Hugs from Dominican Republic.
So clever! Thanks for sharing.
precious!!!!
thank you.
I tried to make them, however, I didn’t have a bunny shaped cooking tins so they came out a bit deformed. ADORABLE lollipops though.
Oh my gosh! Absolutely adorable! We just LOVE Easter and this will be perfect, not only for my family, but for friends as well. We are on Spring Break and it is a wet one here in sunny Florida right now ):. This is the perfect project for a day like this. Thanks so much for all the time and effort you put in to this site. One can tell it is done with love, too!
This is just so sweet. You have amazing talent. thanks for sharing.
Thanks for sharing these adorable bunny cookie lolly pops! Too adorable.
That is sooo cute Louise!!
Thank you soo much!!
regards,
Jill,
Cape Town
I was waiting for your tutorial on these cute lollies!!! Thank you SO much!! They are precious!!
Louise! You are fabulous!
This is totally gorgeous! I love the overall look! Love the bow idea as well.
Here is a
T!
H!
A!
N!
K!
S!
Thanks! That’s what my cheering squad is screeming!
Beautiful!!
great tutorial! I posted a link on my column (ediblecrafts.craftgossip.com). Thanks for sharing!
Louise~ I absolutely LOVE these! Thank you so much for sharing all of you wonderful talented ideas!
adorable!!!
Wow lovely thank you. I’ll have a go this week :o)